background image

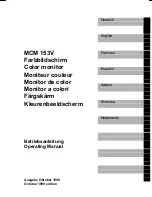
Color monitor MCM 153V

2 - English

A26361-K563-Z100-2-5E19

Important notes

!

In this chapter you will find information regarding safety which is essential to take note of
with your monitor.

Safety

This device complies with the relevant safety regulations for data processing equipment, including
electronic office machines for use in an office environment. If you have any questions, contact your
sales office or our customer service.

• 

If the device is brought into the installation site from a cold environment, condensation can
form. Before operating the device, wait until it is absolutely dry and has reached approximately
the same temperature as the installation site.

• 

During installation and before operating the device, observe the instructions on environmental
conditions in the chapter entitled "

Technical data

" as well as the instructions in the chapter

"

Installing an ergonomic video workstation

".

• 

To ensure adequate ventilation the monitor may only be operated with the monitor foot
installed.

• 

The color monitor must not be exposed to strong magnetic fields (e. g. caused by magnetic
paper clip holders or loudspeakers). Strong magnetic fields could result in a permanent blotchy
image.

• 

The monitor is automatically degaussed when switched on. This results in a magnetic field
around the metal edge of the picture tube, which may damage the data on data carriers nearby.
Therefore, never keep magnetic data carriers near the monitor.

• 

The device automatically sets itself to the correct voltage within the range from 100 V to 120 V
and 200 V to 240 V. Ensure that the local mains voltage lies within these limits.

• 

The device must be installed in such a way that the user has good access to the appliance
socket.

• 

The ON/OFF switch does not disconnect the device from the line voltage. To disconnect the
line voltage completely, remove the power plug from the grounded power outlet.

• 

Lay all cables so that nobody can stand on them or trip over them. When attaching the device,
observe the relevant notes in the chapter "

Connecting the monitor

".

• 

No data transmission cable should be connected or disconnected during a thunderstorm.

• 

Please ensure that no objects (e. g. necklaces, paperclips etc.) or liquids can get into the
interior of the device (this may cause an electrical shock or short circuit).

• 

In emergencies (e. g. damaged casing, elements or cables, penetration of liquids or foreign
matter), switch off the unit, disconnect the power plug and contact your sales office or our
customer service center.

• 

Only qualified technicians may repair the device. Unauthorized opening and incorrect repair
may greatly endanger the user (electric shock, fire risk).

• 

Tampering with the device, in particular adjusting the high voltage or installing a different type
of CRT tube, may result in a large amount of X-ray radiation being emitted. Devices modified in
this way no longer comply with their license and may not be used.

• 

You may set only those resolutions and refresh rates specified in the "

Technical data

" chapter.

Otherwise you may damage your monitor. If you are in any doubt, contact your sales office or
customer service center.

Summary of Contents for MCM 153V

Page 1: ......

Page 2: ...nheft Aktuelle Informationen zu unseren Produkten Tips Updates usw finden Sie im Internet http www fujitsu siemens com Is there any technical problem or other question you need clarified Please contac...

Page 3: ......

Page 4: ...0 1233 12 33...

Page 5: ...r monitor Moniteur couleur Monitor de color Monitor a colori F rgsk rm Kleurenbeeldscherm Betriebsanleitung Operating Manual Deutsch English Fran ais Espa ol Italiano Svenska Nederlands Ausgabe Oktobe...

Page 6: ...oder GM Eintragung Lieferm glichkeiten und technische nderungen vorbehalten Copyright Fujitsu Siemens Computers B V 1999 VESA DDC and DPMS are registered trademarks of Video Electronics Standards Ass...

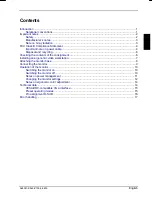
Page 7: ...Checking the contents of the consignment 6 Installing an ergonomic video workstation 7 Attaching the monitor base 8 Connecting the monitor 9 Operation of the monitor 10 Switching the monitor on 10 Swi...

Page 8: ......

Page 9: ...The screen controller the associated driver software is responsible for setting the modes resolution and refresh rate Target group You don t need to be an expert to perform the operations described h...

Page 10: ...lly sets itself to the correct voltage within the range from 100 V to 120 V and 200 V to 240 V Ensure that the local mains voltage lies within these limits The device must be installed in such a way t...

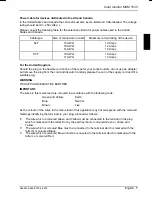
Page 11: ...maged there is a risk of implosion Manufacturer s notes Energy Star The Fujitsu Siemens multiscan color monitor MCM 153V is designed to conserve electricity by dropping to less than 15 W when it goes...

Page 12: ...Increase the separation between equipment and the receiver Connect the equipment into an outlet on a circuit different from that to which the receiver is connected Consult the dealer or an experienced...

Page 13: ...lug from the cord and discard Carefully prepare the end of the supply cord and fit a suitable plug WARNING THIS APPLIANCE MUST BE EARTHED IMPORTANT The wires in this mains lead are coloured in accorda...

Page 14: ...ave any questions on disposal please contact your local office our service department or directly Fujitsu Siemens Computers GmbH Recyclingcenter D 33106 Paderborn Tel 49 5251 818 010 Fax 49 5251 818 0...

Page 15: ...permissible reaching sector 600 mm permissible reaching sector 600 mm Avoid direct and reflected glare Avoid glare from electric lighting Position the keyboard where it is easiest to reach 30 30 65 6...

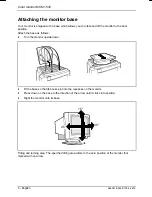
Page 16: ...position Attach the base as follows Turn the monitor upside down Fit the base so that its hooks slot into the recesses on the monitor Press down on the base in the direction of the arrow until it clic...

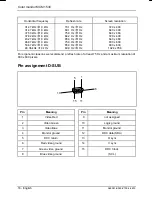
Page 17: ...it are switched off The system unit s power plug must be pulled out The data cable 2 is permanently attached to the monitor It has a 15 pin D SUB connector for the screen controller of the system unit...

Page 18: ...he associated driver software Operation of the monitor 1 2 3 1 Control panel with buttons for screen setting 2 Power indicator 3 ON OFF switch Switching the monitor on Press the ON OFF switch 3 The po...

Page 19: ...W If your PC detects inactivity no input it sends an appropriate signal to the monitor to reduce the power consumption If there is still no input power consumption is further reduced OFF mode Once an...

Page 20: ...above the symbol lights up As long as the indicator remains on the setting buttons for the selected function are active Use the or button to make the desired setting The function indicator flashes qu...

Page 21: ...on is when the sides of the screen display are bent inward or outward Trapezoid distortion is when the length of the top and bottom of the screen display differ from each other Pincushion correction B...

Page 22: ...he following table Background Characters black white purple blue cyan green yellow red black white purple blue cyan green yellow red Color combination very suitable light background colors are only su...

Page 23: ...ith a VESA DDC compatible VGA interface VESA DDC Video Electronics Standard Association Display Data Channel is used as the communications interface between the monitor and the PC If your PC is equipp...

Page 24: ...0 Hz 1 Hz 85 0 Hz 1 Hz 60 0 Hz 1 Hz 720 x 400 640 x 480 640 x 480 720 x 400 640 x 480 800 x 600 800 x 600 1024 x 768 For ergonomic reasons we recommend a refresh rate of at least 75 Hz and a maximum...

Page 25: ...ply units Flickering picture Set an ergonomic refresh rate 75 Hz using the PC software see documentation for your PC or your screen controller graphics card Ensure that the monitor is kept at a distan...

Reviews: