background image

 SCALEOVIEW 

H17-1/H19-1/H19-1W 


The monitor is equipped with a power cable that complies with safety standards. 


Lay all cables so that nobody can stand on them or trip over them. When attaching the device, 
observe the relevant notes in the "Connecting the monitor" chapter. 


If you use a different data cable from the one supplied, ensure that it is adequately shielded. 
CE conformance and optimum picture quality are guaranteed only if you use the data cables 
supplied. 


No data transfer cables should be connected or disconnected during a thunderstorm. 


Make sure that no objects (e.g. jewellery chains, paper clips, etc.) or liquids get inside the 
device (danger of electric shock, short circuit). 


The device is not waterproof! Never immerse the device in water and protect it from spray 
water (rain, sea water). 


In emergencies (e.g. damaged casing, elements or cables, penetration of liquids or foreign 
matter), switch off the unit, disconnect the power plug and contact your sales outlet or our help 
desk. 


The monitor must be disposed of in accordance with the local regulations for disposal of 
special waste. The screen background lighting contains mercury. You must observe the 
applicable handling and disposal safety regulations for fluorescent tubes. 


Only qualified technicians should repair the device. Unauthorised opening and incorrect repair 
may greatly endanger the user (electric shock, fire risk). 


You may set only those resolutions and refresh rates specified in the "Technical data" chapter. 
Otherwise you may damage your monitor. If you are in any doubt, contact your sales outlet or 
our help desk. 


Use a screen saver with moving images and activate the power management for your monitor 
to prevent still images from "burning in". 


If you operate the monitor with the swivel arm or wall bracket, it may not be turned by 180°. 


We recommend that you place your device on an insensitive, non-slip surface. In view of the 
multitude of different finishes and varnishes used on furniture, it is possible that the feet of the 
device will mark the surface they stand on. 

Power cable 

To guarantee safe operation, use the cable supplied. Use the following guidelines if it is necessary to 
replace the original cable set. 


The female/male receptacles of the cord set must meet IEC60320/CEE-22 requirements. 


The cable has to be HAR-certified or VDE-certified. The mark HAR or VDE will appear on the 
outer sheath. 


For devices which are mounted on a desk or table, type SVT or SJT cable sets may be used. 
For devices which sit on the floor, only SJT type cable sets may be used. 


The cable set must be selected according to the rated current for your device. 


If necessary, replace the original power cable with a regular grounded 3-core mains lead. 

A26361-K1086-Z120-1-7619, edition 2 

Summary of Contents for SCALEOVIEW H17-1

Page 1: ...Monitor Operating Manual English SCALEOVIEW H17 1 H19 1 H19 1W...

Page 2: ...ems or other questions which you would like to be clarified Please contact our help desk see Warranty Booklet The latest information on our products tips updates etc can be found on the internet under...

Page 3: ......

Page 4: ...This manual was produced by Xerox Global Services Published by Fujitsu Siemens Computers GmbH AG 08 06 Edition 2 Order no A26361 K1086 Z120 1 7619...

Page 5: ...SCALEOVIEW H17 1 H19 1 H19 1W Operating Manual August 2006 edition...

Page 6: ...ts including rights of translation reproduction by printing copying or similar methods in part or in whole are reserved Offenders will be liable for damages All rights including rights created by pate...

Page 7: ...base 8 Removing monitor base 8 Connecting the monitor 9 Connecting cables to the monitor 9 Connecting cables to the computer 10 Operation of the monitor 11 Adjusting rake 11 Switching the monitor on o...

Page 8: ...Contents A26361 K1086 Z120 1 7619 edition 2...

Page 9: ...ace to swivel arm and wall bracket plug play capability power management for reducing power consumption when the computer is not in use compliance with the recommendations in accordance with TCO 03 In...

Page 10: ...you have any questions contact your sales outlet or our help desk The display surface of the LCD monitor is sensitive to pressure and scratches You should therefore be careful with the display surface...

Page 11: ...air the device Unauthorised opening and incorrect repair may greatly endanger the user electric shock fire risk You may set only those resolutions and refresh rates specified in the Technical data cha...

Page 12: ...this manual unless otherwise specified herein The statement for other products will appear in the accompanying documentation NOTE This equipment has been tested and found to comply with the limits fo...

Page 13: ...Fax No 408 746 8299 We Fujitsu Siemens Computers Inc hereby declare that the equipment bearing the trade name and model number specified above was tested confirming to the applicable FCC Rules under t...

Page 14: ...chweizerischer Wirtschaftsverband der Informations Kommunikations und Organisationstechnik A list of the SWICO Acceptance places can be found at http www swico ch Checking the contents of the consignm...

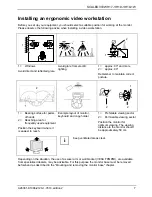
Page 15: ...hands 2 Reaching area for frequently used equipment Position the keyboard where it is easiest to reach Example layout of monitor keyboard and copy holder 1 Preferable viewing sector 2 Permissible vie...

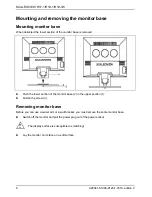
Page 16: ...of the monitor base 2 in the upper section 1 Fasten the screw 3 Removing monitor base Before you can use a swivel arm or a wall bracket you must remove the entire monitor base Switch off the monitor a...

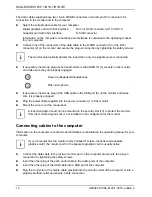
Page 17: ...ity are guaranteed only if you use the data cables supplied Do not cover the ventilation openings of the monitor The computer power plug must be pulled out Be sure that the monitor and the computer ar...

Page 18: ...USB cable in the USB port 6 on the monitor and make sure it is properly engaged Plug the power cable supplied into the power connector 1 of the monitor Mount the cover over the connections A lock Kens...

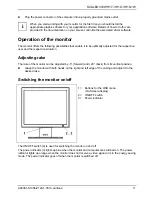
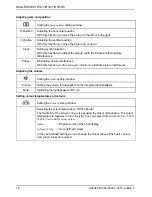
Page 19: ...e respective situation Adjusting rake The rake of the monitor can be adjusted by 5 forward and 20 back from its vertical position Grasp the monitor with both hands on the right and left edge of the ca...

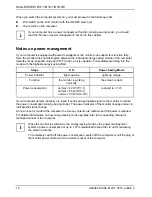
Page 20: ...the monitor is working normally the screen is dark Power consumption normal 42 W H17 1 normal 45 W H19 1 normal 50 W H19 1W reduced to 1 W If your computer detects inactivity no input it sends an app...

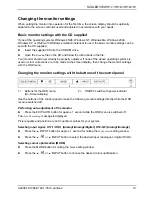
Page 21: ...ngs with the OSD menu Changing the monitor settings with the buttons of the control panel 1 Buttons for the OSD menu On Screen display 2 ON OFF switch with power indicator Use the buttons of the contr...

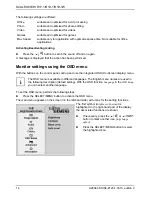
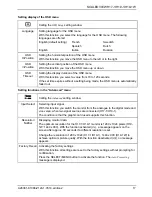
Page 22: ...all up and use the integrated OSD On Screen display menu The OSD menu is available in different languages The English menu names are used in the following description default setting With the OSD func...

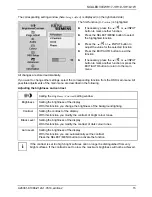
Page 23: ...ossible adjustments of the main menu are described in the following Adjusting the brightness and contrast Calling the Brightness Contrast setting window Brightness Setting the brightness of the displa...

Page 24: ...te picture interference Adjusting the volume Calling the Audio setting window Setting the volume for playback with the integrated loudspeakers Volume Switching the loudspeakers off or on Mute Setting...

Page 25: ...the Advanced menu Calling the Advanced setting window Input Select Selecting input signal With this function you switch the monitor from the analogue to the digital mode and vice versa when two signal...

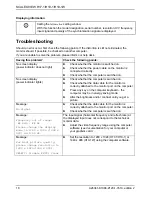
Page 26: ...oard the computer may be in energy saving mode Alter the brightness and or contrast until you get a picture Message No Signal Check whether the data cable for the monitor is correctly attached to the...

Page 27: ...XIT AUTO button to perform the auto adjustment of the screen Picture is wrongly adjusted Press the SELECT MENU button to activate the function Factory Recall The Auto Processing message is displayed P...

Page 28: ...lution of 1280 x 1024 has 1280 x 1024 1310720 pixels Each pixel consists of three subpixels red green and blue so there are almost 4 million subpixels in total In accordance with ISO 13406 2 Class II...

Page 29: ...x 154 mm x 475 mm H19 1W Weight 3 75 kg H17 1 4 45 kg including packaging 5 1 kg H19 1 6 1 kg including packaging 4 85 kg H19 1W 6 95 kg mit Verpackung Accessories Power cable 1 8 m D SUB data cable 1...

Page 30: ...B19 1 P17 1 P19 1 B17 2 B19 2 P17 2 P19 2 W19 1 Preset operating modes The picture position and size have been set to optimum values at the factory for the operating modes listed above Depending on th...

Page 31: ...0 Hz 75 Hz 60 Hz 60 Hz 60 Hz 60 Hz 720 x 400 640 x 480 640 x 480 800 x 600 800 x 600 1024 x 768 1024 x 768 1280 x 1024 1280 x 720 1280 x 800 1440 x 900 For ergonomic reasons a screen resolution of 144...

Page 32: ...not connected 23 TMDS Clock 4 not connected 14 5V Power 24 TMDS Clock 5 not connected 15 Earth 6 DDC Clock 16 Hot Plug Detect C1 Analog R Video Out 7 DDC Data 17 TMDS Data0 C2 Analog G Video Out 8 An...

Page 33: ...n Meaning Pin Meaning 1 Video input red 9 5 V DDC 2 Video input green 10 Sync earth 3 Video input blue 11 Earth 4 Earth 12 DDC Data 5 Earth 13 H sync 6 Red video earth 14 V sync 7 Green video earth 15...

Reviews: