LCD monitor
Connecting the monitor
!
Please take note of the safety information in the "Important notes" chapter.
CE conformance and optimum picture quality are guaranteed only if you use the data cable
supplied.
Do not cover the ventilation openings of the monitor.
The computer power plug must be pulled out!
►
Be sure that the monitor and the computer are switched off.
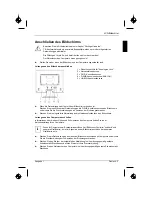
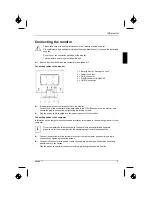
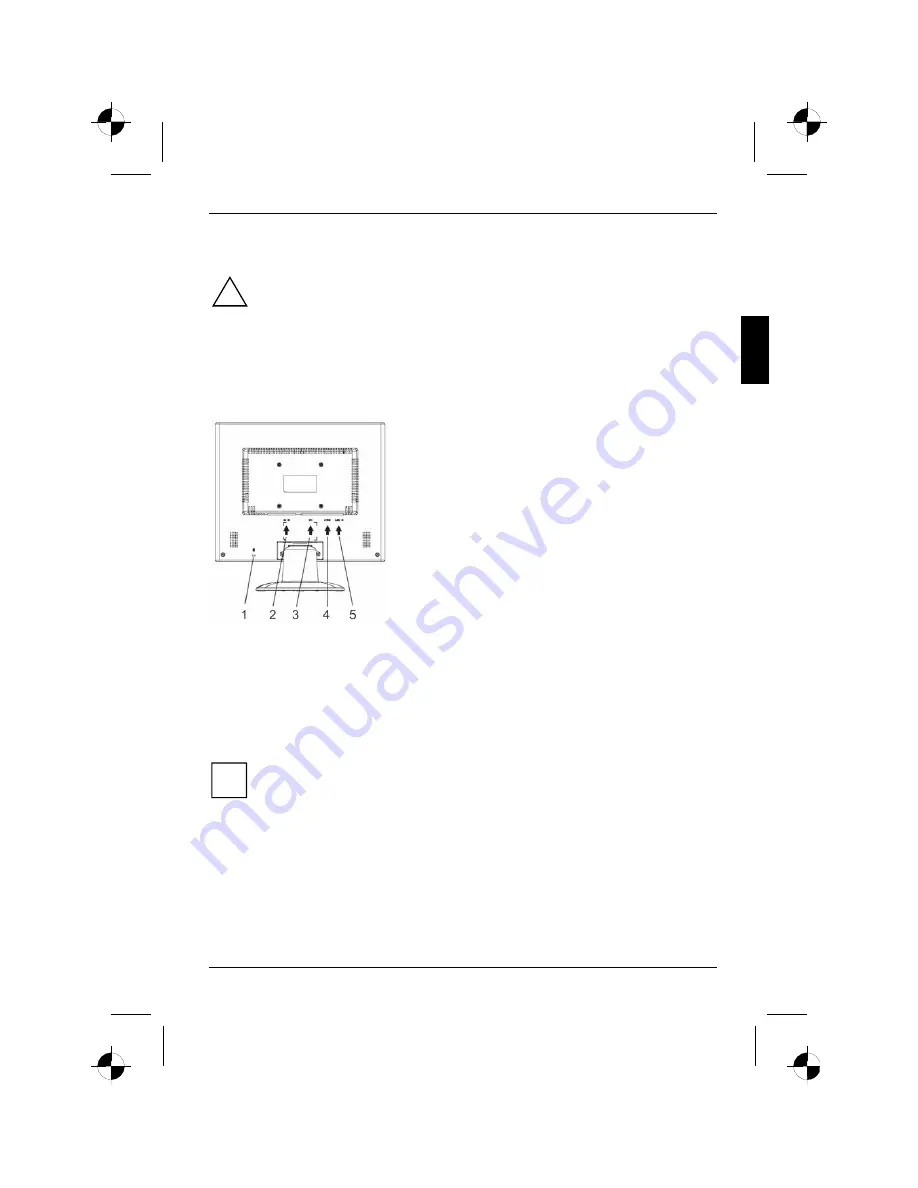
Connecting cables to the monitor
1 = Security slot for "Kensington Lock"
2 = Power connector
3 = DVI-D connector
4 = D-SUB connector (ANALOG)
5 = LINE-IN connector
►
If the data cable is not firmly connected to the monitor:
Connect one of the connectors of the data cable to the D-SUB connector on the monitor and
secure the plug-in connection by tightening the locking screws.
►
Plug the power cable supplied into the power connector of the monitor.
Connecting cables to the computer
Information on the computer connections and interfaces is contained in the operating manual for your
computer.
i
If your computer has two monitor ports ("onboard" screen controller and separate
graphics card), the monitor port for the separate graphics card is usually active.
►
Connect the data cable to the (active) monitor port on the computer and secure the plug-in
connection by tightening the safety screws.
►
Connect the connector of the power cable supplied into a properly earthed mains outlet and
ensure a secure connection.
Plug the power connector of the computer into a properly grounded mains outlet.
edition 1
5
Summary of Contents for SCALEOVIEW L17-2
Page 8: ......
Page 19: ......
Page 30: ......
Page 41: ......
Page 52: ......
Page 63: ......
Page 74: ......
Page 85: ......
Page 96: ......
Page 107: ......
Page 117: ...1 1 2 2 3 3 Fehler Textmarke nicht definiert 4 4 5 6 7 9 1...
Page 118: ......
Page 119: ...VGA Help Desk i 1 1...
Page 120: ...Help Desk 100 240 CE 2 1...
Page 121: ...Help Desk 0 Landscape IEC60320 CEE 22 VDE HAR VDE HAR SVT SJT 3 1 3...
Page 122: ...89 336 EWG 73 23 EWG D SUB i 4 1...
Page 123: ...CE 1 Kensington Lock 2 3 DVI D 4 D SUB 5 LINE IN D SUB i onboard 1 5...
Page 124: ...i 1 OSD On Screen Display 2 3 6 1...
Page 126: ...AUTO OSD AUTO OSD AUTO OSD AUTO OSD OSD 8 1...
Page 129: ......
Page 140: ......
Page 150: ...1 1 2 2 3 3 4 CE 4 4 5 6 7 9 1...
Page 151: ......
Page 152: ...LCD LCD VGA o Help Desk i 1 1...
Page 153: ...O LCD Help Desk LCD Newton 100 V 240 V CE 2 1...
Page 154: ...O LCD Help Desk 0 Landscape IEC60320 CEE 22 VDE HAR VDE HAR SVT SJT LCD 3...
Page 155: ...O LCD LCD CE 89 336 E 73 23 LCD LCD D SUB i 4 1...
Page 156: ...O LCD CE 1 Kensington 2 3 DVI D 4 D SUB 5 LINE IN D SUB i onboard 5...
Page 157: ...O LCD i 1 OSD On Screen Display 2 3 LCD 6 1...
Page 160: ...O LCD LCD 9...
Page 162: ......
Page 173: ......
Page 184: ......
Page 195: ......
Page 206: ......
Page 217: ......
Page 228: ......

