background image


A26361-K1018-Z120-1-7619, edition 2 

Introduction 

Your new LCD (Liquid Crystal Display) monitor SCALEOVIEW S17-2/S19-2/S20-1W offers 
numerous features and functions, for example: 


TFT display (Thin Film Transistor; active matrix) 


minimal space requirements thanks to slim casing 


optimum ergonomic characteristics (totally distortion-free, excellent picture definition and colour 
purity right into the corners) 


high degree of brightness and good contrast 


high resolution (1280 x 1024) 


size of the display area comparable to that of a 19" (S17-2) or 21" (S19-2, S20-1W) CRT 
(Cathode Ray Tube) monitor 


presentation of up to 16.2 million colours (in conjunction with an appropriate graphics card) 


automatic scanning of horizontal frequencies from 30 to 82 kHz and refresh rates (vertical 
frequencies) from 56 to 76 Hz (absolutely flicker-free) 


digital screen controller with microprocessor for storing different display modes 


freely adjustable colour alignment for matching the screen colours to the colours of various 
input and output devices 


convenient operation via integrated OSD (On-Screen-display) menu 

 VESA-DDC 

compatibility 


VESA-FPMPMI compatibility (Flat Panel Monitor Physical Mounting Interface) - mechanical 
interface to swivel arm and wall bracket) 

 plug&play 

capability 


power management for reducing power consumption when the computer is not in use 


compliance with the recommendations in accordance with TCO’03 

In normal screen mode (dark characters against a light background) the monitor satisfies the 
ergonomic requirements for the GS symbol. 
This operating manual contains important information you require to start up and run your LCD 
monitor. 
A graphics card (screen controller) with VGA interface or a digital graphics card with DVI interface is 
required to control the SCALEOVIEW S17-2/S19-2/S20-1W LCD monitor. The monitor processes the 
data supplied to it by the screen controller. The screen controller/the associated driver software is 
responsible for setting the modes (resolution and refresh rate). 
When putting the monitor into operation for the first time, the screen display should be optimally 
adapted to the screen controller used and adjusted in accordance with your needs (see the 
"Changing the monitor settings" section in the "Operation of the monitor" chapter). 

Target group 

You don't need to be an "expert" to perform the operations described here. However, please observe 
the safety information given in the operating instructions of the computer and in this manual. 
In the event of any problems occurring, please contact your sales outlet or our help desk. 

Summary of Contents for SCALEOVIEW S17-2

Page 1: ...Monitor Operating Manual English SCALEOVIEW S17 2 S19 2 S20 1W...

Page 2: ...ems or other questions which you would like to be clarified Please contact our help desk see Warranty Booklet The latest information on our products tips updates etc can be found on the internet under...

Page 3: ......

Page 4: ...This manual was produced by cognitas Gesellschaft f r Technik Dokumentation mbH www cognitas de Published by Fujitsu Siemens Computers GmbH Order No A26361 K1018 Z120 1 7619 Edition 2 AG 1105 11 05...

Page 5: ...SCALEOVIEW S17 2 S19 2 S20 1W LCD screen Operating Manual November 2005 edition...

Page 6: ...ts including rights of translation reproduction by printing copying or similar methods in part or in whole are reserved Offenders will be liable for damages All rights including rights created by pate...

Page 7: ...r base 9 Folding out monitor base 9 Removing monitor base 10 Installation Deinstallation of the loudspeaker module 10 Connecting the monitor 11 Connecting cables to the monitor 11 Connecting cables to...

Page 8: ......

Page 9: ...face mechanical interface to swivel arm and wall bracket plug play capability power management for reducing power consumption when the computer is not in use compliance with the recommendations in acc...

Page 10: ...ty which is essential to take note of with your monitor Safety notes This device complies with the relevant safety regulations for data processing equipment including electronic office machines for us...

Page 11: ...the power plug and contact your sales outlet or our help desk The monitor must be disposed of in accordance with the local regulations for disposal of special waste The screen background lighting cont...

Page 12: ...nt applies to the products covered in this manual unless otherwise specified herein The statement for other products will appear in the accompanying documentation NOTE This equipment has been tested a...

Page 13: ...ules Operation is subject to the following two conditions 1 this device may not cause harmful interference and 2 this device must accept any interference received including interference that may cause...

Page 14: ...su Siemens Computers GmbH has determined that this product meets the Energy Star guidelines for energy efficiency Disposal and recycling This device has been manufactured to the highest possible degre...

Page 15: ...complete LCD monitor package includes one monitor one data cable D SUB DVI I S17 2 S19 2 only D SUB D SUB S20 1W only one data cable DVI D DVI D one power cable one audio cable one mains adapter with...

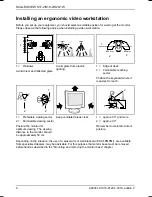
Page 16: ...ing sector Position the keyboard where it is easiest to reach 30 30 65 65 0 60 1 2 2 1 2 1 Preferable viewing sector 2 Permissible viewing sector Position the monitor for optimum viewing The viewing d...

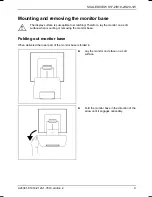
Page 17: ...susceptible to scratching Therefore lay the monitor on a soft surface when mounting or removing the monitor base Folding out monitor base When delivered the lower part of the monitor base is folded i...

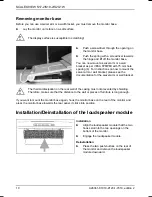
Page 18: ...ivel arm or wall bracket please see the documentation for the swivel arm or wall bracket The thermal dissipation on the rear wall of the casing must not prevented by shielding Therefore make sure that...

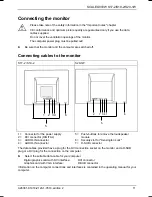
Page 19: ...7 2 S19 2 S20 1W 1 2 3 4 5 6 1 7 34 5 6 2 1 Connector for the power supply 2 DVI connector DIGITAL 3 AUDIO IN connector 4 AUDIO IN connector 5 Push buttons to remove the loudspeaker module 6 Security...

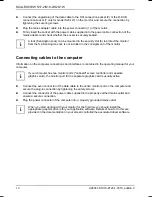
Page 20: ...omputer Information on the computer connections and interfaces is contained in the operating manual for your computer i If your computer has two monitor ports onboard screen controller and separate gr...

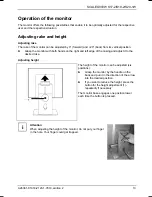
Page 21: ...itor with both hands on the right and left edge of the casing and adjust it to the desired rake Adjusting height 1 The height of the monitor can be adjusted six positions Grasp the monitor by the hand...

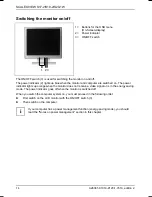
Page 22: ...mputer are switched on The power indicator lights up orange when the monitor does not receive a video signal or is in the energy saving mode The power indicator goes off when the monitor is switched o...

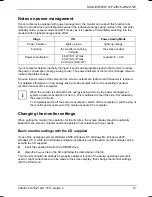
Page 23: ...e operates refer to the operating manual or technical manual of the computer i When the monitor is switched to the energy saving mode by the power management system a power consumption of up to 3 W is...

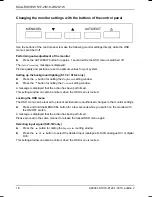
Page 24: ...tting window Press the 6 button for calling the Contrast setting window A message is displayed that the action has been performed This setting window can also be called when the OSD menu is locked Loc...

Page 25: ...up you can select another language To set the OSD menu perform the following steps Press the MENU SEL button to activate the OSD menu The main menu appears on the screen on the left hand side with ico...

Page 26: ...ding function from the OSD main menu All possible adjustments of the main menu are described in the following Adjusting the brightness and contrast Calling the Brightness Contrast setting window Brigh...

Page 27: ...his function you fine tune your monitor to eliminate picture interference Adjusting the volume Calling the Audio setting window Volume Setting the volume for playback with the integrated loudspeakers...

Page 28: ...ng made the OSD menu is automatically faded out Setting functions in the Advanced menu Calling the Advanced setting window Input select Selecting input signal S20 1W only With this function you switch...

Page 29: ...lue and red on a dark background do not produce the minimum required contrast of 3 1 and are therefore not suitable for continuous text and data entry When using several colours for characters and bac...

Page 30: ...y key on the computer keyboard the computer may be in energy saving mode Alter the brightness and or contrast until you get a picture Message No Signal Check whether the data cable for the monitor is...

Page 31: ...n becomes darker The background lighting has a limited lifetime If your monitor display should become too dark the background lighting will have to be exchanged Please contact our help desk Permanentl...

Page 32: ...thout packaging approx 5 9 kg approx 6 45 kg approx 7 7 kg Accessories one data cable D SUB DVI I S17 2 S19 2 only D SUB D SUB S20 1W only one data cable DVI D DVI D one power cable one audio cable on...

Page 33: ...tandard Association Display Data Channel is used as the communications interface between the monitor and the computer If your computer is equipped with a VESA DDC compatible VGA interface it can autom...

Page 34: ...quently used of the preset operating modes Screen resolution Refresh rate 720 x 400 640 x 480 800 x 600 1024 x 768 1280 x 1024 Following resolutions for S20 1W only 960 X 600 1280 x 720 1280 x 800 128...

Page 35: ...S Data2 12 NC 22 TMDS Clock Shield 3 TMDS Data 2 4 Shield 13 NC 23 Clock 4 NC Not connected 14 5V Power 24 Clock 5 NC 15 Earth 6 DDC Clock 16 Hot Plug Detect C1 Analogue R Video Out 7 DDC Data 17 TMDS...

Page 36: ...signment D SUB S20 1W only 1 5 6 10 11 15 Pin Meaning Pin Meaning 1 Video input red 9 5 V DDC 2 Video input green 10 Sync earth 3 Video input blue 11 Earth 4 Earth 12 DDC Data 5 Earth 13 H sync 6 Red...

Reviews: