background image


A26361-K938-Z100-2-5E19


English - 1 


Introduction 

Your new LCD (Liquid Crystal Display) monitor SCENICVIEW B15-1A offers numerous features and 
functions, for example: 

• 

TFT display (Thin Film Transistor; active matrix) 

• 

minimal space requirements thanks to slim casing 

• 

optimum ergonomic characteristics (totally distortion-free, excellent picture definition and colour 
purity right into the corners) 

• 

high degree of brightness and good contrast 

• 

high resolution (1024x768) for displaying the information content of a conventional 17-inch 
screen with CRT (Cathode Ray Tube) 

• 

presentation of up to 16.7 million colours (in conjunction with an appropriate graphics card) 

• 

automatic scanning of horizontal frequencies from 30 to 61 kHz and refresh rates (vertical 
frequencies) from 56 to 76 Hz (absolutely flicker-free) 

• 

digital screen controller with microprocessor for storing 31 different display modes (7 of which 
are preset) 

• 

freely adjustable colour alignment for matching the screen colours to the colours of various 
input and output devices 

• 

convenient operation via integrated OSD (On-Screen-display) menu 

• 

VESA-DDC compatibility 

• 

VESA-FPMPMI compatibility (Flat Panel Monitor Physical Mounting Interface) - mechanical 
interface to swivel arm and wall bracket) 

• 

plug&play capability 

• 

power management for reducing power consumption when the computer is not in use 

• 

compliance with the recommendations in accordance with TCO ’99 

In normal screen mode (dark characters against a light background) the monitor satisfies the 
ergonomic requirements for the GS symbol. 
This operating manual contains important information you require to start up and run your LCD 
monitor.  
A screen controller with VGA interface is required to control the SCENICVIEW B15-1A LCD monitor. 
The monitor processes the data supplied to it by the screen controller. The screen controller/the 
associated driver software is responsible for setting the modes (resolution and refresh rate). 
When putting the monitor into operation for the first time, the screen display should be optimally 
adapted to the screen controller used and adjusted in accordance with your needs (see the 
"Changing the monitor settings" section in the "Operation of the monitor" chapter). 

Target group 

You don't need to be an "expert" to perform the operations described here. Do, however, read the 
"Important notes" chapter in the operating manual of the computer and in this operating manual. 
In the event of any problems occurring, please contact your sales outlet or our help desk. 

Additional information 

Details of how you set the resolution and refresh rate are provided in the documentation on your 
screen controller/the associated driver software. 

Summary of Contents for SCENICVIEW B15-1A

Page 1: ...Betriebsanleitung Operating Manual Monitor SCENICVIEW B15 1A Deutsch English answers2...

Page 2: ...unseren Produkten Tipps Updates usw finden Sie im Internet http www fujitsu siemens com Are there any technical problems or other questions you need clarified Please contact our Help Desk see Warrant...

Page 3: ......

Page 4: ...manual ha sido impreso sobre papel reciclado Questo manuale stato stampato su carta da riciclaggio Denna handbok r tryckt p recyclingpapper Dit handboek werd op recycling papier gedrukt Herausgegeben...

Page 5: ...SCENICVIEW B15 1A LCD Bildschirm LCD monitor Betriebsanleitung Operating Manual Deutsch English TCO 99 Ausgabe November 2003 November 2003 edition...

Page 6: ...rstellt von cognitas Gesellschaft f r Technik Dokumentation mbH www cognitas de Copyright Fujitsu Siemens Computers GmbH 2003 VESA DDC and DPMS are registered trademarks of Video Electronics Standards...

Page 7: ...ergonomic video workstation 7 Mounting and removing the monitor base 8 Folding monitor base out and in 8 Removing monitor base 8 Connecting the monitor 10 Connecting cables to the monitor 10 Connecti...

Page 8: ......

Page 9: ...l bracket plug play capability power management for reducing power consumption when the computer is not in use compliance with the recommendations in accordance with TCO 99 In normal screen mode dark...

Page 10: ...ou should therefore be careful with the display surface so as to avoid lasting damage Newton rings scratches If the device is brought into the installation site from a cold environment condensation ca...

Page 11: ...Technical data chapter Otherwise you may damage your monitor If you are in any doubt contact your sales outlet or our help desk Use a screen saver with moving images and activate the power management...

Page 12: ...ot in use the overall savings in electricity could amount to 2 thousand million annually These savings could also prevent the emission of 20 million tons of carbon dioxide into the atmosphere the equi...

Page 13: ...ibility of the user The use of shielded I O cables is required when connecting this equipment to any and all optional peripheral or host devices Failure to do so may violate FCC rules Declaration of C...

Page 14: ...86 16 Fax 32 2 706 86 13 E Mail info recupel be http www recupel be SWICO Schweizerischer Wirtschaftsverband der Informations Kommunikations und Organisationstechnik A list of the SWICO Acceptance pl...

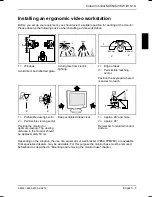
Page 15: ...ching sector Position the keyboard where it is easiest to reach 30 30 65 65 0 60 1 2 2 1 2 1 Preferable viewing sector 2 Permissible viewing sector Position the monitor for optimum viewing The viewing...

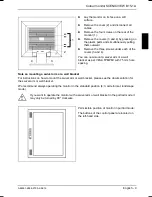
Page 16: ...ase 1 2 Lay the monitor on its face on a soft surface Proceed according to the two steps in the illustrations to fold out the monitor base Folding in monitor base If you want to pack the monitor you m...

Page 17: ...a swivel arm or a wall bracket as per VESA FPMPMI with 75 mm hole spacing Note on mounting a swivel arm or a wall bracket For instructions on how to mount the swivel arm or wall bracket please see the...

Page 18: ...n 2 Security slot for Kensington Lock 3 AUDIO IN connector 4 Headphones port 5 D SUB connector ANALOG 6 Power connector The data cable supplied has two 15 pin D SUB connectors for connection to the mo...

Page 19: ...ower cable supplied into a properly grounded mains outlet and ensure a secure connection Plug the power connector of the computer into a properly grounded mains outlet i When you start working with yo...

Page 20: ...your computer has a power management function energy saving mode you should read the Notes on power management section in this chapter Notes on power management If your computer is equipped with powe...

Page 21: ...oppy disk supplied If one of the operating systems Windows 95 98 Windows NT Windows Me Windows 2000 Windows XP or OS 2 with Windows emulation installed is used the basic monitor settings can be set wi...

Page 22: ...with the ON OFF switch A message is displayed that the action has been performed Please proceed in the same manner to release the locked OSD menu again Locking the ON OFF button The ON OFF switch can...

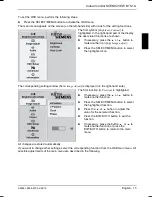
Page 23: ...lighted icon The corresponding setting window here Image Adjust is displayed on the right hand side The first function H Position is highlighted If necessary press the 6 or 5 button to mark another fu...

Page 24: ...nger be distinguished from very bright surfaces If the contrast is set too low the maximum brightness will not be achieved Adjusting size and position Calling the Image adjust setting window H Positio...

Page 25: ...an and Spanish as the language for the OSD menu OSD H Position Setting the horizontal position of the OSD menu With this function you move the OSD menu to the left or to the right OSD V Position Setti...

Page 26: ...you select colours for the display in your application programmes take note of the information below The primary colours blue and red on a dark background do not produce the minimum required contrast...

Page 27: ...data cable 1 8 m Audio cable 1 8 m Storable display modes 31 Electrical data Video analogue positive 0 7 Vpp 75 Synchronisation Separate Sync TTL positive or negative Horizontal frequency 30 kHz 61 k...

Page 28: ...s or Siemens Nixdorf MCF 3511 TA MCM 1405 ND Preset operating modes i The picture position and size have been set to optimum values at the factory for the operating modes listed above Depending on the...

Page 29: ...the problem please inform our help desk Having this problem Check the following points No screen display power indicator does not light Check whether the monitor is switched on Check whether the power...

Page 30: ...XIT AUTO button to perform the auto adjustment of the screen Set the picture position with the OSD menu see Operation of the monitor Picture is shaking Check whether the data cable for the monitor is...

Page 31: ...ent The maximum permitted number of pixels faults is stipulated in the stringent international standard ISO 13406 2 Class II Example a 15 flat screen monitor with a resolution of 1024 x 768 has 1024 x...

Page 32: ...running continuously and thereby consumes a lot of energy What does labelling involve This product meets the requirements for the TCO 99 scheme which provides for international and environmental label...

Page 33: ...lour generating layers of certain computer displays Cadmium damages the nervous system and is toxic in high doses The relevant TCO 99 requirement states that batteries the colour generating layers of...

Reviews: