background image

Technical data

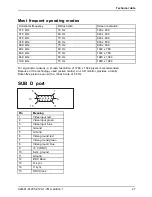
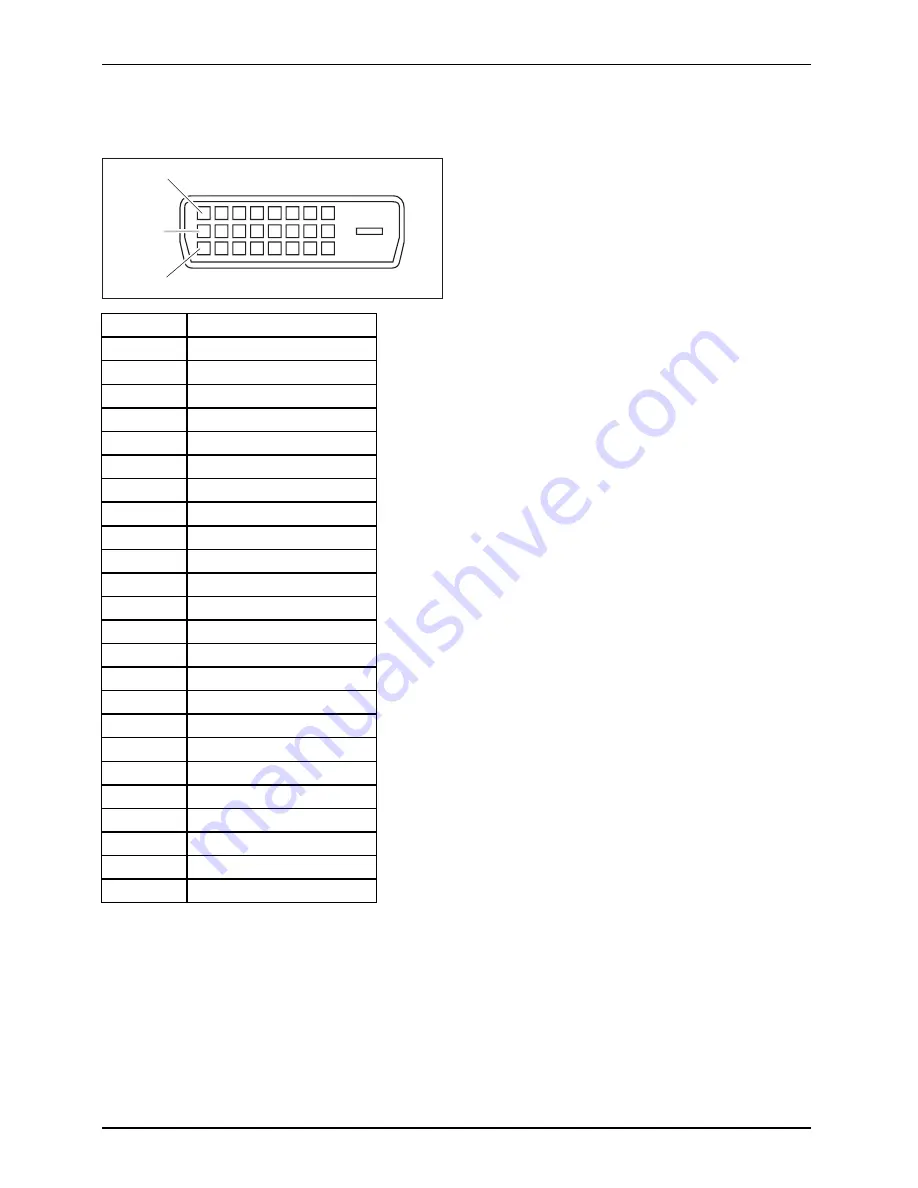
DVI-D port

9

1

17

Pin

Meaning

1

TMDS Data2–

2

TMDS Data2+

3

TMDS Data 2/4 Shield

4

not connected

5

not connected

6

DDC Clock

7

DDC Data

8

Analog Vertical Sync

9

TMDS Data1–

10

TMDS Data1+

11

TMDS Data 1/3 Shield

12

not connected

13

not connected

14

+5V Power

15

Ground

16

Hot Plug Detect

17

TMDS Data0–

18

TMDS Data0+

19

TMDS Data 0/5 Shield

20

not connected

21

not connected

22

TMDS Clock Shield

23

TMDS Clock+

24

TMDS Clock–

28

A26361-K1255-Z120-1-7619, edition 1

Summary of Contents for SCENICVIEW B17-5

Page 1: ...Professional Monitor English Operating Manual SCENICVIEW B17 5 B19 5...

Page 2: ...help with Please contact our Hotline Help Desk refer to the enclosed Help Desk List or go to www fujitsu siemens com support your sales partner your sales office The latest information on our products...

Page 3: ......

Page 4: ...This manual was produced byXerox Global Services Published by Fujitsu Siemens Computers GmbH AG04 08 Edition1 Order no A26361 K1255 Z120 1 7619...

Page 5: ...SCENICVIEW B17 5 B19 5 Your LCD screen 1 Important notes 3 Getting started 7 Operation 14 Troubleshooting 22 Notes regarding the DIN EN ISO 13406 2 standard 24 Technical data 25 Operating Manual...

Page 6: ...n particular rights of translation reproduction by printing copying or similar methods in part or in whole Non compliance is subject to compensation for damages All rights reserved including rights cr...

Page 7: ...otation 9 Adjusting portrait format 10 Removing monitor base 10 Connecting the device 11 Connecting cables to the monitor 12 Connecting cables to the computer 13 Operation 14 Switching the device on a...

Page 8: ...Contents A26361 K1255 Z120 1 7619 edition 1...

Page 9: ...cket Plug Play capability power management for reducing power consumption when the computer is not in use Compliance with the recommendations according to TCO 03 the monitor fulfills all GS Gepr fte S...

Page 10: ...roperly indicates an activity that must be performed in the order shown indicates a result This style flags data entered using the keyboard in a program dialog or command line e g your password Name12...

Page 11: ...e The ON OFF switch does not disconnect the monitor from the mains voltage To disconnect fully from the mains supply disconnect the power plug from the socket The device is equipped with a power cable...

Page 12: ...sheath For devices which are mounted on a desk or table type SVT or SJT cable sets may be used For devices which sit on the floor only SJT type cable sets may be used The cable set must be selected a...

Page 13: ...mental Protection Agency s EPA Energy Star Computers award The EPA estimates that computer equipment uses 5 percent of all business electricity and that this is growing rapidly If all desktop PCs and...

Page 14: ...any questions on disposal please contact your local office our Help Desk or Germany Belgium Switzerland Fujitsu Siemens Computers GmbH Remarketing and Recycling D 33106 Paderborn Tel 49 5251 81 80 10...

Page 15: ...he individual parts Check the contents of the package for any visible damage caused during transport Check whether the delivery conforms to the details in the delivery note Should you discover that th...

Page 16: ...omic video workstation 1 Do not position the video workstation opposite a window 1 1 Position the monitor outside the reach of a light source 1 1 Position the keyboard where it is easiest to reach 1 8...

Page 17: ...oved beforehand as described in Chapter Removing monitor base Page 10 Adjusting the height The height of the monitor can be adjusted by approximately 120 mm Grasp the monitor with both hands on the ri...

Page 18: ...be turned anti clockwise The OSD display can be reset again in the OSD menu Removing monitor base Before you can use a swivel arm or a wall bracket you must remove the monitor base The display surfac...

Page 19: ...ty information in Important notes Page 3 CE conformance and optimum picture quality are guaranteed only if you use the data cables supplied Switch off the monitor and the computer Disconnect the power...

Page 20: ...t for the Kensington Lock 3 D SUB socket ANALOG 4 AUDIO IN socket 5 DVI D connector DIGITAL Connect one of the connectors of the data cable to the D SUB connector 3 or the DVI D connector 4 on the mon...

Page 21: ...tightening the safety screws Insert the other plug of the audio cable in the audio output of the computer Plug the power connector of the monitor into a properly grounded mains outlet Plug the power c...

Page 22: ...r on and off Press the buttons from the bottom up 1 2 3 1 2 3 1 Buttons for the OSD menu On Screen Display 2 Power indicator 3 ON OFF switch First switch on the LCD monitor with the ON OFF switch 3 Th...

Page 23: ...ignal to the monitor to reduce the power consumption power management mode The power indicator of the monitor changes colour to indicate the status change Once an input is made at the computer the scr...

Page 24: ...r about 1 second The Auto Processing message appears Picture quality and position are set to optimum values for your system Selecting the input signal D SUB DVI_D Press the Back INPUT button to open t...

Page 25: ...or a few seconds The Action was executed message appears Please proceed in the same manner to release the locked ON OFF switch again Changing the monitor settings using the OSD menu With the buttons o...

Page 26: ...hlight a different function Press the EXIT AUTO button to exit the function Press the Forwards Mute button or the Back INPUT button to highlight a different function or press the EXIT AUTO button to r...

Page 27: ...longer be distinguished from very bright surfaces If the contrast is set too low the maximum brightness will not be achieved Adjusting the picture size and position Call the Image adjust setting windo...

Page 28: ...is function you choose between English default setting French German Italian and Spanish as the language for the OSD menu OSDH position Setting the horizontal position of the OSD menu With this functi...

Page 29: ...th the function activated On a message appears on the screen after approx 30 seconds if a different resolution is set Change the resolution to 1280 x 1024 to achieve optimum picture quality With the f...

Page 30: ...Message No Signal Check whether the data cable for the monitor is correctly attached to the monitor port on the computer Check whether the computer is switched on The input signal horizontal frequenc...

Page 31: ...creen Picture disturbances horizontal lines picture noise Press the EXIT AUTO button to perform auto adjustment of the screen The screen becomes darker The background lighting has a limited lifetime I...

Page 32: ...elements may be present The maximum permitted number of pixels faults is stipulated in the international standard ISO 13406 2 Class II Examples Example A 17 19 flat screen monitor with a resolution of...

Page 33: ...453 mm Height 436 mm 464 mm Dimensions of box Depth 212 mm 212 mm Weight without packaging approx 5 1 kg approx 5 45kg Storable display modes 25 25 Pixel error classes according to ISO 13406 2 Class...

Page 34: ...d Association Display Data Channel is used as the communications interface between the monitor and the computer If the computer is equipped with a VESA DDC compatible VGA interface it can automaticall...

Page 35: ...1280 x 1024 For ergonomic reasons a screen resolution of 1280 x 1024 pixels is recommended Because of the technology used active matrix an LCD monitor provides a totally flicker free picture even with...

Page 36: ...ck 7 DDC Data 8 Analog Vertical Sync 9 TMDS Data1 10 TMDS Data1 11 TMDS Data 1 3 Shield 12 not connected 13 not connected 14 5V Power 15 Ground 16 Hot Plug Detect 17 TMDS Data0 18 TMDS Data0 19 TMDS D...

Reviews: