background image

Operating the Printer 

Status & Error indication and recovery 


Status indications and Errors are listed in the following sections. 

1st list shows Normal Operating Messages.. 

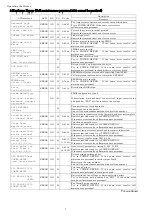
2nd list shows Hardware Errors. 

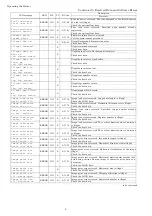
3rd list shows Received data and Software errors. 

Explanation of column titles 

LCD message: 

 Error message and Status displayed by the LCD on the operator panel 

LED: 

Each LED message displayed is described. 

Buzzer (B.Z): 

 Buzzer operation (“ON” means the buzzer is turned on when the error occurs) 

Classification (C.f.): 

Each error is classified as communication error (C), software error (S), hardware error (H), or 
operational indication (O) 

Error code (E-Code): 

Error logging code. 

Description: 

 Simple explanation of the meaning of the error. 

Recovery: 

 Action to be taken by the Operator. 
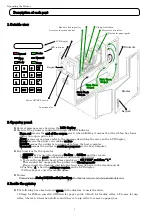
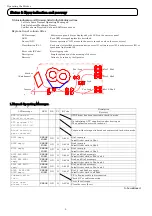
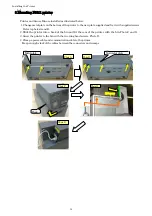
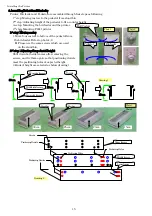
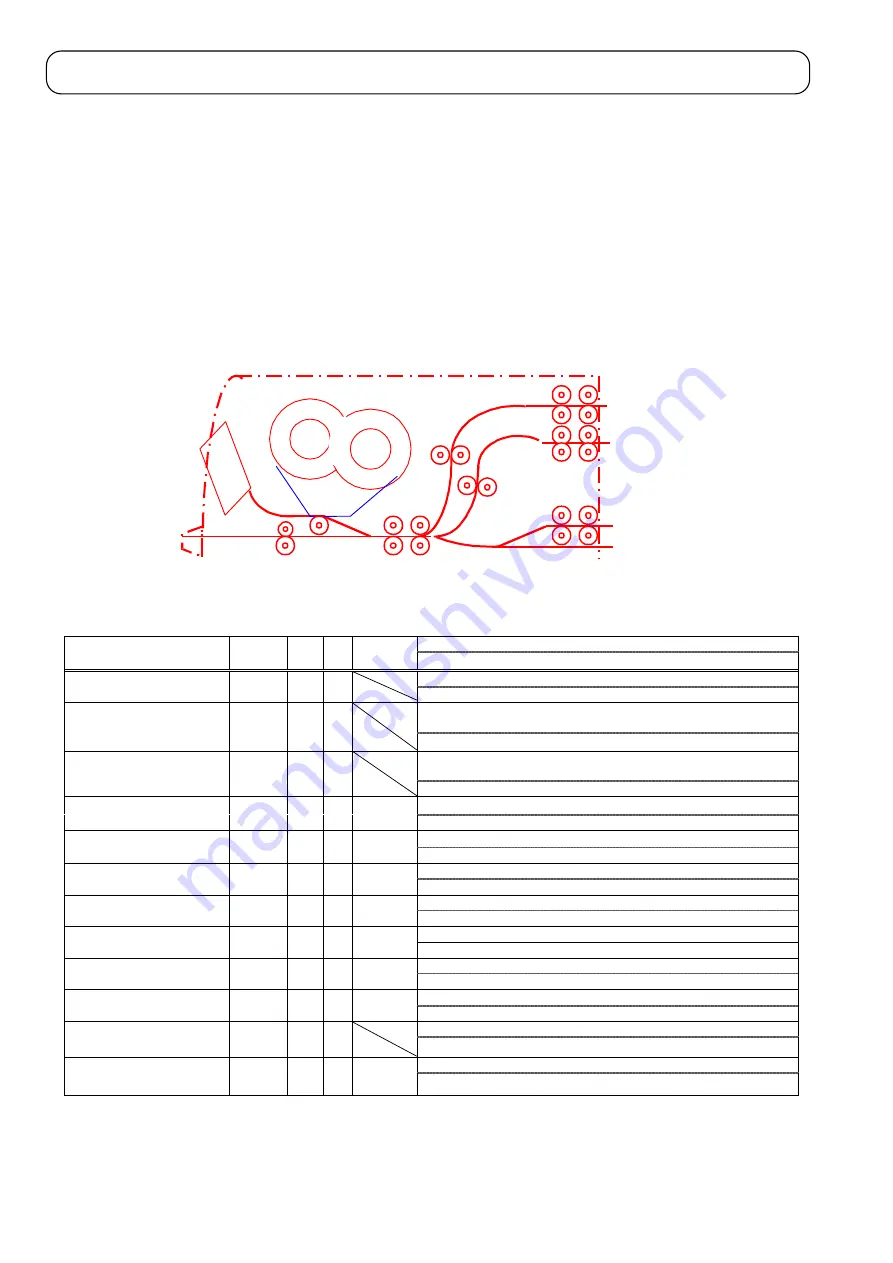


Slot 1, Bin 1


Slot 2, Bin 3


S


lot 3, Bin 2


Inserte


r


Stacker


(Exit hopper)


Pre


-


feed 


1


Print 


unit


Pre


-


feed 


2


Pre


-


feed 


3


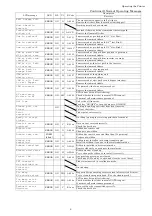
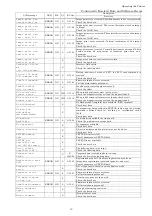
1. Normal Operating Messages. 


Description 

LCD message  

LED 

B.Z.  C.f.  E-Code 

Recovery 

ATB2 ticket has been inserted in check-in mode. 

ATB inserted 

Check-in started 

- - 

-   

 
On initializing ATP’ s application after booting on. 
(The application’s version is shown.) 

ATP program V*.* 

FUJITSU 2000 LH 

- - 

-   


Coupon without magnetic data has been inserted in check-in mode. 

Blank boarding 

pass inserted. 

- - 

-   

 
Bin 1 is empty. 

BIN1 empty 


ERROR 

FORM 

ON O  A-8001 

Install ticket stock in Bin 1. 
Bin 2 is empty. 

BIN2 empty 


ERROR 

FORM 

ON O  A-8002 

Install ticket stock in Bin 2. 
Bin 3 is empty. 

BIN3 empty 


ERROR 

FORM 

ON O  A-8004 

Install ticket stock to Bin 3. 
Bin 1 and Bin2 are empty. 

BIN1 AND BIN2 

empty 


ERROR 

FORM 

ON O  A-8003 

Install ticket stock to Bin 1 and 2. 
Bin 2 and Bin3 are empty. 

BIN2 AND BIN3 

empty 


ERROR 

FORM 

ON O  A-8006 

Install ticket stock to Bin 2 and 3. 
Bin 1 and Bin3 are empty. 

BIN1 AND BIN3 

empty 


ERROR 

FORM 

ON O  A-8005 

Install ticket stock to Bin 1 and 3. 
Bin 1,2, and Bin3 are empty. 

BIN1, BIN2 AND 

BIN3 empty  

ERROR 

FORM 

ON O  A-8007 

Install ticket stock to all Bins. 
P/C is down or cable is disconnected. 

Communication 

lost… 

- - 

-   

Check P/C or cable connection. 
Cover (door) is open. 

Cover open  

please close 

ERROR ON  O  A-8C00 

Close the cover (door). 

to be continued 


Summary of Contents for 9811 ATB

Page 1: ...al transfer with ribbon print 5 Ready to accept How to remove jam paper page 3 Cleaning page 4 Status Error Indication and recovery page 5 Printer Installation Environment for installation page 11 Cables page 11 Space for installation and operation page 12 Unpacking of the printer and the Bin feeder page 13 Mounting F9811 printer page 14 Assembling Pedestal page 15 Adjusting volume of buzzer and c...

Page 2: ...and then 1 This coupled key usage puts the printer into Cleaning mode Please insert the cleaning card into the front insertion slot in the cleaning mode 4 Pushing 4 show the software version on the LCD display Other keys are used for maintenance Buzzer BuzzerindicatesStackerFull RibbonEnd JamError otherhardwareerrorsandcommunicationdataerror Floppy disk drive Clamp for Ribbon Button for paper guid...

Page 3: ...printer The Green coupons in the center bin are led into the middle slot on the printer The Blank coupon in the front bin is led into the bottom slot The printer feeds the coupon automatically by detecting the inserted coupons 4 To switch print mode between Direct thermal print and Thermal transfer with ribbon print To change the mode to thermal transfer with Ribbon 1 Power off printer 2 Load a ri...

Page 4: ...tionslot Push the bottom paper back to therearslot PulltheKnoband opentheinsidedoor Afterremovingjampaperpleaseclosetheinsidedoorandpushthebuttontocloseit TurntheKnobwhilepushing the Presser to move paper to the insertionslot D E F A B C Afteropeningtheinsidedoorbypullingthebutton youcanseetheFeedKnob SeephotoA TurningtheKnobwhilepushingthepresserwillmovethejammedpaperonahorizontalpathtothefrontsi...

Page 5: ...n 1 while on line This coupled key usage puts the printer into Cleaning mode 2 Please insert the cleaning card into the insertion slot The card is fed into and ejected 3 Please pull the ejected card out The mode switches to on line automatically How to clean print head 1 Please remove the ribbon after opening the printer door 2 Clean the print surface of head with the top of the cleaner and wipe i...

Page 6: ...covery ATB2 ticket has been inserted in check in mode ATB inserted Check in started On initializing ATP s application after booting on The application s version is shown ATP program V FUJITSU 2000 LH Coupon without magnetic data has been inserted in check in mode Blank boarding pass inserted Bin 1 is empty BIN1 empty ERROR FORM ON O A 8001 Install ticket stock in Bin 1 Bin 2 is empty BIN2 empty ER...

Page 7: ...ead for ticketing MS read error No data on MS ERROR ON H C A 8320 Check whether the ticket is normal ATB coupon If normal call maintenance personnel Under the off line mode Off line Push key ON OFF to turn the mode to ON LINE Waiting for pulling out ticket from front inserter Please pull out ticket ON Pull out the ticket Ticket print out correctly Print successful On idling waiting for receiving p...

Page 8: ... Unexpected error in configuration POST MESSAGE CODE xx H Memorized the code number And call the maintenance personnel and tell the number The print data transferred to the thermal head does not complete Printing error in thermal head ERROR ON H A 2200 Removes jam ticket and try to POWER OFF ON If the same error results call maintenance personnel Print head approach error Print head approach error...

Page 9: ...ar print err horizontal size ERROR ON S A 7141 Check the host data Characters print error horizontal size Char print err horizontal size S Check the host data Characters print error vertical size Char print err vertical size ERROR ON S A 7140 Check the host data Characters print error vertical size Char print err vertical size S Check the host data Firmware internal error occurred Cancel command i...

Page 10: ...age load error horiz dir size ERROR ON S A 7172 Check the host data Image load error occurred Specified image number already registered Image load error nr alr regist ERROR ON S A 7171 Check the host data Image load error occurred Register number is illegal Image load error regist nr ill ERROR ON S A 7170 Check the host data Image load error occurred The vertical direction size of an image is ille...

Page 11: ...the magnetic head MS encode horizontal format error parity check error MS encode horiz format error ERROR ON O H A 7112 Check the magnetic stripe or clean the magnetic head No Background template data available AEA response No Background S Check host data No magnetic position defined in PECTAB table when the steering command is defined check in boarding or revalidation in the table No mag pos defi...

Page 12: ... Pin number Pin number Signals Signals Pin number 7 5 GND GND 7 2 3 TxD TxD 2 3 2 RxD RxD 3 5 8 CTS CTS 5 8 1 DCD DCD 8 4 7 RTS RTS 4 20 4 DTR DTR 20 6 6 DSR DSR 6 Housing orpin1 Housing FG FG Housing orpin1 toATBPrinter Power cable 1 The cord is specified in VDE 0281 or CENELEC HD21 S2 in Europe alsospecifiedinULorCSAinAmerica ConnectortoATBPrinter Normalvoltage250V AC 10Aisneededforthecablecodei...

Page 13: ...installation and operation TraceofBinFeederDoor KeySize TicketStacker TraceofPrinterDoor 237 Grip KeyLock Cables Cables ScrewedClamps KeySize TraceofBinFeederDoor 4 BallCaster 2 Hinge KeyLock Grip TicketStacker TraceofPrinterDoor 237 12 ...

Page 14: ...Disk Operator sGuide Removewrap Configurationsheet AfterinstallingtheprinterpleasekeeptheFDDandGuideaccordingtoindividualcustomerpolicies Removeprotectivewraparoundtheprinthead Removetapeondoor Removetapeoninsidedoor UnpackingtheBinFeeder Pleaseremovethewrappingafteropeningthebox Pleasecheckthatthefollowingpartsareenclosed TwoKeys Metalplateforfixingtheprinter Twowingscrewsforfixingprinter Twoscre...

Page 15: ... screws Refer to photos A and B 2 Slide the printer into a hook of the bin and fit the rear of the printer with the bin Photo C and D 3 Screw the printer to the bin with the two wing head screws Photo D 4 Clamp a power cable and communication cable to the printer Keep enough slack of the cables between the connectors and cramps Metalplate Newmetalplate PhotoB PhotoA PhotoE fittorear PhotoD PhotoC ...

Page 16: ...der Refer to photo 1 2 Please use the same screws which are used on the stand bin 2nd step Adjusting the pedestal height Shift down both side frames after removing the screws and fix them again so that positioning dowels meet the positioning holes at expected height 4 kinds of height are selected as below drawing 1 Photo2 Binfeeder BallCasters Pedestal Photo1 15cm Drawing1 20cm Screws 25cm Lowersi...

Page 17: ...al plate on the bottom of the printer to enclosed new plate and fixes it with enclosed screws Refer to photo 6 and 7 2 Slide the printer into a hook of the bin and fit the rear of the printer with the bin Photo 8 and 9 3 Screw the printer and the bin with two wing head screws Photo 9 4 Connect a power cable and communication cable to the printer and cramp them on the bin Keep enough slack of the c...

Page 18: ...on top right 1 FlashROMinstall 2 BootfromFDD This message will be Displayed Note If you fail to push the ON OFF key after the beep the firmware will progress to ready to accept In this case please try again after turning the power switch off 5 Push the key 1 after the above message is displayed Note At first Flash ROM is erased and then the program is written to the erased Flash ROM Message will s...

Page 19: ... and several messages will appear on the display Please wait for the beep of buzzer 1b Push the key ON OFF on the keypad when you first hear the beep Message will be displayed follows 1c Push the key 3 after above message Just 3 not 1 and 2 1 Flash ROM inst 2 Boot from FDD all D05 1d The LCD will display the clock and date to be adjusted as below HH hour MM minute mm month dd day yyyy year D06 HH ...

Page 20: ...y for incidental or consequentialdamagearisingfromtheuseofthismanual FUJITSUdisclaimsallwarrantiesregardingtheinformationcontained herein whetherexpressed implied orstatutory FUJITSU reserves all rights to make changes to any products herein to improve reliability function or design without further noticeandwithoutobligation WARNING This equipment has been tested and found to comply with the limit...

Page 21: ...Edition record Revision record Edition Date issued Description Pages 01 11 12 2001 Initial edition 02 06 02 2002 1 Correcting sentence 2 Adding Assembling pedestal Page 15and16 20 ...

Page 22: ...printed in Japan ...

Reviews: