


Operating the Printer
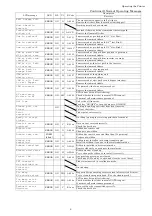
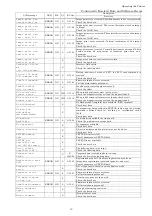
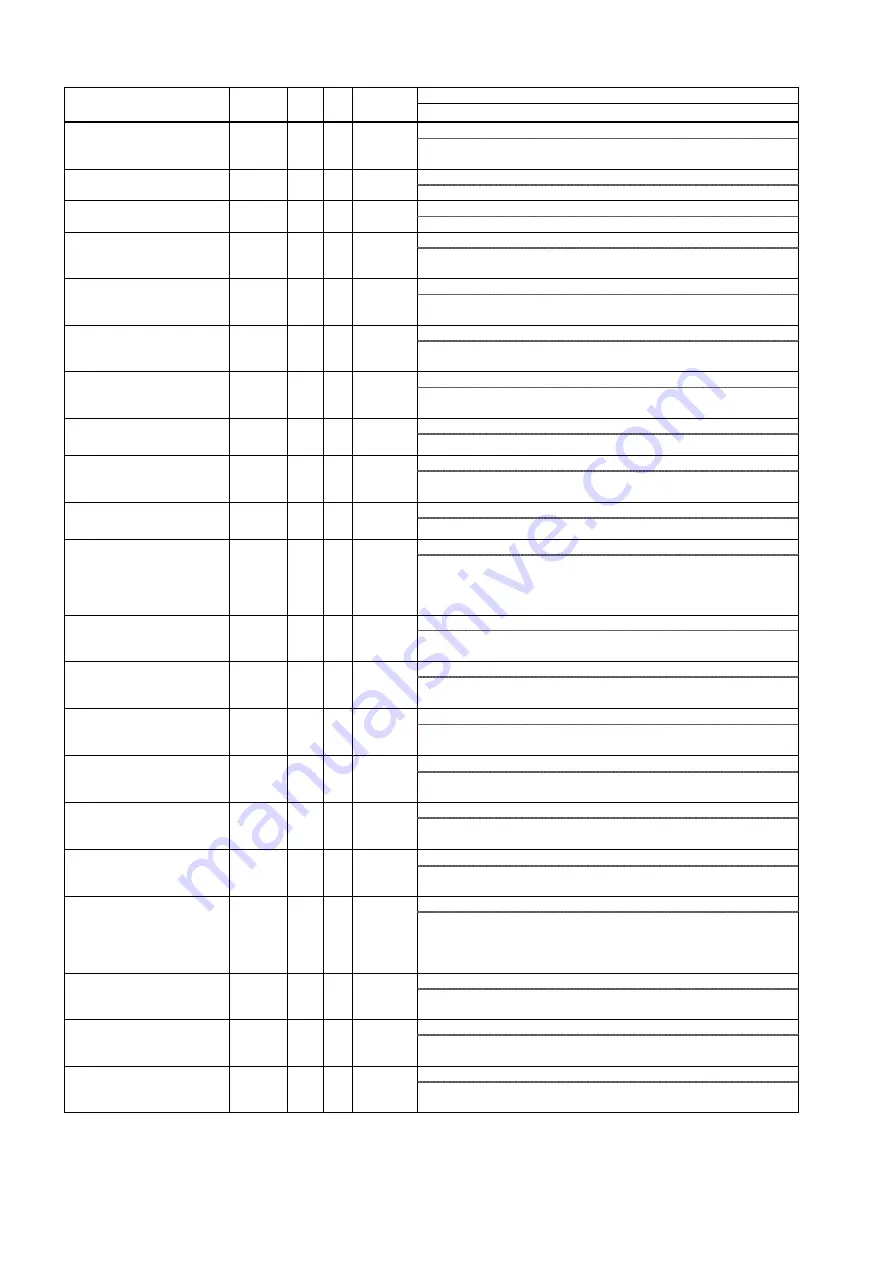
2. Hardware Errors (Call maintenance personnel if it cannot be resolved)
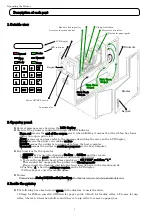
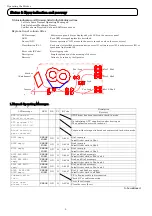
Description
LCD message
LED
B.Z. C.f. E-Code
Recovery
The temperature of print head exceeds the specified limit.
Abnormal high
temp print head
ERROR ON H A-2600 Try to POWER OFF/ON. If the same error results,
call maintenance personnel.
Cutter did not move to initial position.
Cutter save err.
ERROR ON H A-2000
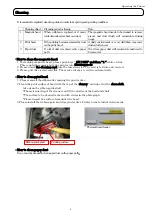
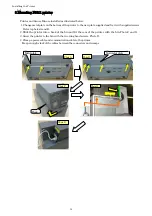
Remove the jammed ticket and close the cover.
Ticket was not cut.
Cutter cut error.
ERROR ON H A-2100
Remove the jammed ticket and close the cover.
Checksum error is detected in the CMOS.
CMOS sum check
Error
ERROR ON H A-6000 Try to POWER OFF/ON. If the same error results, call
maintenance personnel.
CMOS data is invalid.
CMOS data
offset illegal
ERROR ON H A-73xx Try to POWER OFF/ON. If the same error results, call
maintenance personnel.
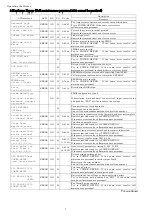
DOS system error occurred.
DOS LOAD xxx
(xxx: 3digs,decimal)
- -
H -
Try to POWER OFF/ON. If the same error results, call
maintenance personnel.
Drive not ready: no diskette on the drive
DOS LOAD 009
- -
H -
Try to POWER OFF/ON. If the same error results, call
maintenance personnel to check diskette or system board.
EEPROM write count exceeded the specified limit(9,999).
EEPROM write
count excessive
ERROR ON H A-6100
Call maintenance personnel to replace the EEPROM.
EEPROM data is invalid.
EEPROM data
offset illegal
ERROR ON H A-74xx Try to POWER OFF/ON. If the same error results, call
maintenance personnel.
Error during BIOS setup.
Error
0x00-0x00-0x00
ERROR ON H A-0000
CMOS configuration is bad.
hh:mm mm/dd/yyyy
(hh:hour, mm:min.
mm:month, dd:date
yyyy:year)
- ON
H - If description (time and date) is not correct, input correct value
and push key “ENT” until auto-reboot the system.
Unexpected error in configuration.
POST MESSAGE
CODE=xx
- -
H -
Memorized the code number.
And call the maintenance personnel and tell the number.
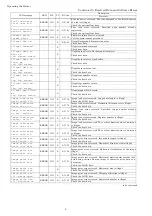
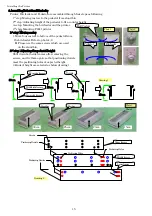
The print data transferred to the thermal head does not complete.
Printing error
in thermal head
ERROR ON H A-2200 Removes jam ticket and try to POWER OFF/ON.
If the same error results, call maintenance personnel.
Print head approach error
Print head
approach error
ERROR ON H A-2700 Removes jam ticket and try to POWER OFF/ON.
If the same error results, call maintenance personnel.
Abnormal temperature of print head thermistor is detected.
Print head ther-
mistor abnormal
ERROR ON H A-2400 Removes jam ticket and try to POWER OFF/ON.
If the same error results, call maintenance personnel.
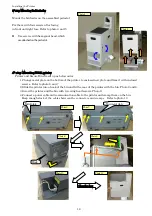
Over current of pulse motor PM1,2,3,4,5.
Pulse motor err.
driver PM x
(x: 1,2,3,4,5,6)
ERROR ON H
A-2310
11-14,1A Removes jam ticket and try to POWER OFF/ON.
If the same error results, call maintenance personnel.
Over drive of pulse motor timing A, B, C, D, E, F
Pulse motor err.
Slew. Timer x
(x: A,B,C,D,E,F)
ERROR ON H
A-2315
16-19,1B Removes jam ticket and try to POWER OFF/ON.
If the same error results, call maintenance personnel.
Errors during bootstrap phase:
SYS ERROR P0xxx
POWER RESET
(xxx: 3digs,decimal)
ERROR ON H
-
Try to POWER OFF/ON. If the same error results, call
maintenance personnel to check system board.
Memorized the error number.
And call the maintenance personnel and tell the number.
Print head Failure:
SYS ERROR P0700
POWER RESET
ERROR ON H
-
Try to POWER OFF/ON. If the same error results, call
maintenance personnel to check print head.
Battery Alarm: Low voltage or disconnect with battery
SYS ERROR P0800
<ENT>
ERROR ON H
-
Try to bootstrap with pushing key “ENT”. If the same error
results, call maintenance personnel.
Fan Alarm during operation
SYS ERROR S0020
POWER RESET
ERROR ON H
-
Try to POWER OFF/ON. If the same error results, call
maintenance personnel.
To be continued
7
Summary of Contents for 9811 ATB
Page 22: ...printed in Japan ...


