background image

En-3

TIMER OPERATION (ON timer/OFF timer/Weekly timer)

Instructions relating to heating are applicable only to “HEAT & COOL MODEL” (Reverse Cycle).

The timer function cannot be used when the remote controller is a slave unit. (For information concerning the slave unit, refer
to the INSTALLATION INSTRUCTION SHEET of the remote controller.)

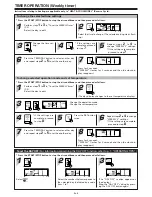
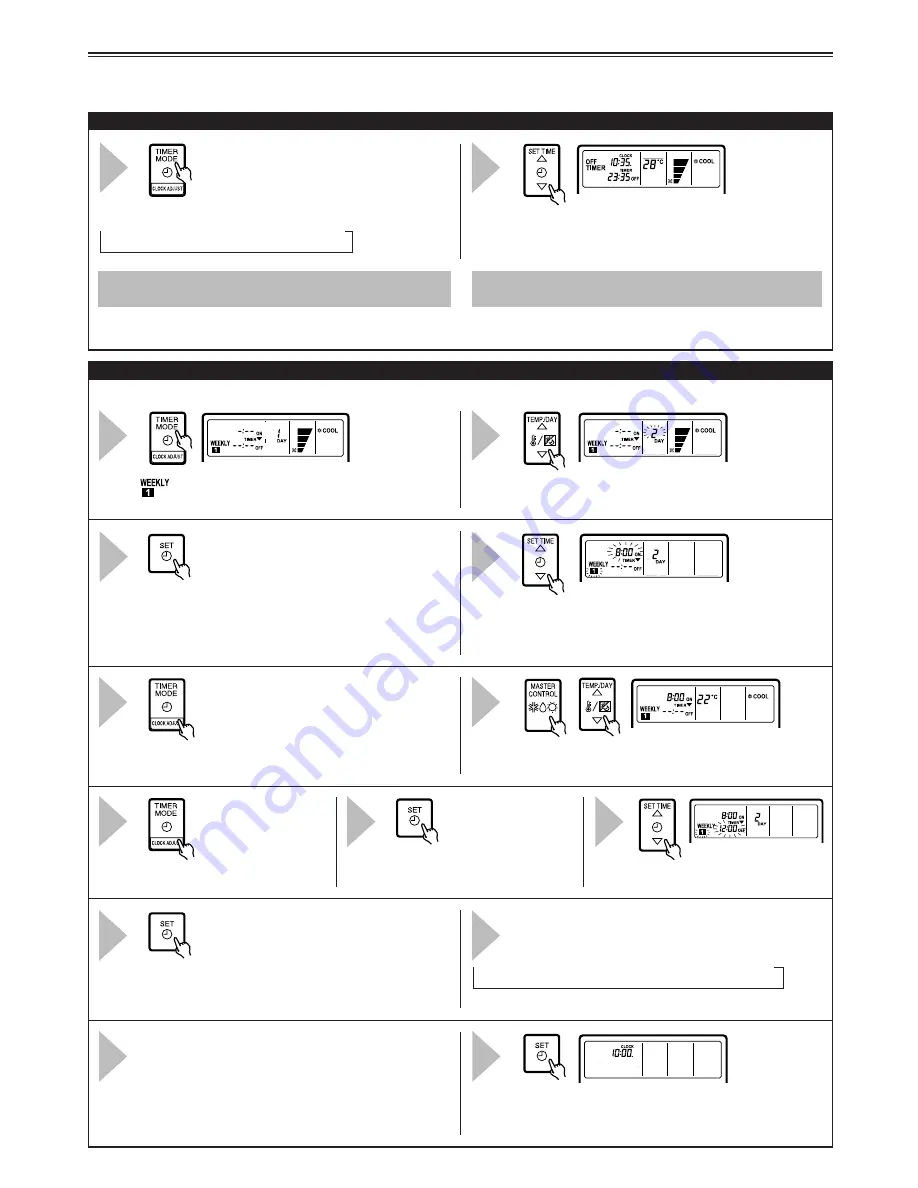
To set the ON/OFF timer

1

Select either “OFF TIMER” or “ON TIMER”.

2

Set the on or off time.
Press repeatedly to adjust the time in 1-minute increments.
Press continuously to adjust the time in 10-minute incre-
ments.

To cancel the TIMER mode during
TIMER operation

Press the TIMER MODE button and set the display to “NON
STOP” (the unit will switch to continuous operation).

To stop or start operation during use of
TIMER mode

Press the START/STOP button.

1

Select 

.

2

Select the number that corresponds to the selected day in-
dicated by a code from 1 to 7.

3

Press for 3 seconds.
(The “WEEKLY 1” ON time starts flashing.)

To set the WEEKLY timer 

(For information concerning the WEEKLY TIMER function, refer to p. 7, “OPERATING TIPS.”)

* Press the START/STOP button to stop the air conditioner, and then proceed as follows.

4

Set the “WEEKLY 1” ON time.
Press repeatedly to adjust the time in 5-minute increments.
Press continuously to adjust the time in 10-minute incre-
ments.

5

(The day display changes to the set temperature display.)

6

Select the desired operation mode.
Set the desired temperature.

10

(The “WEEKLY 2” ON time starts flashing.)

* If the settings are complete, proceed to step 

13

.

11

12

13

Press for 3 seconds.
(“WEEKLY” flashes for 3 seconds, then the clock display
reappears.)

Repeat steps 

4

 to 

10

 to set “WEEKLY 2”.

(Return to the “WEEKLY 1” ON time by pressing
the SET button.)

→ 

WEEKLY 1 


WEEKLY 1 

→ 

WEEKLY 2 

→ 

WEEKLY 2

ON

OFF

ON

OFF

→ 

NON STOP 

OFF

ON

→ 

WEEKLY

(RESET)

TIMER

TIMER

TIMER

9

Set the “WEEKLY 1” OFF time.

7

8

(The  “WEEKLY 1” OFF time starts
flashing.)

Press the TEMP./DAY button to select another day

and repeat steps 

4

 to 

11

 to set another day.

* If the settings are complete, proceed to step 

13

.

Summary of Contents for Airstage UTB- LB Series

Page 1: ...CONDITIONER OPERATING MANUAL BEDIENUNGSANLEITUNG MODE D EMPLOI MANUAL DE FUNCIONAMIENTO MANUALE DI ISTRUZIONI ΕΓΧΕΙΡΙ ΙΟ ΛΕΙΤΟΥΡΓΙΑΣ РУКОВОДСТВО ПО ЭКСПЛУАТАЦИИ MANUAL DE INSTRUÇÕES Remote Control Unit UTB LB REMOTE CONTROLLER WIRED TYPE TM English Deutsch Français Español Italiano EλληvIkά Русский Português ...

Page 2: ...which if improperly performed might possibly result in personal harm to the user or damage to property This mark indicates procedures which if improperly performed might lead to the death or serious injury of the user DANGER Do not attempt to install this controller by yourself This controller contains no user serviceable parts Al ways consult authorized service personnel for repairs When moving c...

Page 3: ...s not operating or when operating at very low speeds Vertical airflow swing operation Airflow direction Range of swing 1 1 to 3 2 2 to 4 3 2 to 4 4 1 to 4 All range Horizontal airflow swing operation Airflow direction Range of swing 1 1 to 5 All range 2 1 to 3 3 2 to 4 4 3 to 5 5 1 to 5 All range Fan speed setting Room temperature setting Vertical air direction adjustment 1 2 Swing operation Horiz...

Page 4: ...seconds The WEEKLY 1 ON time starts flashing To set the WEEKLY timer For information concerning the WEEKLY TIMER function refer to p 7 OPERATING TIPS Press the START STOP button to stop the air conditioner and then proceed as follows 4 Set the WEEKLY 1 ON time Press repeatedly to adjust the time in 5 minute increments Press continuously to adjust the time in 10 minute incre ments 5 The day display...

Page 5: ...sure to set the ON time first then the OFF time If either the ON time or the OFF time is not set correctly the timer will not operate properly The WEEKLY 2 settings cannot be set earlier than the WEEKLY 1 settings The WEEKLY 1 and WEEKLY 2 time spans cannot overlap 2 The earliest OFF time you can set is 5 minutes after the ON time The latest OFF time is 23 55 on the subsequent day 3 You do not nee...

Page 6: ...AY OFF function refer to p 7 OPERATING TIPS Press the START STOP button to stop the air conditioner and then proceed as follows 1 Select 2 Select the number that corresponds to the selected day indicated by a code from 1 to 7 3 The DAY OFF caption appears on the display Stop the DAY OFF setting by press ing the DAY OFF button again Perform steps 1to 3in To set the WEEKLY timer P 3 Select the day t...

Page 7: ...re is very low frost may form on the outside unit and its performance may be reduced In order to remove such frost the unit will automatically enter the defrost cycle from time to time During defrost ing the heating mode will be temporarily interrupted DEFROST will be shown on the remote controller display Fan speed When set to AUTO FAN speed Heating The fan will operate at very low speed when the...

Page 8: ...occurred TROUBLESHOOTING Instructions relating to heating are applicable only to HEAT COOL MODEL Reverse Cycle 1 If the operation lamp is on press the START STOP button to turn it off 2 Press SET TIME and TEMP DAY but tons at the same time for more than 3 seconds to start the self diagnosis check Error code Remote controller address 3 Press the SET TIME and TEMP DAY buttons at the same time for mo...

Page 9: ...eration if the room temperature rises above the set temperature the outdoor unit will stop and the indoor unit will operate at very low fan speed If you wish to warm the room further set the set the temperature for a higher setting During Heating operation the unit will temporarily stop opera tion between 2 and 16 minutes as the Automatic Defrosting mode operates During Automatic Defrosting operat...

Reviews: