background image

M3099GX/GH OEM Manual

C-1

SEPARATION
PRESSURE
ADJUSTMENT

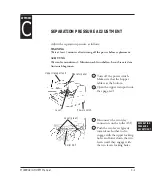
1 Turn off the power switch.

Make sure that the hopper
table is at the bottom.

2 Open the upper transport unit.

(See page 4-2)

3 Disconnect the two relay

connectors on the roller ASY.

4 Push the two levers (green)

towards each other to dis-
engage with the upper locking
holes and lower down the two
levers until they engage with
the two levers locking holes.

APPENDIX

C

SEPARATION PRESSURE ADJUSTMENT

Adjust the separation pressure as follows:

WARNING

Wait at least 3 minutes after turning off the power before replacement.

ACHTUNG

Warten Sie mindestens 3 Minuten nach Ausschalten, bevor Sie mit dem
Austausch beginnen.

Roller ASY

Lever (green)

Power switch

Operator panel

Upper transport unit

Lever

Summary of Contents for C150-E049-02EN

Page 1: ...M3099GX GH IMAGE SCANNER OEM MANUAL C150 E049 02EN 00 1 Cover pm5 98 2 22 1 13 PM 1 ...

Page 2: ...M3099GX GH IMAGE SCANNER OEM MANUAL 00 1 Cover pm5 98 2 22 1 13 PM 2 ...

Page 3: ... 00 1 Cover pm5 98 2 22 1 13 PM 3 ...

Page 4: ...uropa Paseo de la Castellana 95 Madrid 28046 SPAIN TEL 34 1 581 8400 FAX 34 1 581 8125 FUJITSU EUROPE LTD 2 Longwalk Road Stockley Park Uxbridge Middlesex UB11 1AB U K TEL 44 81 573 4444 FAX 44 81 573 2643 TLX 263871 FUJITSU FRANCE S A Batiment Aristote 17 rue Olof palme 94006 Creteil cedex FRANCE TEL 33 14 513 1616 FAX 33 14 399 0700 FUJITSU HONG KONG Limited Room 2521 Sum Hung Kai Centre 30 Harb...

Page 5: ...lectrical environmental physical and option specifications Chapter 3 Interface Specifications Chapter 3 provides SCSI interface specifications Chapter 4 Basic Operation Chapter 4 provides power switch operation opening closing the upper transport unit operator panel arrangement and functions messages loading document and replacement of parts Chapter 5 Error Processing and Recovery Chapter 5 provid...

Page 6: ...miliarize yourself with the contents of this manual before attempting to use the scanner Operators in particular must have read Chapter 4 Basic Operation Special information such as warnings cautions are indicated as follows WARNING A WARNING indicattes that personal injury may result if you do not follow a procedure correctly CAUTION A CAUTION indicates that damage to the scanner may result if yo...

Page 7: ...2 1 General 2 1 Electrical Specifications 2 2 Environmental Specifications 2 2 Physical specifications 2 3 Option specifications 2 6 CHAPTER 3 INTERFACE 3 1 Physical Specifications 3 3 SCSI Bus See ANSI SCSI 2 4 5 3 7 SCSI Bus Signals See ANSI SCSI 2 4 6 3 8 Signal Values 3 9 Signal Source 3 9 SCSI Bus Timing 3 11 Arbitration Delay 3 12 Assertion period 3 12 Bus Clear Delay 3 12 Bus Free Delay 3 1...

Page 8: ... Transfer Phases 3 19 Asynchronous Information Transfer 3 20 Synchronous Data Transfer 3 21 COMMAND Phase 3 22 Data Phase 3 22 DATA IN Phase 3 23 DATA OUT Phase 3 23 STATUS Phase 3 23 Message Phase 3 23 MESSAGE IN Phase 3 23 MESSAGE OUT Phase See ANSI SCSI 2 6 1 9 2 for details 3 24 SCSI Bus Conditions 3 24 Attention Condition 3 24 Reset Condition 3 25 SCSI Bus Phases Sequences 3 26 Commands See A...

Page 9: ...E Init Targ 3 103 DISCONNECT Init Targ 3 103 IDENTIFY Init Targ 3 104 INITIATOR DETECTED ERROR Init Targ 3 105 MESSAGE PARITY ERROR Init Targ 3 105 MESSAGE REJECT Init Targ 3 106 NO OPERATION Init Targ 3 106 RESTORE POINTERS Init Targ 3 107 SAVE DATA POINTER Init Targ 3 107 SYNCHRONOUS DATA TRANSFER REQUEST 3 107 Command Sequence 3 110 System Initialization 3 110 General Procedure for Initializing...

Page 10: ...21 CHAPTER 5 ERROR PROCESSING AND RECOVERY 5 1 Device and Operator Actions for Temporary Errors 5 1 Device and Operator Actions for Equipment Errors 5 4 CHAPTER 6 DOCUMENT SPECIFICATION 6 1 Document Size 6 1 Document Quality 6 2 Document type 6 2 Ream weight 6 2 Precautions 6 2 Document Limitations 6 4 Areas that must not be perforated 6 4 Print prohibit areas on the front and back surfaces 6 5 Gr...

Page 11: ... initial number A 2 A2 3 How to set the print number reset condition A 3 A2 4 How to reset the print number manually A 3 A2 5 How to reset the print head life counter A 4 A2 6 How to test the printing by the operator panel operation A 4 A3 Print head handling A 5 A3 1 Replacing the print head A 5 A3 2 Print head position adjustment A 6 APPENDIX B SETUP MODE B 1 B1 Activating the setup mode B 1 B2 ...

Page 12: ... endorser B 10 B3 11 Reset of ink counter B 10 B3 12 Setting SCSI ID B 10 B3 13 Setting Product ID B 10 B3 14 Setting picking start time B 11 B3 15 Setting picking time B 12 B3 16 Setting time out limit B 12 B3 17 Setting hopper time B 13 B3 18 Setting heater control B 13 APPENDIX C SEPARATION PRESSURE ADJUSTMENT C 1 GLOSSARY OF TERMS GL 1 INDEX IN 1 00 4 Contents pm5 98 2 22 1 14 PM 8 ...

Page 13: ...onnection 3 3 3 2 Alternative 1 termination for Single Ended Devices 3 5 3 3 Alternative 2 termination for Single Ended Devices 3 5 3 4 DATA BUS 3 7 3 5 Phase Sequence 3 26 3 6 Verify State Test 3 113 4 1 Power switch location 4 1 4 2 Operator panel layout 4 3 6 1 Document size 6 1 6 2 Areas that must not be perforated 6 4 6 3 Print prohibit areas on the front and back surfaces 6 5 6 4 Grounding c...

Page 14: ... 9 RELEASE UNIT Command 3 31 3 10 TEST UNIT READY Command 3 32 3 11 INQUIRY Command 3 33 3 12 Standard INQUIRY Data Format 3 35 3 13 Standard VPD Page Format 3 38 3 14 Standard Resolution unit Pixel Inch 3 39 3 15 Function 3 40 3 16 Standard VPD Page Extended Format 3 41 3 17 Physical Function 3 42 3 18 Implemented Standard Command 3 43 3 19 2 bytes structure 3 44 3 20 Implemented Vendor Specific ...

Page 15: ...5 3 43 Gamma Correction Table 3 66 3 44 Outline Extract 3 66 3 45 Image Emphasis 3 67 3 46 Automatic Separation 3 67 3 47 Mirroring 3 67 3 48 SDTC parameter 3 68 3 49 DTC Mode Byte 47 3 69 3 50 DTC Mode Byte 48 3 69 3 51 White Level Follower 3 70 3 52 Paper Size 3 71 3 53 DTC Selection 3 72 3 54 OBJECT POSITION Command 3 73 3 55 Position Function 3 73 3 56 SEND Command 3 74 3 57 Halftone Mask 3 76...

Page 16: ... 80 Status Byte 3 97 3 81 Status Byte Code 3 97 3 82 Message Format 3 99 3 83 Message Codes 3 100 3 84 Extended Message Format 3 101 3 85 Extended Message Codes 3 101 3 86 IDENTIFY message 3 104 3 87 SYNCHRONOUS DATA TRANSFER REQUEST 3 107 4 1 Button functions 4 4 4 2 LEDs function 4 4 4 3 Messages 4 8 5 1 Device and operator actions for temporary errors 5 1 5 2 Device and operator actions for equ...

Page 17: ...ION PRESSURE ADJUSTMENT 6 Chapter 1 Overview Chapter 2 Specifications Chapter 3 Interface Chapter 4 Basic Operation Chapter 5 Error Processing and Recovery Chapter 6 Document Specification Chapter 7 Consumables and Accessories Chapter 8 Cleaning Appendix A Endorser Appendix B Setup Mode Appendix C Separation Pressure Adjustment Glossary of Terms Index 00 5 TagReference pm5 98 2 22 1 19 PM 1 ...

Page 18: ...ADF Scanner types of M3099GH and M3099GX are shown in Table 1 1 and 1 2 Those types of the scanner is hereinafter referred to as this scanner Table 1 1 Types of M3099GH Scanner Types Type 500 sheets hopper 1000 sheets hopper with IPC2 with IPC2 Item 100V 200V 100V 200V Maximum document size A4 Letter Legal Scanning Simplex 80 PPM A4 200dpi portate Duplex 60 PPM A4 200dpi portrate Hopper capacity 5...

Page 19: ...ouble letter Scanning Simplex 60 PPM A4 200dpi portate Duplex 50 PPM A4 200dpi portrate Hopper capacity 1000 sheets Hight of 530 mm the Scanner IPC2 option Installed Input voltage 100V 200V Appearance Figure 1 2 Table 1 2 Types of M3099GX Figure 1 1 500 sheets hopper type 01 Chapter 1 98 2 22 1 21 PM 2 ...

Page 20: ...M3099GX GH OEM Manual 1 3 OVERVIEW Figure 1 2 1000 sheets hopper type 01 Chapter 1 98 2 22 1 21 PM 3 ...

Page 21: ... mode by M3099GH Large capacity hopper Up to 1000 sheets A4 55 kg can be loaded on the hopper by the 1000 sheets hopper type High quality image This scanner uses a compact optical system that provides sharper focus Furthermore the use of new LSI chips produces finer images New image processing function The error diffusion feature is provided as standard Dithering or error diffusion can be applied ...

Page 22: ...drive and control the mechanism unit an image processing control and an interface control Figure 1 3 shows scanner configuration Figure 1 3 Scanner block diagram Configuration Mechanism unit Transfer system Sensor Lamp heater inverter Lamp heater inverter Printer Printer driver Optical system CCD driver Video circuit Front side Back side Back side Control unit Mechanism driver Fan Operator panel I...

Page 23: ... arrangement of these units Figure 1 4 Arrangement of units Power supply units 24V 5V 12V Control unit Operator panel Stacker Optical unit front side Automatic document feeder ADF Hopper Optical unit back side Power switch Power inlet 01 Chapter 1 98 2 22 1 21 PM 6 ...

Page 24: ...rt the documents The motor drive system drives these units The stacker stores documents When the power is turned on the lamps are lit and the scanner waits until the light intensities of the lamps become stable Once the light intensities have become stable the scanner is ready for a command from the host machine A document is picked from the hopper and then ADF feeds a document one by one The docu...

Page 25: ...r driver circuit including a stepper motor a clutch driver Power supply unit Image processing circuit IPC II option Memory board Figure 1 5 shows control block diagram Figure 1 5 Control block diagram Host machine Interface circuit Control circuit MPU Video circuit front side Video circuit back side Image processing circuit II option front side Duplex circuit Memory board Motor driver circuit Oper...

Page 26: ...B s in Asynchronous transfer 4 0MB s in Synchronous transfer following to SCSI 2 standard The VCEP compresses the binary image data in MH MR MMR algorithm defined by CCITT G3 G4 See Chapter 3 for details of SCSI interface Resolution The basic resolution of this scanner is 200dpi The resolution can be changed to 240 300 or 400dpi from the host computer or the operator panel The resolution in the su...

Page 27: ... and photographs Inversion function Mirror image output function Outline extraction function Overlay function Smoothing filtering and noise removing Power supplies This scanner has two power supplies Their output voltages are as follows Power supply 1 5V For logic circuits 12V For video amplifiers Power supply 2 24V For lamp heater and stepping motor drive 01 Chapter 1 98 2 22 1 22 PM 10 ...

Page 28: ...pper CCD image sensor ADF automatic document feeder MF manual feeder 216 356 mm A4 Letter Legal 297 432 mm A3 Double letter 76 63 mm 3 2 5 Green fluorescent lamp MAX 500 MAX 1000 MAX 1000 sheets sheets sheets 256 steps Binary Halftone 64 levels 80 PPM 60 PPM 60 PPM 50 PPM Standard 400 300 240 200dpi Horizontal scanning and vertical scanning are independent If the image processing II IPC2 is instal...

Page 29: ...te or more between FG and AC lines Voltage 1 2 KV pulse duration 5 µs 110 Kcal H 440 BTU H Voltage Phase Frequency Table 2 3 lists environmental specifications Table 2 3 Environmental specifications Item Ambient conditions Shock Stability Acoustic noise ESD Operating 5 to 35 C 20 to 80 no condensation 0 2 G less 5 or less 59 dBA or less ISO 7779 Not operating 20 to 60 C 8 to 95 no condensation 0 4...

Page 30: ... 2 1 to Figure 2 2 show the scanner dimensions Figure 2 3 shows scanner service areas Table 2 4 lists physical specifications Physical Specifications 610 470 680 Figure 2 1 Dimensions of 500 sheets hopper type Unit mm 02 Chapter 2 98 2 22 1 30 PM 3 ...

Page 31: ...2 4 M3099GX GH OEM Manual 610 530 680 Figure 2 2 Dimensions of 1000 sheets hopper type Unit mm 02 Chapter 2 98 2 22 1 30 PM 4 ...

Page 32: ...ations Type Item Dimensions Width Depth Height Weight 500 sheets hopper type 1000 sheets hopper type 610 mm 610 mm 680 mm 680 mm 470 mm 530 mm 55kg 65kg 600 680 600 200 610 600 1 390 1 860 Scanner F F Front Unit mm Figure 2 3 Service areas 02 Chapter 2 98 2 22 1 30 PM 5 ...

Page 33: ...ble 2 5 lists the scanner option specifications Table 2 5 Option specifications Option Specifications Item Endorser Detail Ink jet back side print max 20 characters Specification CA01023 D004 Remark 02 Chapter 2 98 2 22 1 30 PM 6 ...

Page 34: ...itiator An SCSI device that requests an I O process to be performed by another SCSI device a target Target An SCSI device that performes an operation requested by an initiator Logical unit A physical or virtual peripheral device addressable through a target Scope This interface specification is following X3T9 2 draft proposal revision 10c refering JBMS Japan Business Machine Standard System config...

Page 35: ...E UNIT REQUEST SENSE RESERVE UNIT SCAN SEND SEND DIAGNOSTIC SET WINDOW TEST UNIT READY ENDORSER ENDORSER option is required Statuses BUSY CHECK CONDITION GOOD RESERVEATION CONFLICT Messages ABORT BUS DEVICE RESET COMMAND COMPLETE DISCONNECT IDENTIFY INITIATOR DETECTED ERROR MESSAGE PARITY ERROR MESSAGE REJECT 03 pm5 98 2 22 1 31 PM 2 ...

Page 36: ...on between all SCSI devices on the A cable In systems that employ the wide SCSI option wide SCSI devices additionally connect to the B cable Various width SCSI devices may be mixed This scanner supports A cable Note Use of B cable is not recommended because of ANSI draft proposal indicates this definition is removed in a future version of the SCSI TERMINATOR SCSI device SCSI device SCSI device SCS...

Page 37: ...to 0 8 volts dc 2 0 to 5 25 volts dc 0 4 to 0 0mA at Vi 0 5 volts dc 0 0 to 0 1mA at Vi 2 7 volts dc 0 2 volts dc See Table 3 2 Item Driver receiver Connector Cable Signal level Max cable length Characteristic impedance Cable type Stub length Terminator Driver receiver Output characteristics Low level output voltage High level output voltage Input characteristics Low level input voltage High level...

Page 38: ...te 1 Vin Vout Vadj R1 R2 C2 C3 R3 Component Description R1 R2 R3 R20 C1 C2 C3 121 Ω 1 0 25W 154 Ω 1 0 25W 110 Ω 1 10 µF Alum 15V or 4 7 µF Tant 15V 150 µF Alum 10V or 22 µF Tant 10V ESR at 120 Hz 4 0 1 µF Ceramic 25V R20 NOTES 1 The voltage regulator shown is an adjustable type with Vref 1 25V R1 and R2 were selected to provide approximately 10mA Iquiescent The voltage regulator Vdropout shall be ...

Page 39: ...2 DB 3 DB 4 DB 5 DB 6 DB 7 DB P GROUND GROUND RESERVED TERMPWR RESERVED GROUND ATN GROUND BSY ACK RST MSG SEL C D REQ I O Connector Contact Number Set 2 1 2 3 4 5 6 7 8 9 10 11 12 13 14 15 16 17 18 19 20 21 22 23 24 25 Cable Connector Number Connector Contact Number Set 2 26 27 28 29 30 31 32 33 34 35 36 37 38 39 40 41 42 43 44 45 46 47 48 49 50 1 3 5 7 9 11 13 15 17 19 21 23 25 27 29 31 33 35 37 ...

Page 40: ...nes should be open in the other SCSI devices but may be connected to ground The RESERVED lines in this scanner are opened SCSI Bus See ANSI SCSI 2 4 5 Communication on the SCSI bus is allowed between only two SCSI devices at any given time There is a maximum of eight SCSI devices Each SCSI device has an SCSI ID bit assigned as shown in Figure 3 4 Figure 3 4 DATA BUS SCSI ID DB 0 ID 0 DB 1 ID 1 DB ...

Page 41: ...formation transfer handshake A signal driven by an initiator on the A cable to indicate an acknowledgement for a REQ information transfer handshake A signal driven by an initiator to indicate the ATTENTION condition An OR tied signal that indicates the RESET condition Eight data bit signals plus a parity bit signal that from a DATA BUS DB 7 is most significant bit and has the highest priority duri...

Page 42: ...n the signal is true In the case of non OR tied drivers the signal may be actively driven false In this standard whenever the term negated is used it means that the signal may be actively driven false or may be simply released in which case the bias circuitry pulls it false at the option of the implementor Signal Source Table 3 4 indicates which type of SCSI device is allowed to source each signal...

Page 43: ...iven by each SCSI device that is actively arbitrating the other seven data bits shall be released i e not driven by this SCSI device The parity bit DB P may be released or driven to the true state but shall never be driven to the false state during this phase The signal shall be driven by the initiator target or both as specified in the SELECTION phase and RESELECTION phase Init If driven this sig...

Page 44: ... in the following paragraphs Table 3 5 SCSI Bus Timing Values Timing Description Arbitration Delay Assertion Period Bus Clear Delay Bus Free Delay Bus Set Delay Bus Settle Delay Cable Skew Delay Data Release Delay Deskew Delay Disconnection Delay Hold Time Negation Period Power On to Selection Time Reset to Selection Time Reset Hold Time Selection Abort Time Selection Time out Delay Transfer Perio...

Page 45: ...BUS FREE phase is detected SEL is received from another SCSI device during the ARBITRATION phase The transition of RST to true For the first condition above the maximum time for an SCSI device to clear the bus is 1200 nanoseconds from BSY and SEL first becoming both false If an SCSI device requires more than a bus settle delay to detect BUS FREE phase it shall clear the bus within a bus clear dela...

Page 46: ...ction Delay The minimum time that a target shall wait after releasing BSY before participating in an ARBITRATION phase when honoring a DISCONNECT message from the initiator Hold Time The minimum time added between the assertion of REQ or REQB or ACK or ACKB and the changing of the data lines to provide hold time in the initiator or target while using synchronous data transfers REQB and ACKB timing...

Page 47: ...is asserted There is no maximum time Selection Abort Time The maximum time that a target or initiator shall take from its most recent detection of being selected or reselected until asserting a BSY response This time out is required to ensure that a target or initiator does not assert BSY after a SELECTION or RESELECTION phase has been aborted This is not the selection time out period see ANSI SCS...

Page 48: ... ANSI SCSI 2 6 1 1 for details The BUS FREE phase indicates that there is no current I O process and that the SCSI bus is available for a connection SCSI devices shall detect the BUS FREE phase after the SEL and BSY signals are both false for at least a bus settle delay SCSI devices shall release all SCSI bus signals within a bus clear delay after the BSY and SEL signals become continuously false ...

Page 49: ...hat it can initiate or resume an I O process The procedure for an SCSI device to obtain control of the SCSI bus is as follows a The SCSI device shall first wait for the BUS FREE phase to occur The BUS FREE phase detected whenever both the BSY and SEL signals are simultaneously and continuously false for a minimum of a bus settle delay b The SCSI device shall wait a minimum of a bus free after dete...

Page 50: ...CTION phase allows an initiator to select a target for the purpose of initiating some target function e g READ or WRITE command During the SELECTION phase the I O signal is negated so that this phase can be distinguished from the RESELECTION phase The SCSI device that won the arbitration has both the BSY and SEL signals asserted and has delayed at least a bus clear delay plus a bus settle delay be...

Page 51: ...CSI device becomes a target by asserting the I O signal The winning SCSI device shall also set the DATA BUS to a value that is the logical OR of its SCSI ID bit and the initiator s SCSI ID bit The target shall wait at least two deskew delays and release the BSY signal The target shall wait at least a bus settledelay before looking for a response from the initiator The initiator shall determine tha...

Page 52: ... the different information transfer phases see Table 3 6 The target drives these three signals and therefore controls all changes from one phase to another The initiator can request a MESSAGE OUT phase by asserting the ATN signal while the target can cause the BUS FREE phase by releasing the MSG C D I O and BSY signals The information transfer phases use one or more REQ ACK handshakes to control t...

Page 53: ...formation shall be transferred from the initiator to the target If the I O signal is true transfer to the initiator the target shall first drive the DB 7 0 P signals to their desired values delay at least one deskew delay plus a cable skew delay then assert the REQ signal The DB 7 0 P signals shall remain valid until the ACK signal is true at the target The initiator shall read the DB 7 0 P signal...

Page 54: ...et in advance of the number of ACK pulses received from initiator establishing a pacing mechanism If the number of REQ pulses exceeds the number of ACK pulses by the REQ ACK offset the target shall not assert the REQ signal until after the leading edge of the next ACK pulse is received A requirement for successful completion of the data phase is that the number of ACK and REQ pulses be equal The t...

Page 55: ... REQ pulse received After receiving the leading edge of a REQ pulse the initiator shall first drive the DB 7 0 P signals to their desired values delay at least one deskew delay plus one cable skew delay then assert the ACK signal The initiator shall hold the DB 7 0 P signals valid for at least one deskew delay plus one cable skew delay plus one hold time after the assertion of the ACK signal The i...

Page 56: ...ent from the target to the initiator The target shall assert the C D and I O signals and negate the MSG signal during the REQ ACK handshake of this phase Message Phase The message phase is a term that references either a MESSAGE IN or a MESSAGE OUT phase Multiple messages may be sent during either phase The first byte transferred in either of these phases shall be either a single byte message or t...

Page 57: ...as successfully received the message byte s by changing to the BUS FREE phase e g ABORT or BUS DEVICE RESET messages The SCSI bus has two asynchronous conditions the attention condtion These conditions cause the SCSI device to perform ceratin actions and alter the phase sequence Attention Condition The attention condition allows an initiator to inform a target that the initiator has a message read...

Page 58: ...alternative or the soft reset alternative one of which shall be implemented as defined in ANSI SCSI 2 6 2 2 1 and 6 2 2 2 The hard and soft reset alternative is implemented is provided in the SftRe bit of the INQUIRY data This scanner supports Hard Reset alternative as below Hard Reset Alternative 1 Clear all I O process including queued I O process 2 Release all SCSI device reservations 3 Return ...

Page 59: ...rogression is from the BUS FREE phase to ARBITRATION from ARBITRATION to SELECTION or RESELECTION and from SELECTION or RESELECTION to one or more of the information tranfer phases COMMAND DATA STATUS or MESSAGE The final information transfer phase is normally the MESSAGE IN phase where a DISCONNECT or COMMAND COMPLETE message is transferred followed by the BUS FREE phase Reset or protocol error B...

Page 60: ... zero or receives a reserved code value shall terminate the command with CHECK CONDITION status and the sense key shall be set to ILLEGAL REQUEST Logical Unit Number The logical unit number is defined in the IDENTIFY message The target shall ignore the logical unit number specified within the command descriptor block if an IDENTIFY message was received This scanner supports Logical Unit Number 000...

Page 61: ...r has a allocated for returned data An allocation length of zero indicates that no data shall be transferred This condition shall not be considered as an error The target shall terminate the DATA IN phase when allocation length bytes have been transferred or when all available data have been transferred to the initiator whichever is less The allocation length is used to limit the maximum amount of...

Page 62: ...pecify windows within the scanning range of the device Transfers data from initiator to target Provids positioning functions ADF Feed in out Requests the target begin a scan operation Requests the target transfer data to the initiator Specify logical unit peripheral device parameters from the initiator to the target Report parameters from the target to the initiatot Command RESERVE UNIT RELEASE UN...

Page 63: ...RVE UNIT command from the initiator that made the reservation or until released by a BUS DEVICE RESET message from any initiator by a hard reset condition or by a power on cycle The reservation shall not be granted if the logical unit is reserved by another initiator It shall be permissible for an initiator to reserved a logical unit that is currently reserved by that initiator If the logical unit...

Page 64: ...return RESERVATION CONFLICT status See ANSI SCSI 2 9 2 10 2 for details RELEASE UNIT Command The RELEASE UNIT command Table 3 9 is used to release previously reserved logical units for the requesting initiator to another specified SCSI device Table 3 9 RELEASE UNIT Command Bit Byte 0 1 2 3 4 5 7 6 5 3 2 1 0 Operation Code 17h Reserved Reserved Reserved Control Logical Unit Number 3rdPty Third Part...

Page 65: ...appropriate command without returning CHECK CONDITION status this command shall return a GOOD status If the logical unit cannot become operational the target shall return CHECK CONDITION status with a sense key of NOT READY Table 3 10 TEST UNIT READY Command Bit Byte 0 1 2 3 4 5 7 6 5 3 2 1 0 Operation Code 00h Reserved Reserved Reserved Control Logical Unit Number Reserved 4 INQUIRY Command See A...

Page 66: ...h the sense key set to ILLEGAL REQUEST and an additional sense code of INVALID FIELD IN CDB This bit of zero specifies that the target shall return the standard INQUIRY data If the page code field not zero the target shall return CHECK CONDITION status with the sense key set to ILLEGAL REQUEST and an additional sense code of INVALID FIELD IN CDB Page Code This field specifies which page of vital p...

Page 67: ...tatus the target shall perform the INQUIRY command and shall not clear the unit attention condition Standard INQUIRY Data See ANSI SCSI 2 7 2 5 1 This standard INQUIRY data Table 3 12 contains 36 required bytes followed by a variable number of vendor specific parameters Bytes 56 through 95 if returned are reserved for future standardization 03 pm5 98 2 22 1 31 PM 34 ...

Page 68: ...ral Device Type RMB Device Type Modifier ISO Version ECMA Version ANSI Approved Version AENC Reserved Additional Length n 4 Reserved Reserved RelAdr WBus32 WBus16 Linked Reserved CmdQue SftRe Sync MSB MSB MSB Vendor Identification Product Identification Product Revision Level Vendor Specific Reserved Vendor Specific Parameters Vendor Specific LSB LSB LSB 03 pm5 98 2 22 1 32 PM 35 ...

Page 69: ...SCSI 2 if approved AENC Asynchronous Event Notification Capability 0b Reserved TrmIOP Terminate I O Process 0b not supported see ANSI SCSI 2 5 6 22 Response Data Format 2h INQUIRY Data Format is defined in SCSI 2 Additional Length 91 n 95 This field shall specify the length in bytes of the parameters If the allocation length of the command descriptor block is too small to transfer all of the param...

Page 70: ...oduct Revision Level 01 Black and White Binary Vital Product Data JBMS Japanese Business Machines Standard is defining standard Vital Product Data See JBMS 40 1990 Fujitsu Scanners also support this data by adding Fujitsu original extention JBMS 40 1990 uses 30 Bytes as standard VPD to describe specification and functions This data is obtained by setting EVPD bit to 1 and Page Code to F0h in INQUI...

Page 71: ... MSB MSB MSB Peripheral Device Type Page Number F0h J Version Reserved Page Length m 5 Basic X Resolution Basic Y Resolution Maximum X Resolution Maximum Y Resolution Minimum X Resolution Minimum Y Resolution Standard Resolution Window Width Window Length Function Reserved Vendor Unique Parameter Byte s LSB LSB LSB LSB LSB LSB LSB LSB LSB Res Step X Res Step Y 03 pm5 98 2 22 1 32 PM 38 ...

Page 72: ... IPC2 FFF0h with IPC2 This field indicates available resolution bit is set as as described in Table 3 14 This is applied to only for main scan direction Table 3 14 Standard Resolution unit Pixel Inch Bit Byte 17 18 7 60 240 6 75 300 5 100 320 3 150 480 2 160 600 1 180 800 0 200 1200 4 120 400 Window Width 00000980h 2432 dot for M3099GX 000006C0h 1728dot for M3099GH Window Length 00000D80h 3456 dot...

Page 73: ... Bit 4 to 7 are Reserved in JBMS Binary RGB Color Scanners support RGB Color set this bit to 1 Scanners do not support RGB Color set this bit to 0 Dither Halftone RGB Color Scanners support Dither Halftone RGB Color set this bit to 1 Scanners do not support Dither Halftone RGB Color set this bit to 0 Grayscale RGB Color Scanners support Grayscale RGB Color set this bit to 1 Scanners do not support...

Page 74: ... 94 97 95 100 7 6 5 3 2 1 0 4 MSB MSB MSB Reserved Reserved Physical Function Buffering Capability Implemented Standard Command Implemented Vendor Specific Command Implemented Vendor Unique Parameter Image Control Function Image Processing Function Compression Function Endorser Function Barcode Function Reserved LSB LSB LSB 03 pm5 98 2 22 1 32 PM 41 ...

Page 75: ...ex Endorser Barcode Operator Panel Reserved Bits of ADC Byte 32 33 Bit 1XXXXXXXb X1XXXXXXb XX1XXXXXb XXX1XXXXb XXXX1XXXb XXXXX1XXb XXXXXX1Xb XXXXXXX1b 0000nnnnb Buffering Capability 0080 0000h 8M Bytes Buffering Capability field indicates that interface buffering capability in bytes Implemented Standard Command 0000 0000 0000 0000 1110 1101 1011 1111b 0000EDBFh Implemented Standard Command field o...

Page 76: ...AN RECEIVE DIAGNOSTIC RESULTS SEND DIAGNOSTIC SET WINDOW GET WINDOW READ SEND OBJECT POSITION GET DATA BUFFER STATUS COMPARE COPY AND VERIFY WRITE BUFFER READ BUFFER CHANGE DEFINITION LOG SELECT LOG SENSE MODE SELECT 10 MODE SENSE 10 Reserved Reserved Reserved Reserved Reserved Reserved M M M O M M O O O O M M O M O O O O O O O O O O O O Code 00h 03h 12h 15h 16h 17h 18h 1Ah 1Bh 1Ch 1Dh 24h 25h 28h...

Page 77: ...ommand implemented by the scanner This field consists of 4 sets of 2 bytes structure as Table 3 19 Each bit position in these fields indicates lower 4 bits of the command code Implemented Vendor Specific Command field is subdivided to CXh DXh EXh FXh as Table 3 20 Table 3 19 2 bytes structure Bytes 42 43 44 45 46 47 48 49 Description Vendor Specific Command field CXh Vendor Specific Command field ...

Page 78: ...dor Unique Parameter 0Xh Vendor Unique Parameter 1Xh Vendor Unique Parameter 2Xh Vendor Unique Parameter 3Xh Vendor Unique Parameter 4Xh Vendor Unique Parameter 5Xh Vendor Unique Parameter 6Xh Vendor Unique Parameter 7Xh Vendor Unique Parameter 8Xh Vendor Unique Parameter 9Xh Vendor Unique Parameter AXh Vendor Unique Parameter BXh Vendor Unique Parameter CXh Vendor Unique Parameter DXh Vendor Uniq...

Page 79: ...Dither field indicates number of resident Dither patterns in 4 bits If zero is specified no dither pattern is available Number of Registerable Dither xxxx1000b 8 patterns Number of Registerable Dither field indicates registrable dither patterns in 4 bits If zero is specified no dither pattern is registrable Number of Resident Gamma Function 0100xxxxb 4 patterns Number of Resident Gamma Function fi...

Page 80: ... Threshold Circuit Simplified DTC Outline Extract Image Emphasis Automatic Separation Mirror Image White Level Follower Subwindow Error Diffusion Reserved Reserved Reserved Reserved Reserved Reserved Byte 88 89 Bit 1XXXXXXXb X1XXXXXXb XX1XXXXXb XXX1XXXXb XXXX1XXXb XXXXX1XXb XXXXXX1Xb XXXXXXX1b 1XXXXXXXb X1XXXXXXb XX1XXXXXb XXX1XXXXb XXXX1XXXb XXXXX1XXb XXXXXX1Xb XXXXXXX1b Image Processing Function...

Page 81: ...X1XXb XXXXXX1Xb XXXXXXX1b 00000000b Endorser Function 00000000 00000000b without ENDORSER 10000001 00000000b with ENDORSER Endorser Function field of upper 4bit indicates available endorser functions and lower 4bit indicates maximum Endorser Identifiers Table 3 26 Endorser Function Description Mechanical Endorser Stamper Electrical Endorser Reserved Maximum Endorser Identifiers Reserved Byte 92 93...

Page 82: ...ble if other information is available in any field 3 may be available if an unexpected disconnect occurred If the target has no other sense data available to return it shall return a sense key of NO SENSE and an additional sense code of NO ADDITIONAL SENSE INFORMATION The sense data shall be preserved by the target for the initiator until retrieved by a REQUEST SENSE command or until the receipt o...

Page 83: ... Sense Code Additional Sense Code Qualifier Field Replaceable Unit Code Sense Key Specific LSB LSB EOM ILI Sense key Reserved Error Code 70h Valid 1b Valid Information Segment Number 00h not supported Filemark 0b Reserved EOM End of Medium This bit of 1 indicates end of reading a window ILI Incorrect Length Indicator This scanner use this bit when total read image data is not equal to defined wind...

Page 84: ...ld typically use sense keys for high level error recovery procedures Additional sense codes provide further detail describing the sense key Additional sense code qualifiers add further detail to the additional sense code The additional sense code and additional sense code qualifier can be used by initiators where sophisticated error recovery procedures require detailed information describing the e...

Page 85: ...icates that the target detected a non recoverable hardware failure for example controller failure device failure parity error etc while performing the command or during a self test ILLEGAL REQUEST Indicates that there was an illegal parameter in the command descriptor block or in the additional parameters supplied as data for some commands FORMAT UNIT SEARCH DATA etc If the target detects an inval...

Page 86: ...nal sense bytes the additional sense length is not adjusted to reflect the truncation Command Specific Information 00000000h not supported ASC Additional Sense Code This field indicates further information related to the error or exception condition reported in the sense key field The additional sense code qualifier ASCQ indicates detailed information related to the additional sense code Field rep...

Page 87: ...hanical System Failure Optical System Failure Endorser Failure Endorser Fuse Blown INVALID COMMAND OPERATION CODE INVALID FIELD IN CDB LOGICAL UNIT NOT SUPPORTED INVALID FIELD IN PARAMETER LIST INVALID COMBINATION OF WINDOWS SPECIFIED Sense key 0 2 3 4 5 Additional Sense Code 00h 00h 80h 80h 80h 80h 43h 44h 80h 80h 80h 20h 24h 25h 26h 2Ch Additional Sense Code Qualifier 00h 00h 01h 01h 02h 03h 04h...

Page 88: ... test feature with the parameter list length of zero Table 3 31 SEND DIAGNOSTIC Command Bit Byte 0 1 2 3 4 5 7 6 5 3 2 0 4 MSB Operation Code 1Dh Reserved Parameter List Length Control UnitOfL LSB 1 PF Reserved SelfTest Logical Unit Number DevOfL PF Page Format 0b ignored SelfTest Self Test 1b SelfTest This bit is of one directs the target to complete its default selftest If the selftest successfu...

Page 89: ...rved Transfer Length Control LSB 1 Reserved Logical Unit Number The transfer length specifies the length in bytes of the data that shall be sent during the DATA OUT phase A transfer length of zero indicates that no window parameters data shall be transferred This condition shall not be considered as an error The window parameters data shall consist of a header followed by one or more window descri...

Page 90: ...rved Reserved Reserved Reserved Window Descriptor Length LSB 1 The window descriptor length specifies the length in bytes of a single window descriptor Each descriptor shall be of equal length The first forty eight bytes are defined in this standard and the remaining bytes in each descriptor are vendor specific 03 pm5 98 2 22 1 32 PM 57 ...

Page 91: ...B RIF MSB Window Identifier Reserved X Axis Resolution Y Axis Resolution X Axis Upper Left Y Axis Upper Left Window Width Window Length Brightness Threshold Contrast Image Composition Bit Per Pixel Halftone Pattern Bit Ordering Compression Type Compression Argument Reserved Vendor Specific Parameter Byte s Auto LSB LSB LSB LSB LSB LSB LSB LSB 1 Reserved Padding Type 03 pm5 98 2 22 1 32 PM 58 ...

Page 92: ...r inch A value of zero specifies the default resolution Y Axis Resolution 0 400dpi 200 240 300 400 dpi without IPC2 0 400dpi 50 to 400dpi at 1dpi step with IPC2 The y axis resolution field specifies the resolution in the base line direction The unit of measure is picture elements pixels per inch A value of zero specifies the default resolution X Axis Upper Left 0 to 14592 1 1200 inch for M3099GX 0...

Page 93: ...h field value L X Resolution XR Y Resolution YR 1 Maximum Scanning Area limitations 0 ULX W 14592 1 1200 inch for M3099GX 10368 1 1200 inch for M3099GH 0 ULY L 20736 1 1200 inch 2 Width and X Resolution limitation 9 XR W 1200 4864 dot for M3099GX 3456 dot for M3099GH 3 Length and Y Resolution limitation 1 YR L 1200 6912 line 4 Horizontal and Vertical limitation M3099GX only if 13200 11 ULX W 14592...

Page 94: ...t if it is supported Any other value indicates a relative contrast setting with 255 being the highest setting one being the lowest setting and 128 being the nominal setting Threshold 0 to 255 The threshold field specifies the threshold at which scan data is converted tobinary data A value of zero specifies the default threshold at automatic threshold control if it is supported Any other value indi...

Page 95: ...ts per pixel field specifies the number of bits used to represent the intensity of a single color Halftone Table 3 39 3 40 The halftone field specifies the level of halftone at which the scan data is converted to binary data The values in this field are vendor specific This halftone field is used in conjunction with the image composition field Fujitsu defines this field two subfields to fitst byte...

Page 96: ...ftone pattern Dither pattern 0 Dither pattern 1 Dither pattern 2 Dither pattern 3 Reserved Downloaded Pattern Reserved Reverse Image Format RIF 0b 1b with IPC2 A reverse image format RIF bit of zero inidicates that white pixels are to be indicated by zeros and black pixels are to be indicated by ones A RIF bit of one indicates that white pixels are to be indicated by ones and black pixels are to b...

Page 97: ... technique to be applied to the image data see Table 3 41 Table 3 41 Compression Types and Arguments Compression Code 00h 01h 02h 03h 04h to FFh Description No Compression CCITT Group III 1 dimensional CCITT Group III 2 dimensional CCITT Group IV 2 dimensional Reserved Compression Argument Reserved Reserved K factor Reserved Reserved Note K factor can be specified from 0 to 255 0 indicates K facto...

Page 98: ...ngth Image Processing Parameter Vendor Unique Identification Code 00h Image Processing Parameter Table 3 42 Table 3 42 Image Processing Parameter Bit Byte 40 41 42 43 44 45 46 47 48 49 50 51 52 53 54 57 58 61 62 63 7 6 5 3 2 0 4 MSB MSB Vendor Unique Identification Code Gamma Correction Outline Extract Image Emphasis Automatic Separation Mirroring SDTC parameter DTC mode Reserved White Level Follo...

Page 99: ...ifies Gamma Correction Table Table 3 43 Gamma Correction Table Value 00h 01h 02h 03h 04h to 7Fh 80h to 87h 88h to FFh Gamma Correction Table Default Normal Normal Soft Sharp Reserved Downloaded Gamma Table Reserved Outline Extract 00h 80h with IPC2 The outline extract field specifies contour extraction of image Table 3 44 Outline Extract Value 00h 01h to 7Fh 80h 81h to FFh Description Default Disa...

Page 100: ... Emphasis Smoothing Automatic Separation 00h 80h with IPC2 The automatic separation field specifies automatic separation function Table 3 46 Automatic Separation Value 00h 01h to 7Fh 80h 81h to FFh Description Default Disable Automatic Separation Reserved Enable Automatic Separation Reserved Mirroring 00h 80h with IPC2 This field specifies flip left and right of image Table 3 47 Mirroring Value 00...

Page 101: ...rameter This parameter specifies variance rate of threshold Table 3 48 SDTC parameter Value 00h 01h to 1Fh 20h to 3Fh 40h to 5Fh 60h to 7Fh 80h to 9Fh A0h to BFh C0h to DFh E0h to FFh Description Default Small Normal Big DTC Mode 0000h without IPC2 XXXXh with IPC2 The DTC Mode field specifies Dynamic Threshold Circuit mode parameters 03 pm5 98 2 22 1 32 PM 68 ...

Page 102: ...moothing Mode OCR Scanner Undefined Undefined Gradation Ordinal Image High Contrast Reserved Threshold Curve Light for OCR Dark Dark for Scanner Light Table 3 50 DTC Mode Byte 48 value bit 000xxxxxb 001xxxxxb 00x0xxxxb 00x1xxxxb 00xx1xxxb 00xx0xxxb 00xxx1xxb 00xxx0xxb 00xxxx1xb 00xxxx0xb 00xxxxx1b 00xxxxx0b Description Noise Removing Enable Disable matrix size 5x5 Disable Enable 4x4 Disable Enable...

Page 103: ...operation Table 3 51 White Level Follower value 00h 01h to 7Fh 80h 81h to BFh C0h C1h to FFh Description Default Depends on IMAGE COMPOSITION Reserved Enable Reserved Disable Reserved IMAGE COMPOSITION Enable Disable 00h 01h Barcode Window List 00000000b Reserved Subwindow List 00000000b Reserved 03 pm5 98 2 22 1 32 PM 70 ...

Page 104: ...xxxx0101b xxxx0110b xxxx0111b xxxx1000b xxxx1001b xxxx1010b xxxx1011b xxxx1100b xxxx1101b xxxx1110b xxxx1111b Description Undefined Undefined Standard Paper bits 4 to 0 enable Non Standard Paper Paper Width X Paper Length Y effective Image Transfer Top to Bottom Reserved Orientation Portrait Landscape Standard Paper Size Undefined Undefined Undefined A3 M3099GX Undefined M3099GH A4 A5 11 x17 M3099...

Page 105: ...h when Paper Size was specified as Non Standard Paper Notes 1 If the ADF is used and this parameter is not specified the paper is scanned as default paper size A3 for M3099GX or A4 for M3099GH 2 This Paper Size is assuming the document which will be fed through ADF The window area specified in window descriptor block Upper Left X Upper Left Y Width Length must be equal or less than specified paper...

Page 106: ...ion is requested that is not supported Table 3 54 OBJECT POSITION Command Bit Byte 0 1 2 3 4 5 6 7 8 9 7 6 5 3 2 1 0 Operation Code 31h Count Reserved Reserved Reserved Reserved Control Logical Unit Number Reserved 4 Bit Byte 0 1 2 3 4 5 6 7 8 9 MSB LSB Position Function This position function field specifies the requested function see Table 3 55 Table 3 55 Position Function Position Function 000b...

Page 107: ...be loaded and positioned to the base line If upon receipt of this command there is a object already loaded the target shall returns GOOD status This condition shall not be considered as an error If an object is not loaded and the target is unable to load an object the target shall return CHECK CONDITION status and set the EOM bit to one and the sense key to MEDIUM ERROR Count 000000h Reserved SEND...

Page 108: ...r number is depends on numbers of downloadable Gamma Function Table If higher identifier is specified CHECK CONDITION status is returned and Sense Key is set to ILLEGAL REQUEST For the other Data Type Code this field is reserved The transfer length specifies the number of blocks the target shall transfer from the initiator during the DATA OUT phase This scanner block size is defined as one byte by...

Page 109: ...e Mask Size Y direction Halftone Mask Size Reserved Reserved Halftone Mask Data 4 MSB MSB LSB LSB X direction Halftone Mask Size 8 This field specifies halftone mask size in x direction Y direction Halftone Mask Size 8 This field specifies halftone mask size in y direction X and Y direction halftone mask must be equal size 03 pm5 98 2 22 1 33 PM 76 ...

Page 110: ...1 D21 D31 D41 D51 D61 D71 D02 D12 D22 D32 D42 D52 D62 D72 D03 D13 D23 D33 D43 D53 D63 D73 D04 D14 D24 D34 D44 D54 D64 D74 D05 D15 D25 D35 D45 D55 D65 D75 D06 D16 D26 D36 D46 D56 D66 D76 D07 D17 D27 D37 D47 D57 D67 D77 X Y Transfer Order and Data ORDER DATA 0 00h 1 00h 2 00h 3 00h 4 00h 5 00h 6 00h 7 00h 8 00h 9 00h 10 00h 59 D60 60 D61 61 D62 62 D63 63 D64 64 D65 65 D66 66 D67 67 D70 68 D71 69 D72...

Page 111: ...and White The gamma correction table identifier field specifies identifier to distinguish the types of Gamma Correction Table Gamma Correction Table Order 00h Reserved The gamma correction table order field specifies order of color table to be transferred to target in Gamma Correction Table Data Bit Padding Type 00h Reserved The bit padding type field is reserved for extension of higher than 8bit ...

Page 112: ...PUT OUTPUT ORDER DATA 0 00h 1 00h 2 00h 3 00h 4 00h 5 00h 6 00h 7 00h 8 00h 9 00h 10 D0 11 D0 12 D0 13 D0 14 D0 15 D0 16 D0 17 D0 263 D253 264 D254 265 D255 D0 to D255 can be any 0 to 255 value Each data is one byte length Endorser Data See ENDORSER Command SCAN Command The SCAN command Table 3 59 requests the target begin a scan operation Table 3 59 SCAN Command Bit Byte 0 1 2 3 4 5 7 6 5 3 2 1 0...

Page 113: ...ndow to be scanned This command is mandatory when scanning in duplex mode by sending window identifier 00h 80h When scanning in simplex mode this command is not required but it can be available In the simplex mode only 00h front page is specifiable READ Command The READ command Table 3 60 requests that the target transfer data to this initiator Table 3 60 READ Command Bit Byte 0 1 2 3 4 5 6 7 8 9 ...

Page 114: ...Image Vendor Specific Halftone Mask Gamma Function Reserved Vendor specific Pixel Size Detected Paper Information Reserved Command READ SEND SEND READ READ Data Type Qualifier The data type qualifier field provides a means to differentiate data transfers of the same data type code The values used in this field are vendor specific This scanner uses this field for Image Data as follows Byte 4 Reserv...

Page 115: ...e residue between the requested transfer length and the actual number of blocks transferred The command shall be terminated with a status of RESERVATION CONFLICT if any reservation access conflict see ANSI SCSI 2 10 2 10 exists and no data shall be transferred Data Type Format Image Data DATA TYPE CODE 00h Pixel Coordinates in a document Top X direction Right x 1 0 x 1 1 x 1 2 x 1 y 2 x 1 y 1 x 2 ...

Page 116: ... DATA TYPE CODE 80h This data can be obtained only before reading image data which is set by SET WINDOW command The number of pixels can be calculated by formula as below Number of X pixels X Resolution Width 1200 Number of Y pixels Y Resolution Length 1200 These values are not required if number of pixels are calculated by initiator Table 3 62 Pixel Size Data Bit Byte 0 3 4 7 8 15 7 6 5 3 2 1 0 N...

Page 117: ...6 5 3 2 1 0 Reserved Job Separation Sheet Paper Size Reserved 4 Job Separation Sheet 00h 80h This field indicates if job separation sheet is detected Table 3 64 Job Separation Sheet Value 00h 01h 7Fh 80h 81h FFh Description Job Separation Sheet is not detected Reserved Job Separation Sheet is detected Reserved Paper Size This field indicates detected Paper Size by the scanner 03 pm5 98 2 22 1 33 P...

Page 118: ...eserved Reserved A3 or 11 x17 Note 1 M3099GX Reserved M3099GH A4 or 8 5 x11 Note 1 A5 Reserved Reserved Reserved Reserved Reserved B4 M3099GX Reserved M3099GH B5 Reserved Reserved Note 1 M3099GX cannot distinguish 11 x17 and A3 8 5 x11 and A4 M3099GH can not distinguish 11 x17 and A3 B4 2 When this scanner load paper by OBJECT POSITION command Load Object detect paper size assuming orientation is ...

Page 119: ...r Reserved 4 PF SP If an initiator sends a MODE SELECT command that changes any parameters that apply to other initiators the target shall generate a unit attention condition for all initiators except the one that issued the MODE SELECT command see ANSI SCSI 2 7 9 The target shall set the additional sense code to MODE PARAMETERS CHANGED PF Page Format 1b SCSI 2 format SP Save Pages 0b not save pag...

Page 120: ...t is a complementary command to the MODE SELECT 6 command Table 3 67 MODE SENSE 6 Command Bit Byte 0 1 2 3 4 5 7 6 5 3 2 1 0 Operation Code 1Ah Reserved Allocation Length Control Logical Unit Number Reserved 4 DBD Reserved PC Page Code DBD disable block descriptors 0b This bit of zero indicates that the target may return zero or more block descriptors in the returned MODE SENSE data see ANSI SCSI ...

Page 121: ...ted by the target the target shall return CHECK CONDITION status and shall set the sense key to ILLEGAL REQUEST and the additional sense code to INVALID FIELD IN CDB Mode Parameter The mode parameter list shown in Table 3 69 contains a header followed by zero or more block descriptors followed by zero or more variable length pages Table 3 69 Mode Parameter List Bit Byte 0 n 0 n 0 n 7 6 5 3 2 1 0 M...

Page 122: ...rameter Block Descriptor Length are Reserved for Scanner Device The mode page format is defined in Table 3 71 Table 3 71 Mode Page Format Bit Byte 0 1 2 n 7 6 5 3 2 1 0 Page Length Mode Parameter 4 PS Reserved Page Code Each mode page contains a page code a page code length and a set of mode parameters PS parameters savable 0b not saved When using the MODE SENSE command a parameters savable PS bit...

Page 123: ...AL REQUEST with the additional sense code set to INVALID FIELD IN PARAMETER LIST The target is permitted to implement a mode page that is less than the full page length defined by this standard provided no field is truncated and the page length field correctly specifies the actual length implemented a Lamp Timer page The Lamp Timer page provides to adjust the Turn Off time of fluorescent lamp Tabl...

Page 124: ...scription Disable Job Separation Sheet detection default Enable Job Separation Sheet detection Job Separation Sheet Parameter 00h Disable 80h Enable Job Separation Sheet Parameter field specifies Job Separation Sheet information in each bit Table 3 74 Job Separation Sheet Parameter Value 0xxxxxxxb 1xxxxxxxb If Bit7 1 then when Job Separation Sheet is detected CHECK CONDITION will be returned 03 pm...

Page 125: ... MSB LSB The transfer length specifies the length in bytes of the data that shall be sent during the DATA OUT phase A transfer length of zero indicates that no Endorser Descriptors shall be transferred This condition shall not considered as an error The length of an Endorser Descriptor is 4 bytes therefore Transfer Length must be multiple of 4 Otherwise CHECK CONDITION status will be returned and ...

Page 126: ...ould start printing STOP bit of one indicates that specified Endorser Data stop printing BACK 1b back side BACK bit of zero indicates that specified Endorser Data is applied to front side of the page BACK bit of one indicates that specified Endorser Data is applied to back side of the page Initial Counts 0000h to FFFFh 0 to 65535 Initial Counts specifies initial value of Endorser Data counter The ...

Page 127: ...B MSB REVS LSB LSB Reserved DIRS Reserved DECR Reserved CTSTEP DECR 0b CTSTEP add DECR bit of zero specifies CTSTEP value is added to endorser counter DECR bit of one specifies CTSTEP value is subtracted from endorser counter CTSTEP 00b no change 01b 10b 11b is checked CTSTEP field specifies value to be added to or to be subtracted from endorser counter after printing 1 and 2 are available If 0 is...

Page 128: ...ase point of endorser string is Upper Left likewise SET WINDOW Location of Endorser Strings is different from printer strings This specifies upper left corner of the rectangle Font 00h default Font field specifies character fonts to be printed One Endorser Data could have one font Table 3 78 Font Value 00h 01h to 7Fh 80h to FFh Description Default Reserved Downloaded Size 00h default Size field sp...

Page 129: ...ser String Length of zero is not considered as error The maximum printable string length in this scanner is 20 columns including endorser counter value This scanner supports only 05ud for endorser counter format This field can be exceeded 20 because of is two characters but it is recognized as one character Endorser Strings field specifies Endorser Strings to be printed Alpha numeric ASCII code 20...

Page 130: ...eset condition f an unexpected disconnect The STATUS phase normally occurs at the end of a command but in some case may occur prior to transferring the command descriptor block Table 3 80 Status Byte Bit 7 6 5 0 Reserved Status Byte Code Reserved 3 2 1 4 Table 3 81 Status Byte Code Bits of Status Byte 7 R R R R R R R R R Supported Supported Supported Supported Status GOOD CHECK CONDITION CONDITION...

Page 131: ...is unable to accept a command from an otherwise acceptable initiator i e no reservation conflicts The recommended initiator recovery action is to issue the command again at a later time RESERVATION CONFLICT This status shall be returned whenever an initiator attempts to access a logical unit or extent within a logical unit that is reserved with conflicting reservation type for another SCSI device ...

Page 132: ... required to end the MESSAGE OUT phase by negating ATN when it sends certain messages identified in Table 3 82 One byte Two byte and extended message formats are defined The first byte of the message determines the format as defined in Table 3 82 Table 3 82 Message Format Message See ANSI SCSI 2 6 5 Value 00h 01h 02h to 1Fh 20h to 2Fh 30h to 7Fh 80h to FFh Message Format One Byte Message COMMAND C...

Page 133: ...AGE REJECT NO OPERATION MESSAGE PARITY ERROR BUS DEVICE RESET IDENTIFY IDENTIFY SYNCHRONOUS DATA TRANSFER REQUEST Reserved Nefate ATN Before last ACK Yes Yes Yes Yes Yes Yes No Yes Direction Init M O O O M O M M M O M M O Targ M O O O M M M M M M O M O In In In In In In In Out Out Out Out Out Out Out Out M Mandatory support O Optional support In Target to initiator out Initiator to target Yes Init...

Page 134: ...fies the length in bytes of the extended message code plus the extended message arguments to follow Therefore the total length of the message is equal to the extended message length plus two A value of zero for extended message length indicates 256 bytes follow The extended message codes are listed in Table 3 85 The extended message arguments are specified within the extended message descriptions ...

Page 135: ...n if a target receives a second shall go to BUS FREE phase see unexpected disconnect ANSI SCSI 2 6 1 1 The treatment of other logical unit addressing errors is described in ANSI SCSI 2 7 5 Whenever an I_T_L nexus is established by an initiator that is allowing disconnection the Initiator shall ensure that the current pointers are equal to the saved pointers for that particular logical unit or targ...

Page 136: ...tion of ACK for the COMMAND COMPLETE message with the ATN signal false DISCONNECT Init Targ The DISCONNECT message is sent from a target to inform an initiator that the present connection is going to be broken the target plans to disconnect by releasing the BSY signal but that a later reconnect will be required in order to complete the current I O process This message shall not cause the initiator...

Page 137: ...ero specifies that the I O process is directed to or from a logical unit A LUNTAR bit of one specifies that the I O process is directed to or from a target routine This scanner supports direction to logical unit LUNTAR bit is zero only The logical unit number target routine number LUNTRN field specifies a logical unit number if the LUNTRN bit is zero The response to an invalid value in the LUNTRN ...

Page 138: ...nect shall cause the pointers to be restored to their defined prior status MESSAGE PARITY ERROR Init Targ The MESSAGE PARITY ERROR message is sent from the initiator to the target to indicate that it received a message byte with a parity error see ANSI SCSI 2 6 2 1 In order to indicate its intentions of during this message the initiator shall assert the ATN signal prior to its release of the ACK s...

Page 139: ...s message prior to requesting additional message bytes from the initiator This provides and interlock so that the initiator can determine which message byte is rejected After a target sends a MESSAGE REJECT message and if the ATN signal is still asserted then it shall return to the MESSAGE OUT phase The subsequent MESSAGE OUT phase shall begin with the first byte of a message NO OPERATION Init Tar...

Page 140: ... DATA POINTER message occurred for that nexus This scanner sends this message only when received a INITIATOR DETECTED ERROR during image data transfer SAVE DATA POINTER Init Targ The SAVE DATA POINTER message is sent from a target to direct the initiator to copy the current data pointer to the saved data pointer for the current I O process ANSI SCSI 2 6 4 for a definition of pointers SYNCHRONOUS D...

Page 141: ...SDTR message exchange establishes the permissible transfer periods and the REQ ACK offsets for all logical units on the two devices This agreement only applies to data phases Transfer Period Factor 62 4MB s max to 255 The transfer period factor times four is the value of the transfer period The transfer period is the minimum time allowed between leading edges of successive REQ pulses and of succes...

Page 142: ...required to be changed Each device when transmitting data shall respect the limits set by the other s SDTR message but it is permitted to transfer data with larger transfer periods smaller REQ ACK offsets or both than specified in the other s SDTR message The successful completion of an exchange of SDTR message implies an agreement as follows Implied Agreement Each device transmits data with a tra...

Page 143: ...ts for each SCSI device Unpowered or failing logical units may not be completely identifiable 3 The device type for each available logical unit 4 The manufacturer and model for each available logical unit this information may not be available for SCSI 1 devices 5 The critical device type information for each available logical unit 6 This information varies depending on the device type 7 Extended f...

Page 144: ...operations and internal test operations Once powered on initiators that have target capability should be prepared to respond to a selection within a system specific time Reset At power on time it is likely that an SCSI device has caused errors to the ongoing activities on the SCSI bus A bus reset should be generated to notify attached devices that any activities that may have been occurring should...

Page 145: ...device undergoes a device dependent initialization process This process is described for direct access devices sequential access devices and processor devices Other device initialization procedures are not described since they tend to be similar to one of these initialization procedures The initialization process takes into account the state of the device as identified during the verify state test...

Page 146: ...TEST UNIT READY 3 REQUEST SENSE 4 TEST UNIT READY 5 REQUEST SENSE 6 Figure 3 6 Verify State Test TEST UNIT READY 1 This TEST UNIT READY command is used to determine if any outstanding CHECK CONDITION or UNIT ATTENTION condition exists If not the device is indicated to be ready REQUEST SENSE 2 This REQUEST SENSE command is used to clear the outstanding CHECK CONDITION Most SCSI 2 logical units retu...

Page 147: ...ST SENSE command is used to clear the outstanding CHECK CONDITION This may be a NOT READY sense key or another unexpected error TEST UNIT READY 5 This TEST UNIT READY command is used to see if all outstanding CHECK CONDITION statuses have finally been cleared If so the logical unit is identified as ready REQUEST SENSE 6 This REQUEST SENSE command is used to determine why there is a persistent CHEC...

Page 148: ...le because SCAN or READ command automatically feeds in a document Start scanning operation This command is omissible because READ command automatically starts scanning Transfer image data from scanner READ command would be issued one or more The details of READ command sequence is 4 9 5 Feed out document from ADF This command is omissible because end of scanning automatically feeds out document Re...

Page 149: ...ne Mask and or Gamma Function data if required 1 2 This loop is used to scan a batch of document This loop is used to scan a batch of identical format window parameter document at maximum speed 1 2 Specify window parameters for front side 00h and back side 80h The window parameters must be sent in one SET WINDOW command Feed document into ADF This command is omissible because SCAN or READ command ...

Page 150: ...RVE UNIT Reserve exclusive use of the scanner 1 2 Specify document scanning parameter Send Halftone Mask and or Gamma Function data if required Start endorser function by sending identifier with STOP bit 0 Feed document into ADF This command is omissible because SCAN or READ command automatically feeds in a document Start scanning operation This command is omissible beacuse READ command automatica...

Page 151: ...r explanation TL Requested Transfer Length size bytes WD Window Data size defined by SET WINDOW command bytes If compression is specified the size is compressed data VD Scanned image data size in scanner memory bytes This value is varied on scanning progression M Transferred data size bytes N N VD div 65536 bytes TD Total Data that is transferred bytes When TL WD at first READ command it is called...

Page 152: ...D disconnect disabled IDENTIFY ARB SEL MO CMD Init Init Targ READ TL WD DI Image Data TL TD TL TD WD Yes EOM 1 TD WD STS MI BF GOOD COMMAND COMPLETE STS MI BF CHECK CONDITION COMMAND COMPLETE Yes No TD 0 Read End See Note 1 2 03 pm5 98 2 22 1 34 PM 119 ...

Page 153: ...t Targ READ TL M 0 VD TL DI Image Data 64KB N Yes No TD WD STS MI BF GOOD COMMAND COMPLETE STS MI BF CHECK CONDITION COMMAND COMPLETE Yes No Read End VD 64KB MI DISCONNECT BF VD TL M VD 64KB ARB Targ RESEL Targ Init MO IDENTIFY MI SAVE DATA POINTER MI RESEL ARB Targ Targ Init IDENTIFY MO DI Image Data TL M TD TL Yes EOM 1 TD WD Yes Yes Yes BF DISCONNECT M M 64KB N No No No No TD 0 See Note 1 2 03 ...

Page 154: ...nsfer the scanner sets EOM bit to 1 If initiator issues REQUEST SENSE command for each READ command Sense Key will be set to NO SENSE but by checking EOM bit completion of transfer can be detected EOM 0 Image data transfer is not completed EOM 1 Image data transfer has just completed Above specification is described in JBMS but it is not recommended for speed performance reason 3 After all image d...

Page 155: ...temperature 25 C 60 seconds At low temperature 5 C 5 minutes NOT READY status REQUEST SENSE Command NOT READY reported Other command Normal status READY status Waiting READ command Reading Scan completed C A status Hardware error Abnormal command Abnormal parameter Medium error C A status REQUEST SENSE command Error detail reported cleared Other command C A status released Other command GOOD statu...

Page 156: ...n RIF Reverse Image Format Outline Extraction Image Emphasis Automatic Separation Mirror Image Paper Size Simplified Dynamic Threshold Dynamic Threshold White Level Follower Halftone 1 01 3 4 3 Line Art 01 1 2 4 4 Specifiable and effective 1 Effective if automatic separation is specified otherwise ignored 2 Specifiable but not effective if image emphasis is specified 3 Specifiable but not effectiv...

Page 157: ...3 124 M3099GX GH OEM Manual 03 pm5 98 2 22 1 34 PM 124 ...

Page 158: ...power switch operation operator panel arrangement and functions messages and replacement of consumables The power switch is located at the right side of the scanner Figure 4 1 shows switch location Figure 4 1 Power switch location Power switch Power Switch Operation 04 pm5 98 2 22 1 35 PM 1 ...

Page 159: ...per Transport Unit WARNING Make sure that the upper transport unit is engaged in the LIFT up position on the LIFT up latch Operator panel Jammed document Closing the Upper Transport Unit WARNING Before lowering down the unit make sure that the area between the main machine and the upper transport unit is clear of all objects and fingers NOTICE Press the upper transport unit with both hands to secu...

Page 160: ...CD display 24 columns 2 lines 3 LEDs and 5 buttons Figure 4 2 shows layout of operator panel Operator Panel Operator panel function Table 4 1 lists button functions and Table 4 2 lists LED functions Figure 4 2 Operator panel layout Power Read Check Manual Mode 1 Mode 2 Stop Start LCD 24 columns 2 lines LCD 24 columns 2 lines 04 pm5 98 2 22 1 36 PM 3 ...

Page 161: ...operates in On line This button is used to indicate Start to scanner in TEST mode or SETUP mode at Off line This key is used to cancel temporary error while operating at On line This key is used to lower the hopper table to the bottom during waiting for Hopper Timer This key is used to display the abrasion counter during displaying the ready screen This button is used to select manual feeding mode...

Page 162: ...20 21 22 23 Operation Ready in Manual Feed mode 0 1 2 3 4 5 6 S 7 M c 8 a a 9 n n 10 u n 11 a e 12 l r 13 14 F R 15 e e 16 e a 17 d d 18 y 19 20 21 22 23 Warning 0 1 2 3 4 5 6 7 I 8 N 9 K 10 11 E 12 M 13 P 14 T 15 Y 16 17 18 19 20 21 22 23 The lower line is blinking and displays the ink empty of print head after the scanning operation This warning display will be reset when the covers are opened o...

Page 163: ... X 20 X 21 X 22 X 23 X Abrasion counter The abrasion counter is displayed after pressing STOP switch in the Ready screen In following case the display of counter is deleted The next Start Command is issued The valid switches are pressed The error is cleared IPC II pre set mode 0 1 2 3 4 5 6 S 7 c 8 a 9 n 10 n 11 e 12 r 13 14 R 15 e 16 a 17 d 18 y 19 20 21 22 23 When IPC II pre set mode is set an a...

Page 164: ...tarts document feeding By pressing Stop button in Off line mode the scanner stops document feeding The Stop button is also used in On line mode to cancel temporary error condition Mode 1 button This button is used to transit to Off line SETUP mode when Power on By pressing Mode 1 button and turn on the Power switch this scanner starts up in SETUP mode Mode 2 button This button is used to transit t...

Page 165: ...ning Temporary errors Equipment errors Message Warming up Now Scanner Ready INK EMPTY 1 PAPER JAM HOPPER EMPTY COVER OPEN MISS PICK ROLLER UNIT NOT SET PRINT HEAD NOT SET 1 PRINT HEAD ALARM 1 HOPPER OVERLOAD HOPPER ALARM TRANSPORT ALARM LAMP ALARM 1 HEATER ALARM 1 LAMP ALARM 2 HEATER ALARM 2 CCD UNIT ALARM 1 CCD UNIT ALARM 2 TEMP ALARM FUSE ALARM PRINT RAM ALARM PRINT 1 TIME OUT ALARM PRINT 1 HARD...

Page 166: ...per table Extension Hopper table 1 Set the specified document width Hold the lock lever at the guide center on the right of the hopper table and move it horizontal to set the document width 2 Load a document read side face up on the hopper table Note 1 Be sure not to load documents higher than the line marked inside the guide on each side of the hopper table 2 If the documents are too long pull ou...

Page 167: ...end the stacker table for long documents And also use stopper for small documents Load a document about 20 mm a part from the stopper Document Stacker table Stacker Stopper Document about 20 mm Stopper Lamp Replacement The scanner has two lamps one for front side reading and other for back side reading Replace the lamps as follows WARNING Never replace lamp without turning off the power WARNING Wa...

Page 168: ...he lamp sockets CAUTION Be careful not to pull the wire of the heater hard Upper transport unit Operator panel Lever Power switch 3 Remove the two lamp socket covers U shaped spring clips by pulling them out of their positions Wire of the heater Lamp Upper transport unit Lamp socket covers Replacing the front side lamp 1 Turn off the power switch 2 Open the upper transport unit See page 4 2 ...

Page 169: ... contact manufacturer s authorized service center for proper repair service 6 Re attach a new lamp to the C shaped heater Note Position the lamp so that the following lengths are the same a1 a2 b1 b2 Window Window transparent part Cross sectional view of lamp and heater a1 a2 b1 b2 Heater 5 Separate the C shaped heater assembly from the lamp body gently ...

Page 170: ...ON 7 To re install lamp heater reverse procedures in item 4 above Note When re stalling the lamp make sure to rotate the lamp in the direction as shown in the left figure Window Front Rear Socket 8 Close the upper transport unit See page 4 2 ...

Page 171: ... screw to unlock the lamp unit and pull the unit out of the machine 4 Rotate the lamp so that the two terminals on each end align with the exit slot on the lamp socket Maintain the alignment and remove the lamp from the lamp sockets CAUTION Be careful not to pull the wire of the heater hard Wire of the heater Lamp Lamp unit Heater Side cover Power switch Thumb screw Lamp unit ...

Page 172: ...eater If any visible damage on the heater is observed please contact manufacturer s authorized service center for proper repair service 6 Re attach a new lamp to the C shaped heater Note Position the lamp so that the following lengths are the same a1 a2 b1 b2 Window Window transparent part Cross sectional view of lamp and heater a1 a2 b1 b2 Heater ...

Page 173: ...nd insert the lamp unit completely Then turn the thumb screw completely to avoid cover open error 9 Attach the side cover Replace the roller ASY as follows WARNING Wait at least 3 minutes after turning off the power before replacement Roller ASY Replacement Power switch Lever 1 Turn off the power switch 2 Open the upper transport unit See page 4 2 Window Socket Lamp unit Thumb screw Operator panel...

Page 174: ...p it at the upper position with one hand and pull the roller ASY out with the other hand 6 Install a new roller ASY and return the document sensor unit to its original position 7 Push the two levers green towards each other to dis engage with the lower locking holes and lift them up until they engage with the two upper locking holes 8 Connect the two relay connectors on the roller ASY front 3 pin ...

Page 175: ...each other to remove 4 Install a new pick rollers and put the U shaped clips on the pick roller shaft 5 Close the upper transport unit See page 4 2 Pick Roller Replacement Upper transport unit Operator panel Power switch Lever Pick roller U shaped clip Pick roller section White mark NOTICE When you install pick rollers make sure that the white marks on the side of the both pick rollers be in the r...

Page 176: ... down the two levers until they engage with the two levers locking holes Guide Guide plate Hopper table 5 Lift the document sensor unit and keep it at the upper position with one hand and pull the roller ASY out with the other hand 6 Move the guide on the hopper table completely to the end Belt Replacement 1 Turn off the power switch Make sure that the hopper table is at the bottom 2 Open the uppe...

Page 177: ... a new belt by following step 7 to 10 in reverse Align the bracket on the shaft as shown in the figure 12 Lift the document sensor unit and keep it at the upper position with one hand and pull the roller ASY out with the other hand 13 Close the document sensor unit downward Belt Bracket 9 Separate the belt roller and shaft from the guide plate 10 Detach the belt from the roller ...

Page 178: ... engage with the lower locking holes and lift them up until they engage with the two upper locking holes 15 Connect the two relay connectors on the roller ASY 16 Close the upper transport unit See page 4 2 Pad Replacement Operator panel Lever Lever green Roller ASY 3 Disconnect the two relay connectors on the roller ASY 4 Push the two levers green towards each other to disengage with the upper loc...

Page 179: ...6 Move the guide on the hopper table completely to the end 7 Hold both ends of the guide plate and press them down to remove the guide 8 Press the bracket in the direction A and detatch the bracket and pad Note When assembling the pad align the holes on the pad with the projection of the guide plate Guide Guide plate Hopper table Bracket Guide plate Pad A ...

Page 180: ...ath Then close the unit Return the jammed or double fed document to the hopper and read it again PAPER JAM The normally read document is ejected to the stacker and the mechanism system is stopped to suspend the read operation Temporary Error is returned to the host computer and an error message is displayed on the LCD display The hopper table is lowered to the bottom 1 More detailed error messages...

Page 181: ... is returned to the host computer and an error message is displayed on the LCD display The hopper empty sensor SHE goes on during reading The read operation is terminated normally After the document is ejected into the stacker the hopper table is lowered When a START READ or SENSE command is received from the host computer Temporary Error is returned This status is not detected in the manual mode ...

Page 182: ...he stacker Then the mechanism system is stopped Temporary Error is returned to the host computer and an error message is displayed on the LCD display The hopper table is lowered to the bottom The ADF roller ASY is not mounted correctly The documents loaded on the ADF exceed the specified number of pages Close the upper transport unit or the endorser cover Or turn the thumb screw to lock the back s...

Page 183: ...gain If the error message is displayed on the LCD display again change the print head Table 5 2 lists the scanner and operator actions for equipment errors Table 5 2 Device and operator actions for equipment errors LCD display Scanner actions Action to recover The Check lamp lights and an error message is displayed on the LCD display The mechanism system is stopped The Check lamp lights and an err...

Page 184: ...ker and the mechanism system is stopped Check if the lamp or heater is attached correctly Replace lamp according to the replacement method If turning the power on again does not recover the scanner contact the maintenance staff EEPROM ALARM RAM 6 to 9 ALARM V RAM 1 to 4 ALARM The Check lamp lights and an error message is displayed on the LCD display The FAIL signal on HARDWARE ALARM If turning the...

Page 185: ...5 6 M3099GX GH OEM Manual 05 Chapter 5 98 2 22 1 51 PM 6 ...

Page 186: ... out color and job separation sheet for the scanner Figure 6 1 shows document sizes which the scanner can read For M3099GH however maximum size of A3 can be fed through the scanner 6 CHAPTER Document Size Feeding direction Maximum Minimum A 216 297 Scanner M3099GH M3099GX B 356 432 A 76 76 B 63 63 Unit mm A B Figure 6 1 Document size 06 Chapter 6 98 2 22 1 51 PM 1 ...

Page 187: ...fully fed by ADF before performing a reading operation Ream weight The ream weight is as follows 45 to 110 kg 13 9 to 34 lb 52 to 127 g m2 Note Ream weight is a weight of 1000 sheets of paper whose size is 788 mm x 1091 mm Precautions Be careful to scan the following documents Preliminary document feed test may be necessary to avoid the unexpected errors If the document slips in ADF JAM error or d...

Page 188: ... square NOTICE Do not feed important original document so as not damage it in rare case When scanning a translucent document set the density to light mode To prevent roller smudging avoid scanning a document filled out in pencil Clean the roller as often as possible when scanning many document Once every 1000 pages is recommended The chemical composition of some carbonless papers reacts with the r...

Page 189: ...2 to avoid document size detection error or job separation sheet detection error or jam Document Limitations Top of the paper More than 30 mm Less than 5 mm Read surface Feed direction Read surface Feed direction Top of the paper More than 30 mm Less than 3 mm Figure 6 2 Areas that must not be perforated 113 134 79 96 12 12 10 10 10 10 10 10 15 Front side Reading surface Document feeding direction...

Page 190: ... in rare case result a double feed error Figure 6 3 shows print prohibit areas on the front and back surfaces Note Figure 6 3 shows the document as viewed from the reading surface Figure 6 3 Print prohibit areas on the front and back surfaces 113 134 79 96 10 15 Document feeding direction Unit mm Top of document Bottom of document Center of document 10 34 10 10 Area A Area B Reading reference posi...

Page 191: ...ut color If the drop out color cannot be specified select Photo for the document type line drawing or photograph For details of the drop out color see next Section Grounding Color Area Figure 6 4 Grounding color area Main scanning direction Reading reference Grounding color white or drop out color area 3 Subscanning direction 06 Chapter 6 98 2 22 1 51 PM 6 ...

Page 192: ...ows in Figure 6 5 is used to measure print density The measurement must be made in one of the following ways A light source using fluorescent G54 Macbeth PCS meter PCM II is used which requires a filter Drop out Color Figure 6 5 Spectrum band Drop out color standards In the spectrum of fluorescent lamp G54 the PCS value must satisfy the following standards Maximum 0 14 or less Average 0 1 or less ...

Page 193: ...Separation Sheet Figure 6 6 Shape of document Document type The document type and ream weight specifications given in page 6 2 However the document size shall be A4 or larger 210 mm or more wider 15 15 Center of document more than 210 mm Scanning direction Unit mm 06 Chapter 6 98 2 22 1 51 PM 8 ...

Page 194: ...0 000 sheets or one year Requires two per scanner Up to 600 000 sheets or one year This part contains Pick Roller but the life of the Roller Units does not include the life of the Pick Roller Up to 300 000 sheets or one year Up to 600 000 sheets or one year This part includes Separation Belt but the life of the Belt Assembly does not include the life of the Separation Belt Up to 300 000 sheets or ...

Page 195: ...OEM Manual Table 7 2 lists accessories of the scanner Table 7 2 Accessories Accessories Name Power cable 100 V or 200 V Operator s guide Terminator Consumable kit Remark Quantity 1 1 1 1 07 Chapter 7 98 2 22 1 52 PM 2 ...

Page 196: ...nd Frequencies Locations Front side lamp Roller and belt Transport path Glass surface Sensor tops Tools Dry cloth Cleaning sheet Cleaner F2 Dry cloth and isopropyl alcohol Frequencies Every 50 000 sheets Every 50 000 sheets Document width detection Document detection Front side reading timing detection Ejection detection Dry cloth and isopropyl alcohol Note Depending on use it may be necessary to ...

Page 197: ...e used for steel rollers Cleaning Tools This section provides instructions on how to clean each section of the scanner WARNING Wait at least 3 minutes after turning off the power before cleaning Procedure Cleaning the front side lamp 1 Turn off the power switch 2 Open the upper transport unit See page 4 2 3 Remove the two lamp socket covers U shaped spring clips by pulling them out of their positi...

Page 198: ...mp from the lamp sockets CAUTION Be careful not to pull the wire of the heater hard 5 Clean the lamp with a dry cloth CAUTION Be careful not to peel the tape on the heater If any visible damage on the heater is observed please contact manufacturer s authorized service center for proper repair service Lamp Wire of the heater Upper transport unit 08 Chapter 8 98 2 22 1 53 PM 3 ...

Page 199: ...oss sectional view of lamp and heater a1 a2 b1 b2 Heater 7 Close the upper transport unit See page 3 5 Window Front 6 To re install lamp heater reverse procedures in item 4 above Note When re installing the lamp make sure to rotate the lamp in the direction as shown in the left figure Rear Socket 08 Chapter 8 98 2 22 1 53 PM 4 ...

Page 200: ... it with the left guide 3 Press MODE2 twice MODE1 once then START The hopper table goes up and the cleaning sheet is transported 4 By aligning with the right guide place the same cleaning sheet on the hopper table with the adhesive side up 5 Transport the cleaning sheet by the switch operations of 3 6 Place a new cleaning sheet on the hopper table with the adhesive side down and repeat steps 2 to ...

Page 201: ...per transport unit See page 4 2 2 Apply a small amount of cleaner F2 to a Q Tips While turning the roller slowly wipe its surface with Q Tips Cleaning the transport paths Clean the transport paths as follows 1 Open the upper transport unit See page 4 2 2 Wipe the transport paths with a dry cloth or cloth soaked in isopropyl alcohol Use a vacuum cleaner when removing paper dust from the paths 3 Clo...

Page 202: ...with a dry cloth or cloth soaked in isopropyl alcohol 4 Re install the sheet guide assembly 5 Close the upper transport unit See page 4 2 Cleaning the sensors Document width detection sensor Clean the four document width detection sensors as follows 1 Open the upper transport unit See page 4 2 2 Hold the handles of the document sensor unit and keep the unit open 3 Wipe the top of the four sensors ...

Page 203: ...ean the document detection sensor as follows 1 Open the upper transport unit See page 4 2 2 Hold the handles of the document sensor unit and keep the unit open 3 Wipe the two sensor windows a and b with a dry cloth or cloth soaked in isopropyl alcohol 4 Close the document sensor unit 5 Close the upper transport unit See page 4 2 a b ...

Page 204: ...f the upper transport unit with a dry cloth or cloth soaked in isopropyl alcohol 3 Close the upper transport unit See page 4 2 Ejection sensor Clean the ejection sensor as follows 1 Open the upper transport unit See page 4 2 2 Wipe the top of sensor at the rear center of the device with a dry cloth or cloth soaked in isopropyl alcohol 3 Close the upper transport unit See page 4 2 Sensor Sensor Lam...

Page 205: ...8 10 M3099GX GH OEM Manual 08 Chapter 8 98 2 22 1 53 PM 10 ...

Page 206: ...od Characters Alphabet A to Z a to z Number 0 1 to 9 Symbol _ blank Maximum number 20 of characters Character size 2 9 1 5 mm 0 11 0 06 hight width Character pitch Approx 2 54 mm 0 1 Print area Back side of the document A 5 mm 0 2 B 28 mm 1 1 C 20 mm 0 79 D 5 mm 0 2 Figure A 1 Print area A C D B Read reference position Center of the document Feed direction ABC ST Back side A 1 Appendix A 98 2 22 2...

Page 207: ...ed press Mode 1 until OFF blinks Then press Mode 2 to turn the endorser ON Screen 3 If you want to set the status in EEPROM go to 5 Then if you want to close the job go to 6 and 7 NOTICE Set the endorser ON only when you use endorser or the characters may be printed on every scanned document A2 2 How to set the initial number Initial number is the number which the scanner starts printing or return...

Page 208: ... Screen 1 press Mode 1 nine times to go to the ENDORSER RESET METHOD screen Screen 7 9 Press Mode 2 to see Screen 8 If ON is displayed the print number will be reset when HOPPER EMPTY is detected If OFF is displayed it wouldn t The ON or OFF status flips each time you press Mode 1 The status will be set in EEPROM automatically 10 If you want to return to Screen 7 press Mode 2 If you want to close ...

Page 209: ... If you want to reset the counter press Mode 2 And you can see Screen 14 for 3 sec If you don t want it press Mode 1 to go to Screen 12 If you want to close the job go to 7 A2 6 How to test the printing by the operator panel operation You can check the print result by the following procedures 15 Set the endorser ON by the procedure of the section A2 1 16 While pressing the Mode 2 turn the power of...

Page 210: ... Replacing the print head When INK EMPTY is displayed in LCD display the operator is responsible to change the print head as follows 1 Open and remove the endorser cover at the rear top corner of the scanner Power of the scanner will turn off if the power is on at cover open 2 Turn the print head lock lever up then replace the print head 3 Attach the new print head in the endorser and turn the pri...

Page 211: ...n in mainscanning direction manually The position you can set is limited as stated in section 1 1 Open and remove the endorser cover at the rear top corner of the scanner Power of the scanner will turn off if the power is on at the cover open 2 Pinch the tab near the print head and slide it to the position you want to print The print position is indicated by the indicater behind the tab and the la...

Page 212: ...n 1 2 After a while the LCD displays the SETUP MODE initial screen Screen 2 3 Press the Mode 1 to go to the SETUP MODE menu screen Press the Stop to go to the readable status Screen 3 B 1 Activating the setup mode When Mode1 button is pressed at power on 1 Press the Mode1 button 2 The device goes online POWER ON IRAS WAIT Warm up Setup mode 1 2 B 2 Operational transition in the setup mode Warming ...

Page 213: ... Set in EEPROM whethr the buzzer function is on or off Set in EEPROM whether pre picking is done for fast reading or not Set in EEPROM the LCD contrast Set in EEPROM whether pick speed is fast or slow Set the using of endorser and the initial number The set value is able to be stored in EEPROM Set in EEPROM whether the number is reset by hopper empty detection Reset the number to initial value Res...

Page 214: ...s each time you press Mode 2 6 Press Mode 1 to see Screen 6 This means how to defect the double feed as follows 1 is the method by comparing with the length of the first paper 2 is the method by the output of Document detection sensor in addition to 1 At Screen 6 press the Mode 2 until the number changes as you want 7 Press Mode 1 to see Screen 7 This means the length to compare with the paper bas...

Page 215: ...ed Scanner may mistake to detect the Double feed rarely In case of this please test to scan the thin papers in advance SETUP MODE IPC 2 SET Screen 8 IPC 2 SET No Screen 9 IPC 2 SET X Screen 10 B3 2 Setting IPC 2 pre set mode When you set the using of IPC 2 pre set mode you must set as follows 10 At Screen 2 press Mode 1 twice to go to the IPC 2 SET screen Screen 8 11 Press Mode 2 to see Screen 9 o...

Page 216: ...ackground and light character 3 Dark background and normal density character 4 Light character on red paper 5 Light character on green paper Notice 1 For patterns 1 to 5 when the power is turned on Check that IPC 2 for front back sides are installed during initialization If IPC 2 for either the front or back side is not installed the scanner regards as no setting obligatory and changes the memory ...

Page 217: ...extraction DTC Valid Invalid B3 3 Reset of abrasion counter When you reset the abrasion counter you must set as follows D At Screen 2 press Mode 1 three times to go to the PAPER COUNT RESET screen Screen 13 E Press Mode 2 to see Screen 14 You may see current paper count If you want to reset the count press Mode 2 And you can see Screen 15 for 3 seconds If you don t want it press Mode 1 to go to Sc...

Page 218: ...cally 19 If you want to return to Screen 16 press Mode 2 When yo close the setup mode go to 9 B3 5 Setting pre pick When you set the using pre pick you must set as follows 20 At Screen 2 press Mode 1 five times to go to the PREPICK SET screen Screen 18 21 Press Mode 2 to see Screen 19 If ON is displayed the pre picking will be done when the document is fed If OFF is displayed it wouldn t The ON or...

Page 219: ... When all fields are filled by next pressing Mode 1 stars from all The lightest contrast 26 Press Mode 2 to see Screen 20 The settings are stored to EEPROM 27 When you close the setup mode go to 9 B3 7 Setting pick speed When you set the pick speed you must set as follows 28 At Screen 2 press Mode 1 seven times to go to the PICK SPEED SET screen Screen 22 29 Press Mode 2 to see Screen 23 The defau...

Page 220: ...e is from 00000 to 65535 NOTICE If the specified value exceeds acceptable range returning to SETUP menu is failed Method of Increment In case of the initial value is 00001 NOTICE When it is not set depending on operator panel by host no blinking You can not change the setting When the setting is set ON depending on operator panel the direction of printing is 20 mm from read reference position B3 9...

Page 221: ...u must set as follows 31 At Screen 2 press Mode 1 twelve times to go to the SCSI ID SET screen Screen 24 32 Press Mode 2 to see Screen 25 The default setting is 5 33 At Screen 25 the SCSI ID is from 0 to 7 each time you press Mode 1 34 Press Mode 2 to see Screen 24 The settings are stored to EEPROM 35 When you close the setup mode go to 9 B3 13 Setting Product ID When you set the Product ID you mu...

Page 222: ...cking start time you must set as follows 41 At Screen 2 press Mode 1 fourteen times to go to the PICK START TIME screen Screen 28 42 Press Mode 2 to see Screen 29 The default setting is 1 sec 43 At Screen 29 press Mode 1 until the digit you want to change blinks Then press Mode 2 until the digit changes as you want The specifiable range is from 0 2 to 29 8 sec in 0 2 sec step 44 Press Mode 1 and M...

Page 223: ...o EEPROM j When you close the setup mode go to 9 B3 16 Setting time out limit When you set the time out limit you must set as follows k At Screen 2 press Mode 1 sixteen times to go to the TIME OUT SET screen Screen 32 l Press Mode 2 to see Screen 33 The default setting is 30 sec m At Screen 33 press Mode 1 until the digit you want to change blinks Then press Mode 2 until the digit changes as you w...

Page 224: ...EEPROM 60 When you close the setup mode go to 9 B3 18 Setting heater control When you set the heater control you must set as follows 61 At Screen 2 press Mode 1 eighteen times to go to the HEATER CONTROL screen Screen 36 62 Press Mode 2 to see Screen 37 If ON is displayed the heater control will be done If OFF is displayed warming up will finish within 30 sec necessarily When the heater is broken ...

Page 225: ...M3099GX GH OEM Manual B 14 A 3 Appendix B 98 2 22 2 42 PM 14 ...

Page 226: ... each other to dis engage with the upper locking holes and lower down the two levers until they engage with the two levers locking holes APPENDIX C SEPARATION PRESSURE ADJUSTMENT Adjust the separation pressure as follows WARNING Wait at least 3 minutes after turning off the power before replacement ACHTUNG Warten Sie mindestens 3 Minuten nach Ausschalten bevor Sie mit dem Austausch beginnen Roller...

Page 227: ...down to remove the guide 8 Adjust the separation pressure by using the separa tion pressure adjustment lever according to paper feed error as follows Slip feed Turn clockwise by 45 In crease the separation pressure Double feed Turn counter clockwise by 45 Decrease the separation pres sure Notice If the paper feed error reccur try this adjustment again until the lever stops Hopper table Guide Guide...

Page 228: ...method to detect the difference between text and photos and choose the thresholding accordingly Automatic separation allows the scanner to switch between line mode and half tone mode in one pass Automatic start mode A mode that the scanner starts to read by the command from the host machine Bit The smallest unit of information in computer memory A bit is a single digit either a 1 or a 0 in the bin...

Page 229: ...ed densities Density data for adjacent pixels is modified by diffusing errors on the objective pixel into several pixels which are than binarized This maintains high grayscale levels and resolution during reading while suppressing moire patterns by dotted halftone images such as newspaper photo graphs Filtering The quality of images written in pencil or ballpoint pen and readed depends on the refl...

Page 230: ...a IPC II Image processing option of this scanner Letter size A standard paper size used in the U S A and other countries Paper is 8 1 2 x 11 inches 215 9 x 279 4 mm Manual mode A mode that the operator can put the document on the hopper one by one A document on the hopper can be read automatically Manual start mode A mode that the scanner starts to read by pressing the START button on the operator...

Page 231: ...tandard computer interface Information is transferred between devices over a single wire although other wires are used for control With a serial interface an interface cable greater than 3 meters 10 feet can be used This is often necessary in networking environments where the scanner may be shared Smoothing Smoothing eliminates jaggies from slanted lines and curves Irregular convexities are delete...

Page 232: ...ies 8 1 Cleaning the glass surface 8 7 Cleaning the rollers 8 5 Cleaning the sensors 8 7 Cleaning the transport paths 8 6 Cleaning Tools 8 2 Closing the Upper Transport Unit 4 2 COMMAND COMPLETE Init Targ 3 103 COMMAND Phase 3 22 Command Sequence 3 110 Commands 3 27 Configuration 1 5 Configuration of the scanner 1 5 Consumables 7 1 CONSUMABLES AND ACCESSORIES 7 1 Control circuit MPU 1 8 Control un...

Page 233: ...ODE SENSE 6 Command 3 87 Motor driver circuit 1 8 Multiple READ disconnect disabled 3 119 Multiple READ disconnect enabled 3 120 Drop out color standards 6 7 Duplex circuit back side 1 8 Duplex Scanning 3 116 E Ejection sensor 8 9 Electrical Specifications 2 2 ENDORSER Command 3 92 Endorser Control 3 117 Environmental Specifications 2 2 ERROR PROCESSING AND RECOVERY 5 1 F Features 1 4 filtering 1 ...

Page 234: ...ns 6 2 Pre pick B 2 B 7 Print density measurement 6 7 Print prohibit areas on the front and back surface 6 5 Procedure 8 2 Product ID B 2 B 10 R READ Command 3 80 READ command sequencces and phase progression 3 118 Reading counter 4 6 Ream weight 6 2 RELEASE UNIT Command 3 31 Replacing the back side lamp 4 14 Replacing the front side lamp 4 11 REQUEST SENSE Command 3 49 RESELECTION 3 18 RESELECTIO...

Page 235: ... Stacker 1 6 Standard INQUIRY Data 3 34 Status 3 97 STATUS Phase 3 23 Superseding Reservations 3 31 Synchronous Data Transfer 3 21 SYNCHRONOUS DATA TRANSFER REQUEST 3 107 System Initialization 3 110 T TEST UNIT READY Command 3 32 Timing 3 11 Time out limit B 2 B 12 Transfer Period 3 15 V Vendor Unique Parameters 3 65 Verify State Test 3 112 Video circuit front side back side 1 8 Vital Product Data...

Page 236: ... Sales Fully Well Well Reference Maintaining Operating Covered illustrated Organized Publication No Rev Letter Title Current Date What is your overall rating of this publication What is your occupation Very Good Fair Very Poor Good Poor Your other comments may be entered here Please be specific and give page paragraph and line number references where applicable Your Name Return Address Z3 ComForm ...

Reviews: