3.1 Main Dialog Box Functions
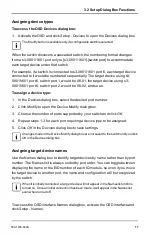
To disconnect from a target device:
Press Print Screen and then Alt+0 (zero). This leaves the user in a free state, with
no target device selected. The status flag on your desktop displays
Free
.
Soft switching
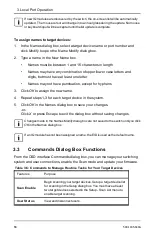
Soft switching is the ability to switch target devices using a hotkey sequence. You
can soft switch to a target device by pressing Print Screen and then, depending
on the method you’ve selected, typing the first few characters of its name or
number. If you have set a Screen Delay Time for the OSD and you press the key
sequences before that time has elapsed, the OSD will not display.
To soft switch to a target device:
1.
Press Print Screen and type the port number the first few letters of the name
of the target device to establish it as unique and press Enter.
2.
To switch back to the previous target device, press Print Screen then
Backspace.
Viewing the status of your switching system
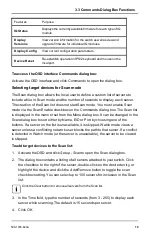
The status of target devices in your system is indicated in the far right columns of
the Main dialog box. The following table describes the status symbols.
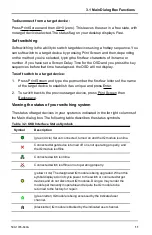
Symbol
Description
(green circle) Server connected, turned on and the IQ module is online.
Connected target device is turned off or is not operating properly, and
the IQ module is offline.
Connected switch is online.
Connected switch is offline or not operating properly.
(yellow circle) The designated IQ module is being upgraded. When this
symbol displays, do not cycle power to the switch or connected target
devices and do not disconnect IQ modules. Doing so may render the
module permanently inoperable and require the IQ module to be
returned to the factory for repair.
(green letter) IQ module is being accessed by the indicated user
channel.
(black letter) IQ module is blocked by the indicated user channel.
Table 3.2: OSD Interface Status Symbols
590-1035-640A
11
Summary of Contents for Control 3-0801
Page 2: ......
Page 3: ...KVM s3 0801 1601 Installer User Guide Edition February 2011 ...
Page 6: ...Contents 590 1035 640A 6 ...
Page 8: ...1 Product Overview 590 1035 640A 2 ...
Page 28: ...3 Local Port Operation 590 1035 640A 22 ...
Page 44: ...4 Web Interface Operations 590 1035 640A 38 ...
Page 46: ...5 Flash Upgrades 590 1035 640A 40 ...
Page 50: ...6 UTP Cabling 590 1035 640A 44 ...
Page 56: ...8 Sun Advanced Key Emulation 590 1035 640A 50 ...
Page 58: ...9 Technical Support 590 1035 640A 52 ...
Page 59: ......
Page 60: ......
Page 61: ...KVM s3 0801 1601 Installations und Bedienungsanleitung Ausgabe Februar 2011 ...
Page 64: ...Inhalt 590 1035 640A 6 ...
Page 66: ...1 Produktüberblick 590 1035 640A 2 ...
Page 74: ...2 Installation 590 1035 640A 10 ...
Page 90: ...3 Betrieb des lokalen Ports 590 1035 640A 26 ...
Page 108: ...4 Verwenden der Weboberfläche 590 1035 640A 44 ...
Page 114: ...6 UTP Verkabelung 590 1035 640A 50 ...
Page 120: ...8 Tastenemulation für Sun Zusatztasten 590 1035 640A 56 ...
Page 122: ...9 Technischer Kundendienst 590 1035 640A 58 ...
Page 123: ......
Page 124: ......
Page 125: ...KVM s3 0801 1601 Guide d installation et d utilisation Édition de février 2011 ...
Page 128: ...Table des matières 590 1035 640A 6 ...
Page 130: ...1 Présentation du produit 590 1035 640A 2 ...
Page 138: ...2 Installation 590 1035 640A 10 ...
Page 154: ...3 Fonctionnement de la voie locale 590 1035 640A 26 ...
Page 172: ...4 Utilisation de l interface Web 590 1035 640A 44 ...
Page 178: ...6 Câblage UTP 590 1035 640A 50 ...
Page 184: ...8 Émulation des touches avancées du clavier Sun 590 1035 640A 56 ...
Page 186: ...9 Assistance technique 590 1035 640A 58 ...
Page 187: ......
Page 188: ......
Page 189: ...KVM s3 0801 1601 Guía de uso e instalación Edición de febrero de 2011 ...
Page 192: ...Contenido 590 1035 640A 6 ...
Page 194: ...1 Información general del producto 590 1035 640A 2 ...
Page 202: ...2 Instalación 590 1035 640A 10 ...
Page 218: ...3 Funcionamiento del puerto local 590 1035 640A 26 ...
Page 236: ...4 Operaciones de la interfaz Web 590 1035 640A 44 ...
Page 242: ...6 Cableado UTP 590 1035 640A 50 ...
Page 248: ...8 Emulación de teclas avanzadas de Sun 590 1035 640A 56 ...
Page 250: ...9 Asistencia técnica 590 1035 640A 58 ...
Page 251: ......
Page 252: ......
Page 253: ...KVM s3 0801 1601 Guida all installazione e manuale dell utente Versione febbraio 2011 ...
Page 256: ...Sommario 590 1035 640A 6 ...
Page 258: ...1 Panoramica sul prodotto 590 1035 640A 2 ...
Page 266: ...2 Installazione 590 1035 640A 10 ...
Page 282: ...3 Funzioni della porta locale 590 1035 640A 26 ...
Page 300: ...4 Funzioni dell interfaccia Web 590 1035 640A 44 ...
Page 306: ...6 Cablaggio UTP 590 1035 640A 50 ...
Page 312: ...8 Emulazione avanzata di tasti Sun 590 1035 640A 56 ...
Page 314: ...9 Supporto tecnico 590 1035 640A 58 ...
Page 315: ......
Page 316: ......
Page 317: ...KVM s3 0801 1601 インストーラ ユーザー ガイド 2011年2月 ...
Page 320: ...目次 590 1035 640A 6 ...
Page 322: ...1 製品概要 590 1035 640A 2 ...
Page 358: ...4 Webインターフェイスの操作 590 1035 640A 38 ...
Page 364: ...6 UTPケーブル 590 1035 640A 44 ...
Page 370: ...8 Sunキーボードのアドバンスト キー エミュレーション 590 1035 640A 50 ...
Page 372: ...9 テクニカル サポート 590 1035 640A 52 ...
Page 373: ......
Page 374: ...590 1035 640A ...


