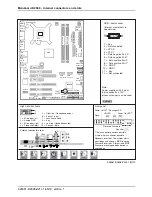
Brief description of mainboard
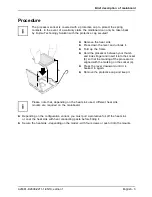
Procedure
The processor socket is covered with a protective cap to protect the spring
contacts. In the event of a warranty claim, the mainboard can only be taken back
by Fujitsu Technology Solution with the protective cap secured!
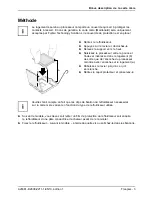
a
b
b
►
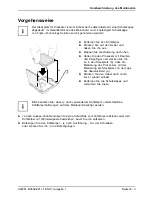
Remove the heat sink.
►
Press down the lever and unhook it.
►
Fold up the frame.
►
Hold the processor between your thumb
and index
fi
nger and insert it into the socket
(b) so that the marking of the processor is
aligned with the marking on the socket (a).
►
Press the lever downward until it is
hooked in again.
►
Remove the protective cap and keep it.
Please note that, depending on the heat sink used, different heat sink
mounts are required on the mainboard.
►
Depending on the con
fi
guration variant, you must pull a protective foil off the heat sink
or coat the heat sink with heat conducting paste before
fi
tting it.
►
Secure the heat sink - depending on the model - with four screws or push it into the mounts.
A26361-D2608-Z211-1-8N19, edition 1
English - 3
Summary of Contents for D2608
Page 1: ...Mainboard D2608 Operating Manual ...
Page 14: ...Kurzbeschreibung des Mainboards 8 Deutsch A26361 D2608 Z211 1 8N19 Ausgabe 1 ...
Page 22: ...Brief description of mainboard 8 English A26361 D2608 Z211 1 8N19 edition 1 ...
Page 30: ...Brève description de la carte mère 8 Français A26361 D2608 Z211 1 8N19 édition 1 ...
Page 38: ...Sistem yapı grubunun kısa tanıtımı 8 Türkçe A26361 D2608 Z211 1 8N19 basım 1 ...


