


Summary of Contents for fa-19w1s-h2a
Page 16: ...15 ...
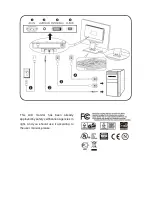
The Fujitsu FA-19W1S-H2A is a high-quality monitor that delivers exceptional visual clarity and versatile functionality. For users seeking assistance with this product, a comprehensive User Manual is available for free download at 88.208.23.73:8080, offering step-by-step instructions and valuable insights to enhance the user experience.
Page 16: ...15 ...


