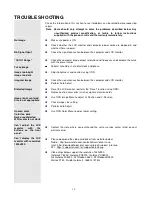
background image

10


TROUBLE SHOOTING


Check the information in this section to see if problems can be solved before requesting 
repair. 

Note

Users  should  only  attempt  to  solve  the  problems  described  below.  Any 

unauthorized  product  modification,  or  failure  to  follow  instructions 
supplied with the product, will void the warranty immediately. 

No image 


Make sure power is ON. 


Check  whether  the  LCD  monitor  and  computer  power  cords  are  plugged  in  and 
whether there is power. 

No Signal Input 


Check the signal connection between the computer and LCD monitor. 

“Out Of Range” 


Check the computer image output resolution and frequency and compare the value 
with the preset values. 

Fuzzy image 

◆     

Perform Auto Adjust, or adjust clock and phase. 

Image too bright 
Image too dark 


Adjust brightness and contrast using OSD. 

Irregular image 


Check the signal connection between the computer and LCD monitor. 


Perform Auto Adjust. 

Distorted image 


Reset the LCD monitor. (perform the “Reset” function using OSD) 


Remove extra accessories (such as signal extension cord). 

Image is not centered 
Size is not appropriate 


Use OSD Image Menu to adjust H. Position and V. Position. 


Check image size setting. 


Perform Auto Adjust. 

Uneven color 
Color too dark 
Dark area distorted 
White color is not white 


Use OSD Color Menu to adjust color setting. 

Can’t  adjust  the  LCD 
monitor 

with 

the 

buttons  on  the  front 
panel. 
 
Can’t  display  the  LCD 
monitor with resolution 
1440x900 


Contact  the  store  where  you  purchased  the  unit  or  service  center  listed  on  your 
warranty card. 


Please download the video card driver from websites below: 
Nvidia : http://www.nvidia.com/content/drivers/drivers.asp 
Intel : http://downloadfinder.intel.com/scripts-df/support_intel.asp 
ATI : https://support.ati.com/ics/support/default.asp 


Video chips below support the resolution 1440x900: 
Geforce4 Ti4200 , Geforce FX5200 , Geforce PCX6200 , 
G5 Geforce FX5200 , ATI Radeon 9600 , ATI RadeonRX300 
Matrox P750 , Nvidia Geforce2 , I865G , I915G 


Summary of Contents for fa-19w1s-h2a

Page 1: ...This LCD monitor has been already approved by safety certification agencies in right and you should use it according to the user manual please ...

Page 2: ...PRODUCT 3 Contents 3 Features 3 Power saver 3 Plug play 3 SAFETY 4 Electrical 4 Common 5 SET UP YOUR LCD MONITOR 6 Installation 6 Screen Adjustments 6 OSD Control 7 Description 9 TROUBLE SHOOTING 10 MAINTENANCE 11 SPECIFICATIONS 12 ...

Page 3: ...Do not let children use this LCD monitor alone Viewing the User Manual for other safety precautions Quick Setup The setup steps are described as following Step 2 to 4 are illustrated on the overleaf of the cover 1 Shutdown your computer and unplug 2 Please combine the LCD monitor with the stand tightly 3 Connect the 15 pin D Sub or DVI D optional signal cable and Audio cable to the computer and th...

Page 4: ...low voltage mode to save power Slight movement of the mouse or any pressing key on the keyboard will return the original image The VGA card inside the computer configures Power Saver You can use your PC to set the function The LCD monitor is compatible with EPA ENERGY STAR and NÜTEK if used with a VESA DPMS computer To save power turn off the LCD monitor power when not in use Plug play The new VES...

Page 5: ...t insert any metal object into any opening in the LCD monitor casing Do not attempt to service this product yourself as opening or removing covers may expose you to dangerous voltage points or other risks Refer all servicing to qualified service personnel If the power cord is damaged do not use the LCD monitor Do not place any object on the power cord and place the power cord away from crowded are...

Page 6: ... image quality Handle with care when unplugging and moving the monitor Do not place items on top of the LCD monitor If the LCD monitor is not in use for a long time unplug it and store it in the proper package The original carton and packaging should be used if possible The openings in the LCD monitor casing are for ventilation To prevent overheating the openings should not be blocked or covered D...

Page 7: ... system the Auto Adjust function can enhance the display To enter adjust mode refer to OSD Control Turn the computer and LCD monitor on Press the Auto button to start Auto Adjust The LCD monitor starts the Auto Adjust process The process will continue for 10 seconds You will notice the image change as the Auto Adjust is working Self Test Function Check STFC Your LCD monitor provides a STFC functio...

Page 8: ... Move selection up when OSD is displayed 3 Auto Automatically optimize positions phase and clock when OSD is not displayed Move selection down when OSD is displayed 4 Quick contrast adjustment and decrease contrast brightness Move selection left when OSD is displayed 5 Quick brightness adjustment and increase contrast brightness Move selection right when OSD is displayed 6 Enter and exit the OSD m...

Page 9: ...lly To exit the OSD menu press Menu again Position 50 Notes The OSD turns off several seconds after you stop pressing the buttons while performing an adjustment Any changes are automatically saved in memory when the OSD turns off Turning off the power should be avoided while using the menu Adjustments for clock phase and positions are saved for each individual signal timing Except for these adjust...

Page 10: ...l screen Reset Restore LCD monitor to factory settings Input Select Analog Digital Auto setting Adjust clock phase and positions automatically Optional CM Engine Color Management Engine Optional Info Resolution Displays resolution Horizontal frequency Displays horizontal frequency Vertical frequency Displays vertical frequency Version Displays firmware version Quick Adjustment You can skip the Men...

Page 11: ...monitor Perform Auto Adjust Distorted image Reset the LCD monitor perform the Reset function using OSD Remove extra accessories such as signal extension cord Image is not centered Size is not appropriate Use OSD Image Menu to adjust H Position and V Position Check image size setting Perform Auto Adjust Uneven color Color too dark Dark area distorted White color is not white Use OSD Color Menu to a...

Page 12: ...ries Cleaner Use pure water or non ammonia non alcohol based glass cleaner Do not use ketene such as acetone ethanol toluene acetic acid methane chloride or abrasive detergent to clean the monitor because these chemicals can damage the LCD monitor Screen To clean your LCD monitor screen use water or mild cleaner as above to gently moisten a soft clean cloth If possible use a special screen cleaner...

Page 13: ...ption Saving Mode 1W max Temperature 5 35 Working 20 55 Storage Environment Requirement Humidity 20 80 Working 20 85 Storage Dimension W X H X D 444 4mm x 366 0mm x 185 0mm Net Weight 4 5 kg Display Mode Hori Sync kHz Vert Sync Hz Pixel Clock MHz Sync Polarity H V 31 469 59 940 25 175 37 861 72 809 31 500 VGA 640 x 480 37 500 75 000 31 500 35 156 56 250 36 000 37 879 60 317 40 000 48 077 72 188 50...

Page 14: ...The labeling scheme was developed as a joint effort by the TCO The Swedish Confederation of Professional Employees Svenska Naturskyddsforeningen The Swedish Society for Nature Conservation and Statens Energimyndighet The Swedish National Energy Administration Approval requirements cover a wide range of issues environment ergonomics emission of electric and magnetic fields energy consumption and el...

Page 15: ...ents must not contain any cadmium Mercury Mercury is sometimes found in batteries relays and switches The relevant TCO 99 requirement states that batteries may not contain any mercury It also demands that mercury is not present in any of the electrical or electronics components associated with the labeled unit There is however one exception Mercury is for the time being permitted in the back light...

Page 16: ...15 ...

Reviews: