background image

3

fi-6670(A) & fi-6770(A) C

ONSUMABLE

 R

EPLACEMENT


AND

 C

LEANING

 I

NSTRUCTIONS

R

EPLACING


THE

 B

RAKE

 R

OLLER

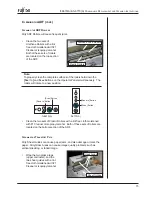
When the consumables have
fed 250,000 pages the
message to the right is
displayed on the computer
screen.

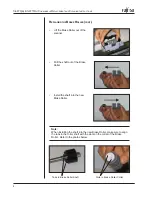
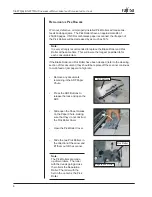
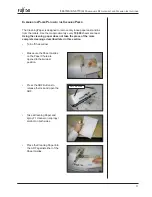
Remove any documents
remaining in the ADF Paper
Chute.

Press the ADF Buttons to
release the lock and open the
ADF.

Open the Brake Roller Cover.

A worn out or improperly installed Brake Roller will cause multiple feeds or
paper jams.  The Brake Roller has an approximate life of 250,000 pages.  If
NCR or carbonless paper is scanned the life span of the Brake Roller may
be decreased by as much as 50%.

Note:

It is very strongly recommended to replace the Brake Roller and Pick
Roller at the same time.  This will insure the longest possible life for
each consumable item.

If the Brake Roller and Pick Roller have been cleaned (refer to the cleaning
section of this document) they should be replaced if the scanner continues
to multi-feed or jam paper at a high rate.

ADF Buttons

Brake Roller Cover

Brake Roller Cover

Summary of Contents for fi-6670 Series

Page 1: ...1 fi 6670 A fi 6770 A CONSUMABLE REPLACEMENT AND CLEANING INSTRUCTIONS fi 6670 A fi 6770 A CONSUMABLE REPLACEMENT AND CLEANING INSTRUCTIONS CG00002 015501C ...

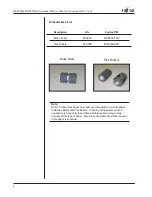
Page 2: ...ck Rollers 250 000 PA03338 K011 Note NCR or Carbonless paper has chemical composition which damages the Brake Roller and Pick Rollers Cleaning of these items will be needed more frequently to avoid feed problems if scanning a large quantity of this type of paper Also the consumable life will be reduced if this paper is scanned Pick Rollers Brake Roller ...

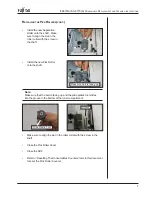
Page 3: ...e multiple feeds or paper jams The Brake Roller has an approximate life of 250 000 pages If NCR or carbonless paper is scanned the life span of the Brake Roller may be decreased by as much as 50 Note It is very strongly recommended to replace the Brake Roller and Pick Roller at the same time This will insure the longest possible life for each consumable item If the Brake Roller and Pick Roller hav...

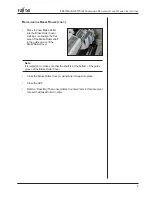
Page 4: ...f the scanner Pull the shaft out of the Brake Roller Install the shaft into the new Brake Roller Slots in Brake Roller Collar Note When installing the shaft into the new Brake Roller make sure to align the tabs in the roller shaft with the slots on the collar of the Brake Roller Refer to the photos below Tabs in Brake Roller Shaft ...

Page 5: ...ign the flat area of the Brake Roller shaft in the guide groove of the Brake Roller Cover Note It is important to make sure that the shaft is at the bottom of the guide groove of the Brake Roller Cover Close the Brake Roller Cover making sure it snaps into place Close the ADF Refer to Resetting The Consumables Counters later in this document to reset the Brake Roller Counter ...

Page 6: ...ller and Pick Roller have been cleaned refer to the cleaning section of this document they should be replaced if the scanner continues to multi feed or jam paper at a high rate Remove any documents remaining in the ADF Paper Chute Press the ADF Buttons to release the lock and open the ADF Slide open the Sheet Guides on the Paper Chute making sure that they do not obstruct the Pick Roller Cover Ope...

Page 7: ... the new Pick Roller onto the shaft Make sure belt is facing up Make sure to align the slot in the roller collar with the screw in the shaft Close the Pick Roller Cover Close the ADF Refer to Resetting The Consumables Counters later in this document to reset the Pick Roller Counter Note Make sure that the belt is facing up and the wide plastic foot slides into the groove in the bottom of the rolle...

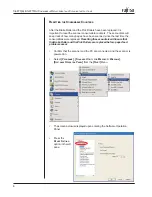
Page 8: ... scanned since the last time the consumables were replaced Resetting these counters will insure that the Brake Roller and the Pick Rollers are replaced before paper feed problems occur Confirm that the scanner and the PC are connected and the scanner is powered on Select PROGRAMS SCANNER UTILITY FOR MICROSOFT WINDOWS SOFTWARE OPERATION PANEL from the START Menu The screen below is displayed upon e...

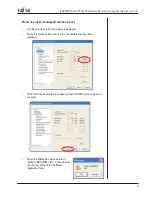
Page 9: ... The Device Setting Screen below is displayed Press the CLEAR button next to the consumable that has been replaced Once the CLEAR buttons are pressed press the OK button to clear the counters Press the OK button when asked to Write to EEPROM OK This will reset the counter and exit the Software Operation Panel ...

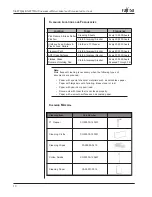
Page 10: ...ted paper Location Tools Frequency Cleaning Sheets Every 10 000 Sheets Cloth Isopropyl Alcohol Every 20 000 Sheets Urethane Feed Rollers Plastic Feed Rollers Transport Path Cloth Isopropyl Alcohol Every 20 000 Sheets ADF Glass Surfaces Cloth Isopropyl Alcohol Every 20 000 Sheets Every 20 000 Sheets Scanned Through FB Cloth Isopropyl Alcohol Flatbed Glass Document Holding Pad Cloth and F1 Cleaner E...

Page 11: ... release the lock and open the ADF Take a Cleaning Paper and spray F1 cleaner or isopropyl alcohol on both sides Place the Cleaning Paper into the ADF against either of the Sheet Guides The Cleaning Paper is designed to remove only loose paper dust and ink from the rollers Use them approximately every 10 000 sheets scanned Using the cleaning paper does not take the place of the more complete clean...

Page 12: ... WITH THE CLEANING PAPER CONT Close theADF and turn the scanner on The Cleaning Paper will be automatically fed through the ADF Repeat the above steps aligning the Cleaning Paper against the opposite Sheet Guide Turn the Cleaning Paper over and rotate and repeat the steps above a number of times ...

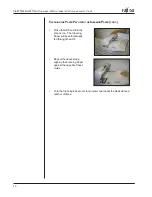
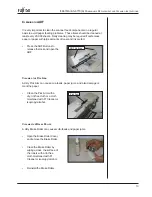
Page 13: ...Buttons to release the lock and open the ADF CLEANING THE PICK ARM A dirty Pick Arm can cause mis feeds paper jams and also damage or mark the paper Clean the Pick Arm with a dry lint free cloth or a cloth moistened with F1 Cleaner or isopropyl alcohol CLEANING THE BRAKE ROLLER A dirty Brake Roller can cause multi feeds and paper jams Open the Brake Roller Cover and remove the Brake Roller Clean t...

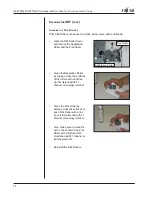
Page 14: ... the Separation Roller by wiping across the surfaces of the rollers with a lint free cloth moistened with F1 Cleaner or isopropyl alcohol Clean the Pick Roller by wiping across the surfaces of each Pick Roller with a lint free cloth moistened with F1 Cleaner or isopropyl alcohol Also make sure to clean the belt in the center of the Pick Roller with a lint free cloth moistened with F1 Cleaner or is...

Page 15: ...an the two sets of Plastic Rollers with a lint free cloth moistened with F1 Cleaner or isopropyl alcohol Both of these sets of rollers are located on the bottom section of the ADF CLEANING THE TRANSPORT PATH Dirty Sheet Guides can cause paper jams and also damage or mark the paper Dirty Glass Areas can cause image quality problems such as vertical streaking or faded image Wipe the two glass areas ...

Page 16: ... Pad these marks can appear on the image when scanning thin sheets of paper Open the Document Cover by pressing the Open Close Lever and lifting Clean the Flatbed Glass with a lint free cloth moistened with F1 Cleaner or isopropyl alcohol Make sure not to leave any streaks on the glass Clean the Document Holding Pad with a lint free cloth moistened with F1 Cleaner or isopropyl alcohol Close the Do...

Page 17: ...configured to display at user selected intervals This will alert the user to clean the scanner CONFIGURING CLEANING NOTIFICATION Confirm that the scanner and the PC are connected and the scanner is powered on Select PROGRAMS SCANNER UTILITY FOR MICROSOFT WINDOWS SOFTWARE OPERATION PANEL from the START Menu The screen below is displayed upon entering the Software Operation Panel Press the CLEANING ...

Page 18: ...NSTRUCTIONS check box Select the page interval of when the Cleaning Notification is displayed 10 000 pages is recommended Note More frequent cleaning may be necessary depending on what type of paper is scanned The following screen is displayed notifying the user that it is time to clean the scanner CLEARING THE CLEANING COUNTER ...

Page 19: ...should be cleared Open the Software Operation Panel Press the DEVICE SETTING option in the left pane Press the CLEAR button next to the After cleaning counter Once the CLEAR buttons are pressed press the OK button to clear the counters Press the OK button when asked to Write to EEPROM OK This will reset the counter and exit the Software Operation Panel ...

Page 20: ...fi 6670 A fi 6770 A CONSUMABLE REPLACEMENT AND CLEANING INSTRUCTIONS 20 ...

Page 21: ...tsu com 2008 Fujitsu Computer Products of America Inc All rights reserved All statements herein are valid only in the U S for U S residents are based on normal operating conditions are provided for informational purposes only and are not intended to create any implied warranty FCPA reserves the right to change its service offerings and limited warranty at any time without notice Fujitsu and the Fu...

Page 22: ...fi 6670 A fi 6770 A CONSUMABLE REPLACEMENT AND CLEANING INSTRUCTIONS 22 ...

Reviews: