41
U s e r - I n s t a l l a b l e F e a t u r e s
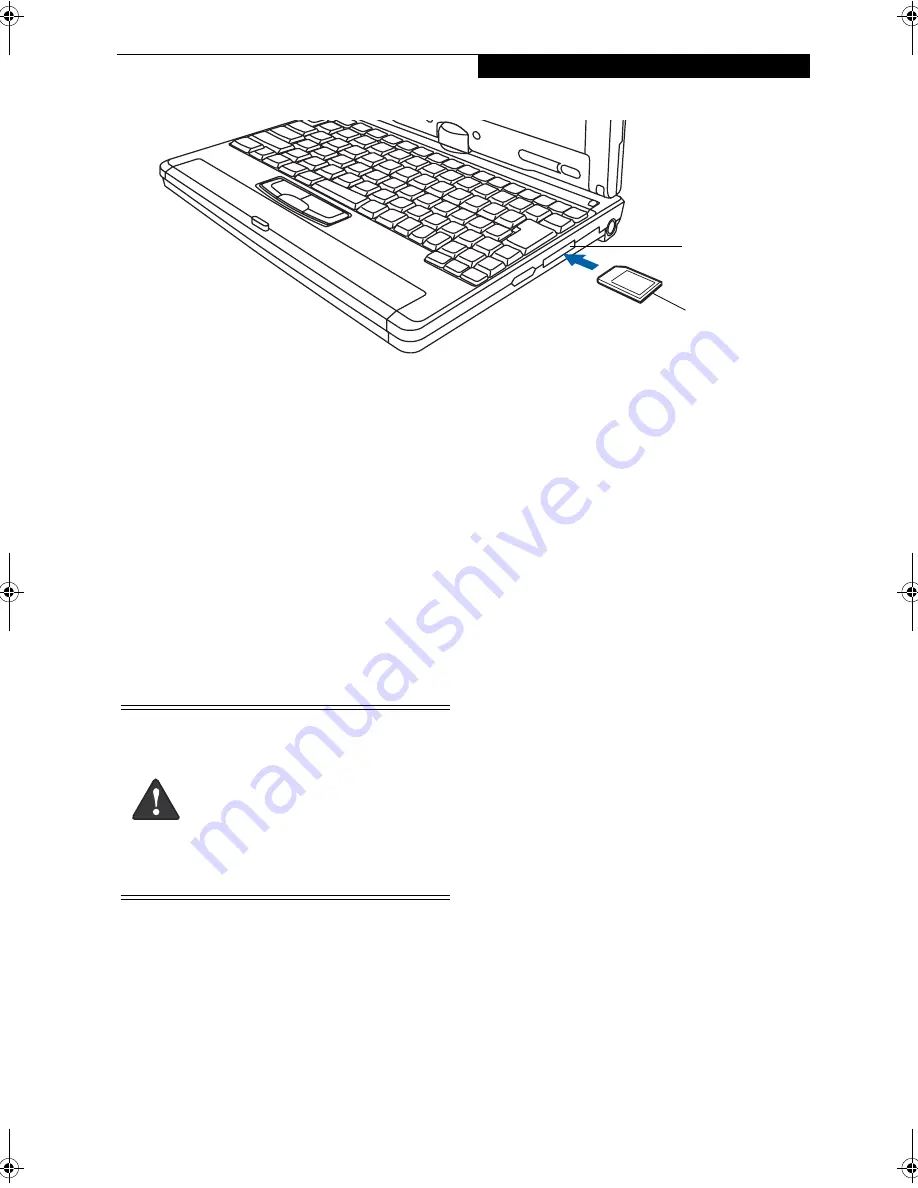
Figure 4-5. Inserting an SD Card
Secure Digital Media
Your LifeBook notebook/Tablet PC supports Secure
Digital (SD) cards, on which you can store and transfer
data to and from a variety of digital devices. These cards
use flash memory architecture, which means they don’t
need a power source to retain data.
Secure Digital (SD) Cards allow portable storage among
a variety of devices, such as cell phones, GPS systems,
digital cameras, and PDAs. SD Cards transfer data
quickly, with low battery consumption. It uses flash
memory architecture.
INSERTING SD CARDS
SD Cards are inserted in the SD Card slot
(Figure 4-5)
.
To insert an SD Card, follow these steps
:
1. See your SD Card manual for instructions on the
insertion of your card. Some cards may require that
your system is off while inserting them.
2. Make sure there is no card currently in the slot. If
there is, see Removing an SD Card.
3. Insert your card into the slot with the product label
facing up.
4. Push the card firmly into the slot until it is seated in
the connector.
REMOVING AN SD CARD
To remove an SD Card, first see your SD Card manual
for instructions. Some cards may require your LifeBook
notebook/Tablet PC to be in Suspend Mode or Off while
removing them. To remove the card from the slot,
simply pull it out.
SD Card Slot
SD Card
■
inserting or removing an SD Card during
your LifeBook notebook/Tablet PC’s
shutdown or bootup process may dam-
age the card and/or your LifeBook note-
book/Tablet PC.
■
Do not insert a card into a slot if there is
water or any other substance on the
card as you may permanently damage
the card, your LifeBook notebook/Tablet
PC, or both.
P Series.book Page 41 Friday, February 17, 2006 11:09 AM
Summary of Contents for FPCM20654
Page 6: ...L i f e B o o k P S e r i e s N o t e b o o k T a b l e t P C ...
Page 7: ...1 1 Preface ...
Page 8: ...2 L i f e B o o k P S e r i e s N o t e b o o k T a b l e t P C ...
Page 10: ...4 L i f e B o o k P S e r i e s N o t e b o o k T a b l e t P C ...
Page 11: ...5 2 Getting to Know Your LifeBook ...
Page 12: ...6 L i f e B o o k P S e r i e s N o t e b o o k T a b l e t P C ...
Page 32: ...26 L i f e B o o k P S e r i e s N o t e b o o k T a b l e t P C ...
Page 33: ...27 3 Using Your LifeBook ...
Page 34: ...28 L i f e B o o k P S e r i e s N o t e b o o k T a b l e t P C ...
Page 41: ...35 4 User Installable Features ...
Page 42: ...36 L i f e B o o k P S e r i e s N o t e b o o k T a b l e t P C ...
Page 54: ...48 L i f e B o o k P S e r i e s N o t e b o o k T a b l e t P C ...
Page 55: ...49 5 Troubleshooting ...
Page 56: ...50 L i f e B o o k P S e r i e s N o t e b o o k T a b l e t P C ...
Page 69: ...63 6 Care and Maintenance ...
Page 70: ...64 L i f e B o o k P S e r i e s N o t e b o o k T a b l e t P C ...
Page 74: ...68 L i f e B o o k P S e r i e s N o t e b o o k T a b l e t P C ...
Page 75: ...69 7 System Specifications ...
Page 76: ...70 L i f e B o o k P S e r i e s N o t e b o o k T a b l e t P C ...
Page 81: ...75 8 Glossary ...
Page 82: ...76 L i f e B o o k P S e r i e s N o t e b o o k T a b l e t P C ...
Page 89: ...83 Appendix A Integrated Wireless LAN User s Guide Optional Device ...
Page 90: ...84 L i f e B o o k P S e r i e s N o t e b o o k T a b l e t P C ...
Page 107: ...101 Appendix B Using the Fingerprint Swipe Sensor ...
Page 108: ...102 L i f e B o o k P S e r i e s N o t e b o o k T a b l e t P C ...
Page 116: ...110 L i f e B o o k P S e r i e s N o t e b o o k T a b l e t P C ...


