97
U s i n g t h e F i n g e r p r i n t S e n s o r
Fingerprint Sensor Device
INTRODUCING THE
FINGERPRINT SENSOR DEVICE
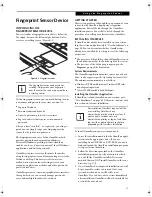
Your system has a fingerprint sensor device below the
Touchpad, between the left and right buttons. It also
serves as a scrolling sensor.
(Figure B-1)
Figure B-1 Fingerprint sensor
With a fingerprint sensor, you can avoid having to enter
a username and password every time you want to:
■
Log onto Windows
■
Resume from standby mode
■
Cancel a password-protected screen saver
■
Log into websites that require a username and
password
After you have “enrolled” - or registered - your finger-
print, you can simply swipe your fingertip over the
sensor for the system recognize you.
The fingerprint sensor uses Softex OmniPass which
provides password management capabilities to
Microsoft Windows operating systems. OmniPass
enables you to use a "master password" for all Windows,
applications, and on-line passwords.
OmniPass requires users to authenticate themselves
using the fingerprint sensor before granting access to the
Windows desktop. This device results in a secure
authentication system for restricting access to your
computer, applications, websites, and other password-
protected resources.
OmniPass presents a convenient graphical user interface,
through which you can securely manage passwords,
users, and multiple identities for each user.
GETTING STARTED
This section guides you through the preparation of your
system for the OmniPass fingerprint recognition
application. You will be led through the OmniPass
installation process. You will also be led through the
procedure of enrolling your first user into OmniPass.
INSTALLING OMNIPASS
If OmniPass has already been installed on your system,
skip this section and go directly to “User Enrollment” on
page 98. You can determine whether OmniPass has
already been installed by checking to see if the following
are present:
■
The presence of the gold key-shaped OmniPass icon in
the notification area at the bottom right of the screen.
■
The presence of the Softex program group in the
Programs
group of the
Start
menu
System Requirements
The OmniPass application requires space on your hard
drive; it also requires specific Operating Systems (OS’s).
The minimum requirements are as follows:
■
Windows XP Home Edition or Windows XP Profes-
sional operating system
■
At least 35 MB available hard disk space
Installing the OmniPass Application
If OmniPass is already installed on your system, go to
“User Enrollment” on page 98
.
Otherwise continue with
this section on software installation.
To install OmniPass on your system you must:
1. Insert the installation media for the OmniPass appli-
cation into the appropriate drive. If you are
installing from CD-ROM or DVD-ROM, you must
find and launch the OmniPass installation program
(setup.exe) from the media.
2. Follow the directions provided in the OmniPass
installation program. Specify a location to which
you would like OmniPass installed
.
It is recom-
mended that you NOT install OmniPass in the root
directory (e.g.
C:
\
).
3. Once OmniPass has completed installation you will
be prompted to restart you system. Once your
system has rebooted you will be able to use
OmniPass. If you choose not to restart immediately
after installation, OmniPass will not be available for
use until the next reboot.
The fingerprint sensor can be used for
scrolling. Simply move your fingerprint
over the sensor the same as you would use
a scrolling sensor.
For installation, OmniPass requires that the
user installing OmniPass have
administrative privileges to the system. If
your current user does not have
administrative privileges, log out and then
log in with an administrator user before
proceeding with OmniPass installation.
fennec2.book Page 97 Thursday, December 21, 2006 12:43 PM
Summary of Contents for LifeBook A6020
Page 1: ...Fujitsu LifeBook A6020 Notebook User s Guide ...
Page 2: ......
Page 8: ...L i f e B o o k A 6 0 0 0 S e r i e s N o t e b o o k ...
Page 9: ...1 Preface ...
Page 10: ...L i f e B o o k A 6 0 0 0 S e r i e s N o t e b o o k ...
Page 12: ...2 L i f e B o o k A 6 0 0 0 S e r i e s N o t e b o o k ...
Page 13: ...3 2 Getting to Know Your LifeBook Notebook ...
Page 14: ...4 L i f e B o o k A 6 0 0 0 S e r i e s N o t e b o o k S e c t i o n T w o ...
Page 31: ...21 3 Getting Started ...
Page 32: ...22 L i f e B o o k A 6 0 0 0 S e r i e s N o t e b o o k S e c t i o n T h r e e ...
Page 39: ...29 4 User Installable Features ...
Page 40: ...30 L i f e B o o k A 6 0 0 0 S e r i e s N o t e b o o k S e c t i o n F o u r ...
Page 54: ...44 L i f e B o o k A 6 0 0 0 S e r i e s N o t e b o o k S e c t i o n F o u r ...
Page 55: ...45 5 Troubleshooting ...
Page 56: ...46 L i f e B o o k A 6 0 0 0 S e r i e s N o t e b o o k S e c t i o n F i v e ...
Page 70: ...60 L i f e B o o k A 6 0 0 0 S e r i e s N o t e b o o k S e c t i o n F i v e ...
Page 71: ...61 6 Care and Maintenance ...
Page 72: ...62 L i f e B o o k A 6 0 0 0 S e r i e s N o t e b o o k S e c t i o n S i x ...
Page 76: ...66 L i f e B o o k A 6 0 0 0 S e r i e s N o t e b o o k S e c t i o n S i x ...
Page 77: ...67 7 System Specifications ...
Page 78: ...68 L i f e B o o k A 6 0 0 0 S e r i e s N o t e b o o k S e c t i o n S e v e n ...
Page 83: ...73 8 Glossary ...
Page 84: ...74 L i f e B o o k A 6 0 0 0 S e r i e s N o t e b o o k S e c t i o n E i g h t ...
Page 92: ...82 L i f e B o o k A 6 0 0 0 S e r i e s N o t e b o o k S e c t i o n E i g h t ...
Page 93: ...83 Appendix A Integrated Wireless LAN User s Guide ...
Page 94: ...84 L i f e B o o k A 6 0 0 0 S e r i e s N o t e b o o k A p p e n d i x ...
Page 105: ...95 Appendix B Using the Fingerprint Sensor ...
Page 106: ...96 L i f e B o o k A 6 0 0 0 S e r i e s N o t e b o o k ...
Page 114: ...104 L i f e B o o k A 6 0 0 0 S e r i e s N o t e b o o k ...
Page 118: ...108 L i f e B o o k A 6 0 0 0 S e r i e s N o t e b o o k I n d e x ...
Page 119: ......
Page 120: ......

