30
L i f e B o o k B 6 2 0 0 S e r i e s – S e c t i o n T h r e e
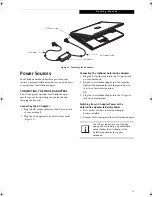
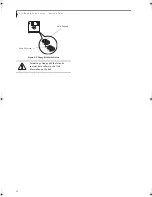
Figure 3-2. Opening the Display Panel
Display Panel
Your LifeBook notebook contains a display panel that is
backlit for easier viewing in bright environments and
maintains top resolution through the use of active-
matrix technology.
OPENING THE DISPLAY PANEL
1. Press the Display Panel latch in. This releases the
locking mechanism and raises the display slightly.
2. Lift the display backwards, being careful not to
touch the screen, until it is at a comfortable
viewing angle.
ADJUSTING DISPLAY PANEL BRIGHTNESS
Once you have turned on your notebook, you may want
to adjust the brightness level of the screen to a more
comfortable viewing level.
Adjusting the brightness using the keyboard changes the
setting only temporarily.
■
[Fn+F6]: Pressing repeatedly will lower the
brightness of your display.
■
[Fn+F7]: Pressing repeatedly will increase the
brightness of the display.
CLOSING THE DISPLAY PANEL
1. Holding the edge of your display panel, pull it
forward until it is flush with the body of your note-
book.
2. Push down until you hear a click. This will engage
the locking mechanism and prevent your display
panel from opening unexpectedly.
Display Panel Latch
If using AC power your brightness setting
is set to its highest level by default. If using
battery power your brightness setting is
set to approximately mid-level by default.
The higher the brightness level, the more
power the LifeBook notebook will
consume and the faster your batteries will
discharge. For maximum battery life, make
sure that the brightness is set as low as
possible.
B Series.book Page 30 Thursday, May 17, 2007 2:25 PM
Summary of Contents for LifeBook B6220
Page 1: ...Fujitsu LifeBook B6220 Notebook User s Guide ...
Page 2: ......
Page 8: ...L i f e B o o k B 6 2 0 0 S e r i e s ...
Page 9: ...1 1 Preface ...
Page 10: ...2 L i f e B o o k B 6 2 0 0 S e r i e s ...
Page 12: ...4 L i f e B o o k B 6 2 0 0 S e r i e s S e c t i o n O n e ...
Page 13: ...5 2 Getting to Know Your LifeBook ...
Page 14: ...6 L i f e B o o k B 6 2 0 0 S e r i e s ...
Page 34: ...26 L i f e B o o k B 6 2 0 0 S e r i e s S e c t i o n T w o ...
Page 35: ...27 3 Getting Started ...
Page 36: ...28 L i f e B o o k B 6 2 0 0 S e r i e s S e c t i o n T h r e e ...
Page 44: ...36 L i f e B o o k B 6 2 0 0 S e r i e s S e c t i o n T h r e e ...
Page 45: ...37 4 User Installable Features ...
Page 46: ...38 L i f e B o o k B 6 2 0 0 S e r i e s S e c t i o n F o u r ...
Page 60: ...52 L i f e B o o k B 6 2 0 0 S e r i e s S e c t i o n F o u r ...
Page 61: ...53 5 Troubleshooting ...
Page 62: ...54 L i f e B o o k B 6 2 0 0 S e r i e s ...
Page 74: ...66 L i f e B o o k B 6 2 0 0 S e r i e s S e c t i o n F i v e ...
Page 75: ...67 6 Care and Maintenance ...
Page 76: ...68 L i f e B o o k B 6 2 0 0 S e r i e s S e c t i o n S i x ...
Page 80: ...72 L i f e B o o k B 6 2 0 0 S e r i e s S e c t i o n S i x ...
Page 81: ...73 7 Specifications ...
Page 82: ...74 L i f e B o o k B 6 2 0 0 S e r i e s S e c t i o n S e v e n ...
Page 86: ...78 L i f e B o o k B 6 2 0 0 S e r i e s S e c t i o n S e v e n ...
Page 87: ...79 8 Glossary ...
Page 88: ...80 L i f e B o o k B 6 2 0 0 S e r i e s S e c t i o n E i g h t ...
Page 96: ...88 L i f e B o o k B 6 2 0 0 S e r i e s S e c t i o n E i g h t ...
Page 97: ...89 Appendix A Integrated Wireless LAN User s Guide Optional Device ...
Page 98: ...90 L i f e B o o k B 6 2 0 0 S e r i e s N o t e b o o k A p p e n d i x A ...
Page 114: ...106 L i f e B o o k B 6 2 0 0 S e r i e s A p p e n d i x B ...
Page 126: ...118 L i f e B o o k B 6 2 0 0 S e r i e s I n d e x ...
Page 127: ...119 I n d e x ...
Page 128: ...120 L i f e B o o k B 6 2 0 0 S e r i e s I n d e x ...


