background image

8

L i f e B o o k   C   S e r i e s   N o t e b o o k   –   S e c t i o n   T w o

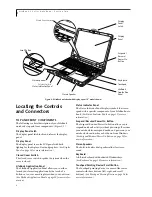
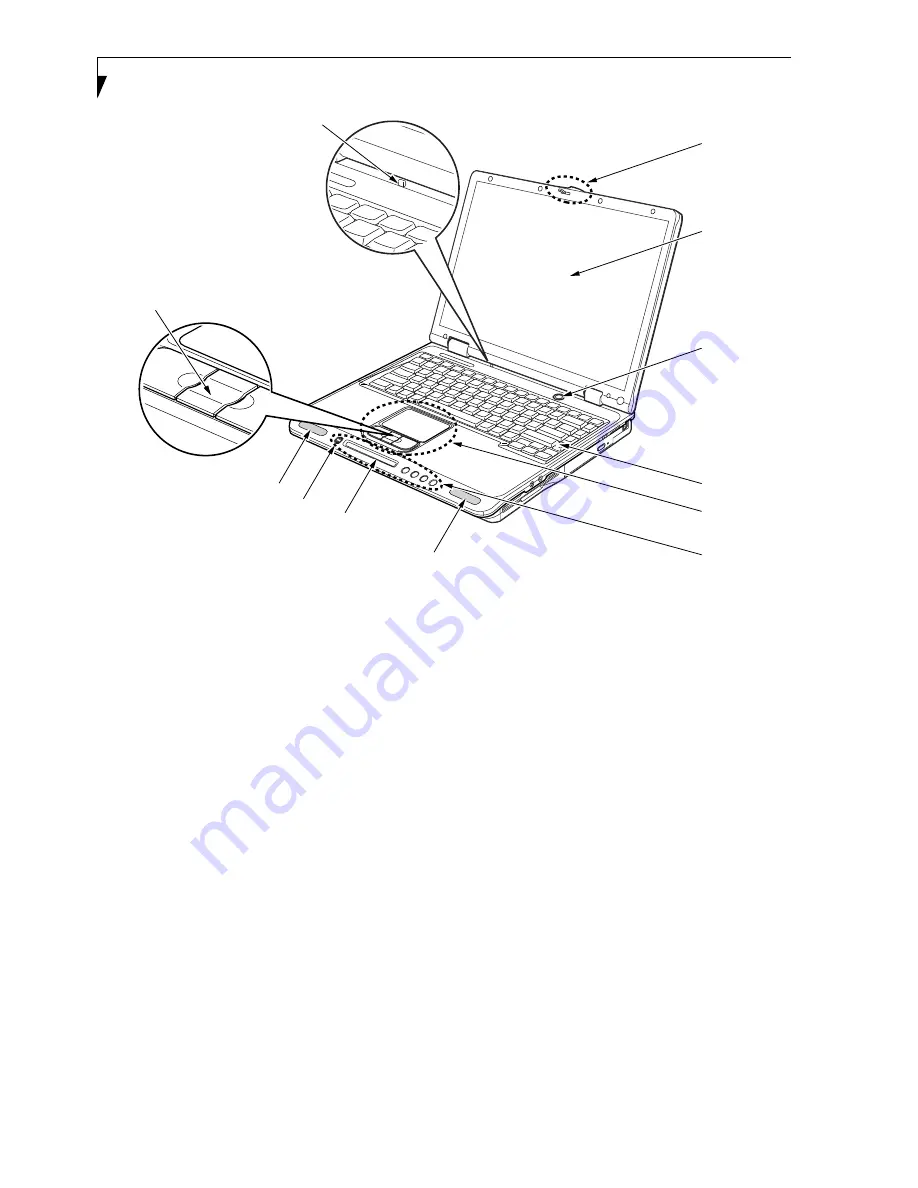
Figure 2-3 LifeBook notebook with display open (15” model shown)

Locating the Controls
and Connectors

TOP AND FRONT COMPONENTS

The following is a brief description of your LifeBook 
notebook’s top and front components. (Figure 2-3)

Display Panel Latch

The display panel latch locks and releases the display 
panel. 

Display Panel

The display panel is a color LCD panel with back 
lighting for the display of text and graphics. (See Display 
Panel on page 26 for more information.)

Closed Cover Switch

The closed cover switch suspends the system when the 
cover is closed.

LifeBook Application Panel

The LifeBook Application Panel allows you to either 
launch your favorite applications by the touch of a 
button or to use as a media player when your unit is on. 
(See LifeBook Application Panel on page 20 for more infor-
mation.)

Status Indicator Panel

The Status Indicator Panel displays symbols that corre-
spond with a specific component of your LifeBook note-
book. (See Status Indicator Panel on page 13 for more 
information.)

Suspend/Resume/Power On Button

The Suspend/Resume/Power On button allows you to 
suspend notebook activity without powering off, resume 
your notebook from suspend mode, and power on your 
notebook when it has been shut down from Windows. 
(See Suspend/Resume/Power On Button on page 30 for 
more information.)

Stereo Speakers

The built-in boxless dual speakers allow for stereo 
sound. 

Keyboard

A full-size keyboard with dedicated Windows keys. 
(See Keyboard on page 15 for more information.)

Touchpad Pointing Device/Scroll Button

The Touchpad pointing device is a mouse-like cursor 
control with three buttons (left, right, and scroll 
buttons). (See Touchpad Pointing Device on page 18 for 
more information.)

Display
Panel
Latch

Display 

Suspend/

Keyboard

LifeBook
Application 
Panel

Status Indicator Panel

Stereo Speaker

Stereo Speaker

Touchpad

Scroll Button

Selector Switch

Closed Cover Switch

Panel

Resume/
Power On
Button

Summary of Contents for LifeBook C series

Page 1: ...e DVD player found in some models of the LifeBook notebook incorporates copyright protection technology that is protected by method claims of certain U S patents and other intellectual property rights owned by Macrovision Corporation and other rights users Use of this copyright protection technology must be authorized by Macrovision Corporation and is intended for home and other limited viewing us...

Page 2: ...L i f e B o o k C S e r i e s N o t e b o o k ...

Page 3: ...14 CapsLock Indicator 14 ScrLk Indicator 14 Keyboard Using the Keyboard 15 Numeric Keypad 15 Windows Keys 15 Cursor Keys 15 Function Keys 16 Volume Control Controlling the Volume 17 Touchpad Pointing Device Clicking 18 Double Clicking 18 Dragging 19 Scrolling 19 Touchpad Control Adjustment 19 LifeBook Application Panel Selector Switch 20 Application Launch Media Player Buttons 20 Configuring your ...

Page 4: ...Cards 44 Removing PC Cards 44 Memory Upgrade Module Installing a Memory Upgrade Module 45 Removing a Memory Upgrade Module 46 Checking the Computer Recognition of New Memory Capacity 46 Device Ports Modem RJ 11 Telephone Jack 47 Internal LAN RJ 45 Jack 47 IEEE 1394 Port 47 Universal Serial Bus Port 47 Parallel Port 47 Microphone Jack 47 Optical Digital Audio Out Connector 48 Headphone Jack 48 S Vi...

Page 5: ...fications Configuration Label 93 Microprocessor 93 Memory 93 Video 93 Audio 93 Mass Storage Device Options 93 Integrated Pointing Device 94 Communications 94 LifeBook Application Panel 94 Theft Prevention Lock SLot 94 Device Ports 94 Keyboard 94 Power 94 Dimensions and Weight 94 Environmental Requirements 95 Pre Installed Software 95 Regulatory Information 97 9 GLOSSARY Glossary 103 ...

Page 6: ...L i f e B o o k C S e r i e s N o t e b o o k ...

Page 7: ...1 1 Preface ...

Page 8: ...2 L i f e B o o k C S e r i e s N o t e b o o k ...

Page 9: ...pc com Before you place the call you should have the following information ready so that the customer support representative can provide you with the fastest possible solution Product name Product configuration number Product serial number Purchase date Conditions under which the problem occurred Any error messages that have occurred Hardware configuration Type of device connected if any Fujitsu O...

Page 10: ...4 L i f e B o o k C S e r i e s N o t e b o o k S e c t i o n O n e ...

Page 11: ...5 2 Getting to Know Your Computer ...

Page 12: ...6 L i f e B o o k C S e r i e s N o t e b o o k S e c t i o n T w o ...

Page 13: ...2 2 Phone Modem RJ 11 telephone cable Drivers and Applications CD Fujitsu Service Assistant CD Getting Started Guide User s Guide this document Premium Care registration card and envelope International Limited Warranty Brochure Microsoft associated product materials Depending upon the configuration of your notebook you may have also received the following items DVD and CD RW Application CD DVD App...

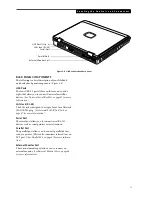
Page 14: ...icator Panel The Status Indicator Panel displays symbols that corre spond with a specific component of your LifeBook note book See Status Indicator Panel on page 13 for more information Suspend Resume Power On Button The Suspend Resume Power On button allows you to suspend notebook activity without powering off resume your notebook from suspend mode and power on your notebook when it has been shut...

Page 15: ...394 4 pin Port The 1394 port is used to connect between your LifeBook notebook and a peripheral such as a digital video camera See IEEE 1394 Port on page 47 for more informa tion DC Power Jack The DC power jack allows you to plug in the AC adapter or the optional Auto Airline adapter to power your LifeBook notebook and charge the internal Lithium ion battery PC Card PC Card Eject Buttons Anti Thef...

Page 16: ...lease allows you to open the media player tray without powering on your LifeBook notebook Infrared Port The fast IrDA compatible port allows you to communicate with another IrDA compatible infrared device without a cable USB 2 0 Port The USB port allows you to connect Universal Serial Bus 2 0 or USB 1 1 devices Note that there are three addi tional USB 2 0 ports on the rear of the system See Unive...

Page 17: ...esigned to accept a Local Area Network LAN RJ 45 plug See Internal LAN RJ 45 Jack on page 47 for more information Serial Port The serial port allows you to connect serial RS 232 devices such as serial printers or serial scanners Parallel Port The parallel port allows you to connect parallel devices such as a printer This is also sometimes referred to as an LPT port See Parallel Port on page 47 for...

Page 18: ...r and manufacturer information that you will need to give your support representative It identi fies the exact version of various components of your LifeBook notebook See Configuration Label on page 93 for more information Lithium ion Battery Bay The battery bay contains the internal Lithium ion battery It can be opened for the removal of the battery when stored over a long period of time or for s...

Page 19: ... on if you have either adapter connected and are shut down from Windows but have not turned off the power switch AC ADAPTER INDICATOR The AC Adapter indicator states whether your LifeBook notebook is operating from the AC adapter the Auto Airline adapter or the batteries This icon has two different states that can tell you what power source your LifeBook notebook is using On This means that either...

Page 20: ...our software tries to access a disk even if no floppy disk drive is installed See Internal Floppy Disk Drive on page 37 for more information PC CARD ACCESS INDICATORS The PC Card Access indicators state whether or not your LifeBook notebook is accessing a PC Card The indica tors will flash if your software tries to access a PC Card even if there is no card installed The first indicator represents ...

Page 21: ... edge of the key to indicate their secondary functions WINDOWS KEYS Your LifeBook notebook has two Windows keys consisting of one Start key and one Application key The Start key displays the Start menu This button functions the same as your on screen Start menu button The Application key functions the same as your right mouse button and displays shortcut menus for the selected item Please refer to...

Page 22: ...ternal mouse USB type Fn F5 Pressing F5 while holding Fn allows you to toggle between video compensation and no compensation Video compensation controls spacing on the display When it is enabled displays with less than 1024 x 768 or 800 x 600 pixel resolution will still cover the entire screen Fn F6 Pressing F6 repeatedly while holding Fn will lower the brightness of your display Fn F7 Pressing F7...

Page 23: ... that are set within individual applications Certain external audio devices you might connect to your system may have hardware volume controls Each source discussed above puts an upper limit on the volume level that must then be followed by the other sources We recommend that you experiment with the various volume controls to discover the optimal sound level P O I N T Any software that contains au...

Page 24: ... without having to use the scroll bars Figure 2 11 CLICKING Clicking means pushing and releasing a button To left click move the cursor to the item you wish to select press the left button once and then immedi ately release it To right click move the mouse cursor to the item you wish to select press the right button once and then immediately release it You also have the option to perform the click...

Page 25: ... you to navigate through a document quickly without using the window s scroll bars This is particularly useful when you are navigating through on line pages To use the Scrolling button press the crescent shape at the top or bottom of the button to scroll up or down a page When you have reached the desired section of the page release the button Figure 2 15 Figure 2 15 Scrolling TOUCHPAD CONTROL ADJ...

Page 26: ...uttons will launch a user defined application When the selector switch is in the Media Player position the buttons operate the media player CONFIGURING YOUR LIFEBOOK APPLICATION PANEL When you start your system the LifeBook Application Panel is automatically activated An icon resembling a finger pressing a button will appear on the system tray the indented portion of the status bar where the clock...

Page 27: ...his is the first button to the right of the Selector switch If you press it once it will stop an audio CD that is playing If you press it twice it will eject the audio CD Play Pause This is the second button to the right of the Selector switch Press this button to start playing an audio CD starting at Track 1 While the audio CD is playing press it to pause Press it again to continue Fast Backward ...

Page 28: ...ation Panel To deactivate the LifeBook Application Panel follow these easy steps 1 Click on Start 2 Click on Programs 3 Click on LifeBook Application Panel 4 Click on Deactivate Panel To reactivate follow the same procedure except for step 4 Click on Activate Panel instead Application Panel Setup If you insert an audio CD which has both audio and data tracks into the media player drive the media p...

Page 29: ...23 3 Getting Started ...

Page 30: ...24 L i f e B o o k C S e r i e s N o t e b o o k S e c t i o n T h r e e ...

Page 31: ...lug the DC output cable into the DC power jack on your LifeBook notebook 2 Plug the Auto Airline adapter into the cigarette lighter of an automobile with the ignition key in the On or Accessories position OR 3 Plug the Auto Airline adapter into the DC power jack on an airplane seat Switching from AC Adapter Power or the Auto Airline Adapter to Battery Power 1 Be sure that you have at least one cha...

Page 32: ... your display Fn F7 Pressing repeatedly will increase the brightness of the display Using the Power Management Utility Windows 2000 only Adjusting the brightness using the Power Management changes the setting permanently 1 Double click the BatteryAid icon in the lower right corner of your display This will open the BatteryAid Properties dialog box 2 Select the Power Control tab and adjust your LCD...

Page 33: ...ion is in the BIOS program Each time you power up or restart your Life Book notebook it goes through a boot sequence which displays a Fujitsu logo until your operating system is loaded During booting your LifeBook notebook is performing a standard boot sequence including a Power On Self Test POST When the boot sequence is completed without a failure and without a request for the BIOS Setup Utility...

Page 34: ...ccommodate the needs of many users in many different countries Windows needs to be config ured the first time you use them Windows has two parts Getting Started You have the opportunity to review the Windows License Agreement to enter custom information for your system and to set up your modem so that your LifeBook notebook will be prepared to dial out Registration Easy online registration for Win...

Page 35: ...Product Activation and Registration are not the same thing Registration is optional whereas Prod uct Activation is a required procedure REGISTERING YOUR LIFEBOOK NOTEBOOK What are the benefits of registering You will receive an identification label for your LifeBook notebook which if your notebook is ever lost may help in getting it returned to you You will also receive tech nical support access a...

Page 36: ...DE Suspend or Standby mode saves the contents of your LifeBook notebook s system memory during periods of inactivity by maintaining power to critical parts This mode will turn off the CPU the display the hard drive and all of the other internal components except those necessary to maintain system memory and allow for restarting Your LifeBook notebook can be put in Suspend mode by Pressing the Susp...

Page 37: ...ive Access indicators are all Off See figure 2 8 on page 13 If you turn off the power while accessing a disk or PC Card there is a risk of data loss To ensure that your LifeBook notebook shuts down without error use the Windows shut down proce dure Using the correct procedure to shut down from Windows allows your LifeBook notebook to complete its operations and turn off power in the proper sequenc...

Page 38: ...32 L i f e B o o k C S e r i e s N o t e b o o k S e c t i o n T h r e e ...

Page 39: ...33 4 User Installable Features ...

Page 40: ...34 L i f e B o o k C S e r i e s N o t e b o o k S e c t i o n F o u r ...

Page 41: ... the low battery message the batteries will continue to discharge until they are too low to operate When this happens your LifeBook notebook will go into Suspend mode There is no guarantee that your data will be saved once the notebook reaches this point Dead Battery Suspend mode shows on the Status indi cator just like the normal Suspend mode Once your LifeBook notebook goes into Dead Battery Sus...

Page 42: ...e 2 9 on page 13 If this display shows a Shorted Battery it means that the battery is damaged and must be replaced so it does not damage any other parts of your LifeBook notebook REPLACING THE BATTERY With the purchase of an additional battery you can have a fully charged spare to swap with one that is not charged Figure 4 1 1 Have a charged battery ready to install 2 Shut down your LifeBook noteb...

Page 43: ...repared so your LifeBook notebook knows where to store infor mation This preparation is called formatting or initial izing a disk You will need to format new disks unless they are preformatted Please refer to your operating system manual for step by step instructions on formatting a disk To prevent accidental erasure of the data stored on a disk slide the write protect tab until a small hole is ex...

Page 44: ...del only With the combo drive you can play DVD movies read audio CDs and write data onto recordable CD R or CD RW discs DVD RW model only With this drive you can play CD s and DVD s record CD R s and CD RW s and record DVD R s and DVD RW s Media Holder Tray Media Player Eject Button P O I N T Install your media player software before first using the DVD DVD CD RW or DVD RW media drives Refer to th...

Page 45: ...CD RW tray you will be prompted to select what you want the system to do when discs are inserted e g start automatically or wait for a prompt Until you make a selection you will receive the same prompt whenever you insert a disc 3 Click OK to close the About DVD Player Performance dialog box and the movie will begin Opening the Media Player Control Panel With most DVD ROMs you have the option of a...

Page 46: ...e on battery power you may need to swap in an additional charged battery or attach AC power during the movie to view it in its entirety To Watch a Movie on Battery Power 1 Have an additional full charged battery or your AC adapter ready for use 2 Start watching your DVD movie 3 When the low battery warning occurs immediately stop the movie and exit the media player 4 Power down your LifeBook noteb...

Page 47: ... v e P O I N T Some shorter DVD movies may not require you to swap batteries or attach AC power to complete them However it is best to be prepared since actual battery life while operating the media player drive cannot be guaranteed ...

Page 48: ...emory Sticks and SD Cards are installed in the Memory Stick SD Card slot Figure 4 6 To install a Memory Stick or SD Card follow these steps 1 See your Memory Stick or SD Card manual for instructions on the installation of your card Some cards may require that your notebook is off while installing them 2 Make sure there is no card currently in the slot If there is see Removing a Memory Stick SD Car...

Page 49: ...he vendor s user instruc tions Connect the other end of the optical digital cable to the Optical Digital Audio Out port on your LifeBook notebook The Optical Digital Audio Out port is the middle round port on the right hand side of your Life Book notebook Figure 4 8 Connecting Optical Digital Cable P O I N T MiniDisc recorder operation is dependent upon the individual vendor s instructions Be sure...

Page 50: ...tructions on removing your card Some PC Cards may require your LifeBook notebook to be in Suspend Mode or Off while removing them 2 Unlock the card from the slot by pressing the eject button associated with the slot in which the card is located When pressed the button will pop out 3 Firmly press the button again until it is flush with the notebook This will eject the card slightly out of the slot ...

Page 51: ...ed freely Figure 4 11 Figure 4 11 Sliding the keyboard 7 Carefully pivot the front of the keyboard away from the laptop until it is lying on the display Figure 4 12 Figure 4 12 Folding the keyboard back 8 Align the connector edge of the memory upgrade module chip side up with the connector slot in the compartment Figure 4 13 9 Insert the memory upgrade module at a 45o angle and press it firmly ont...

Page 52: ...go appears on the screen This will open the main menu of the BIOS setup with the current settings displayed See BIOS Setup Utility on page 27 for more information Use the right arrow key to select Info in the BIOS Setup menu The System Memory and the Extended Memory capacity as detected by your LifeBook notebook during the Power On Self Test POST are displayed at the bottom of the Info menu screen...

Page 53: ...vices keyboards and speakers USB 2 0 is downward compatible with USB 1 1 devices so older USB devices will work with these ports USB 2 0 is a much faster design running forty times faster than USB 1 1 To connect a USB device follow these steps See figure 2 6 on page 11 for location 1 Align the connector with the port opening 2 Push the connector into the port until it is seated PARALLEL PORT The p...

Page 54: ...old down screws located on each end of the connector SERIAL PORT The serial port allows you to connect serial devices such as printers or scanners In order to connect a serial inter face device follow these easy steps 1 Align the connector with the port opening See figure 2 6 on page 11 for location 2 Push the connector into the port until it is seated 3 Tighten the two hold down screws located on...

Page 55: ... no more than 36 for maximum performance P O I N T Do not move either device while communication is active as it may interrupt data transmission Be careful not to scratch the infrared port lens Dirt scratches or other surface marks can degrade operation ...

Page 56: ...50 L i f e B o o k C S e r i e s N o t e b o o k S e c t i o n F o u r ...

Page 57: ...51 5 Using the Integrated Wireless LAN Optional device ...

Page 58: ...52 L i f e B o o k C S e r i e s N o t e b o o k S e c t i o n F i v e ...

Page 59: ...d operation of this device FCC Interference Statement This equipment has been tested and found to comply with the limits for a Class B digital device pursuant to Part 15 of the FCC Rules These limits are designed to provide reasonable protection against harmful interfer ence in a residential installation This equipment gener ates uses and can radiate radio frequency energy If not installed and use...

Page 60: ...tion easily and at a low cost In the AdHoc mode you can use the function supported by Microsoft Network such as File and Print Sharing to exchange files and share a printer or other peripheral devices To use the AdHoc Mode you must set the same SSID and the same encryption key for all the computers that are connected All connected computers can communi cate with each other within the communication...

Page 61: ...parameters Updated drivers and or utilities may become available after this manual is printed see any addenda or fliers that may be included in the system packaging Item Description Profile Enter the system file name in which the parameter information is to be saved Mode Ad Hoc Network Click the down arrow and select 802 11 AdHoc Infrastructure Network Click the down arrow and select Infrastructur...

Page 62: ... 4 Perform the following steps Click Internet Protocol TCP IP Click Properties The Internet Protocol TCP IP Properties window appears 5 Set an IP address as indicated in Table 5 Ask your network administrator to check the setting Create Keys with Passphrase Not supported Passphrase Not supported Create Keys Manually Hexadecimal Input Select this to use hexadecimal character codes to set the encryp...

Page 63: ...ng for Microsoft Networks is not found in the list click Install and perform Step 5 and subsequent steps When you click Install the Select Network Component Type window appears 5 Perform the following steps Click Service Click Add The Select Network Service window appears 6 Perform the following steps Click File and Printer Sharing for Microsoft Networks Click OK You will go back to Local Area Con...

Page 64: ...you want to access The drive is displayed showing its contents and made available to you If you have any questions or prob lems refer to Troubleshooting on page 63 Checking the Connectivity 1 Click Start Settings Control Panel 2 Double click the PRISM Settings icon PRISM Wireless Settings appears 3 Check the connectivity on the Link tab The current condition of connection is displayed P O I N T If...

Page 65: ... Add under Preferred networks Wireless Network Properties appears 7 Set parameters For the AdHoc network specify the same value to all the computers for which the encryption key is used for connection For the infrastructure network specify the encryp tion key network key with the same value to the encryption key of the access point For how to check the encryption keys set for the access point refe...

Page 66: ... network Set the same name for all of the computers that are to be connected Infrastructure network Specify the same name as that specified on the access point that is to be connected For access point instructions refer to the manual that comes with the access point Key Format Click the down arrow and select the input for the Network key ASCII characters Select this when using ASCII characters for...

Page 67: ...ter Sharing for Microsoft Networks Click OK You will go back to Wireless Network Connection 2 Properties and File and Printer Sharing for Microsoft Networks is added to the list 7 Click Close Sharing Files The following example shows how to set sharing the Work folder on the c drive 1 Click Start My Computer 2 Double click the Local Disk c icon 3 Right click the Work folder and then click Sharing ...

Page 68: ...click the computer to which you want to connect The drive that you set in Computer Sharing appears 5 Double click the drive to which you want to connect The contents of the drive will appear and is available for use If you have a question or problem refer to Trouble shooting on page 63 Checking the Connectivity 1 Click Start Control Panel 2 Double click the PRISM Settings icon PRISM Wireless Setti...

Page 69: ...r Click Start Search Other Computers Enter the computer name that you are connecting to in Name and click Search Double click the icon of the computer that has been searched A failure in installing the driver Make sure that the driver is correctly installed The TCP IP protocol is not installed or the IP address is not set correctly Make sure that the TCP IP protocol is installed To check this you ...

Page 70: ... by the PING statistics similar to below 5 To check that your system is communicating with other systems go to the DOS prompt and type ping XXX XXX XXX XXX With the destination IP address in place of XXX XXX XXX XXX Example if the destination IP address is 10 0 1 3 C ping 10 0 1 3 A message similar to the following appears if the connection is successful Pinging 10 0 1 3 with 32 bytes of data Repl...

Page 71: ... Wireless LAN PCI Card and click Uninstall from the menu that is displayed Confirm Device Removal appears 6 Click OK 7 Close System Properties 8 Make sure that the icon has disappeared from the task tray in the lower right corner of the screen 9 Click Start Settings Control Panel 10 Double click Add Remove Programs Add Remove Programs appears 11 Perform the following steps Click PRISM 11Mbps Wirel...

Page 72: ...ght click Intersil PRISM Wireless LAN PCI Card and click Uninstall from the menu that is displayed Confirm Device Removal appears 6 Click OK 7 Close System Properties 8 Make sure that the icon has disappeared from the task tray in the lower right corner of the screen 9 Click Start Control Panel Control Panel appears 10 Double click Add Remove Programs Add Remove Programs appears 11 Perform the fol...

Page 73: ... ask the network administrator to check the IP address to be set for the computer If no access point is found in the network An IP address is expressed with four values in the range between 1 and 255 Set the each computer as follows The value in paren theses is a subnet mask Example Computer A 192 168 100 2 255 255 255 0 Computer B 192 168 100 3 255 255 255 0 Computer C 192 168 100 4 255 255 255 0...

Page 74: ... Network Type IEEE 802 11b Transfer Rate 11 5 5 2 1Mbps auto change Frequency Range 2 400 2 473 MHz Channels One of 11 channels is used Card Type Non intelligent VCC Class B Security Network name encryption key Supported Operating Systems Windows 2000 Windows XP Power Current Max 350mA Maximum number of units recommended for wireless LAN AdHoc network 10 or less ...

Page 75: ...69 6 Troubleshooting ...

Page 76: ...70 L i f e B o o k C S e r i e s N o t e b o o k S e c t i o n S i x ...

Page 77: ...otebook Make sure it has been off at least 10 seconds before you turn it on 6 Go through the boot sequence 7 If the problem has not been resolved refer to the Troubleshooting Table that follows for more detailed troubleshooting information 8 If you have tried the solutions suggested in the Trou bleshooting Table without success contact your support representative Toll free 1 800 8Fujitsu 1 800 838...

Page 78: ...ook fails to recognize media discs The disc is not pushed down onto raised center circle of the drive Open media player tray and re install the media disc properly Media player tray is not latched shut Push on the front of the media player tray until it latches Setup utility is set to something other than media player or Auto for Secondary Master Controller Revise BIOS settings for the Secondary M...

Page 79: ... the floppy disk and set it to write enable See Internal Floppy Disk Drive on page 37 for more infor mation Floppy disk is not loaded correctly Eject floppy disk check orientation and re insert See Internal Floppy Disk Drive on page 37 for more information BIOS setup utility states Floppy Disk Controller Disabled Revise the setup utility Main menu settings to enable Diskette Controller See BIOS Se...

Page 80: ... the power using the power switch wait at least 10 seconds and then power on Memory Problems Your Power On screen or Main menu of the BIOS setup utility infor mation does not show the correct amount of installed memory Your memory upgrade module is not properly installed Remove and re install your memory upgrade module See Memory Upgrade Module on page 45 for more information You have a memory fai...

Page 81: ...tility on page 27 for more information Your PC Card device and another device are assigned the same I O address Check all I O addresses located within the BIOS setup utility and any other installed hardware or software to make sure there are no duplications The card may have been removed using the Unplug or Eject Hardware utility If the Unplug or Eject Hardware utility has been used to remove the ...

Page 82: ...uit your operation needs You are operating on battery power only and have ignored a low battery alarm until the batteries are all at the dead battery state and your machine has gone into Dead Battery Suspend mode Install a power adapter and then push the Suspend Resume button See Power Sources on page 25 for more information You have a battery failure Verify the condition of the batteries using th...

Page 83: ... the setup utility are not compatible with your configuration Set the operating source by pressing the ESC key while the Fujitsu logo is on screen or use the F2 key and enter the setup utility and adjust the source settings from the Boot menu See BIOS Setup Utility on page 27 for more information You have a secured system requiring a password to load your operating system Make sure you have the ri...

Page 84: ...ck the Continue Anyway or Yes buttons to proceed The LifeBook notebook turned on with a series of beeps and your built in display is blank Power On Self Test POST has detected a failure which does not allow the display to operate Contact your support representative The display goes blank by itself after you have been using it The LifeBook notebook has gone into Video timeout Standby mode Suspend m...

Page 85: ... enable your external monitor See Video Features submenu located within the Advanced Menu of the BIOS See BIOS Setup Utility on page 27 for more information Your external monitor is not properly installed Reinstall your device See External Monitor Port on page 48 for more information Your operating system software is not setup with the correct soft ware driver for that device Check your device and...

Page 86: ...and correct them if necessary If the settings are OK and the message appears when you restart the system there may be a serious fault which might cause you to lose data if you continue Contact your support representative Incorrect Drive A type run SETUP Type of floppy drive A not correctly identified in Setup This means that the floppy disk drive type identified in your setup utility does not agre...

Page 87: ...ystem CMOS checksum bad run SETUP BIOS CMOS RAM has been corrupted or modified incorrectly perhaps by an application program that changes data stored in BIOS memory Run Setup and reconfigure the system System RAM Failed at offset nnnn System memory failed at offset nnnn of in the 64k block at which the error was detected This means that there is a fault in your built in memory If you continue to o...

Page 88: ...rompt appears below the Fujitsu logo press the F12 key 3 Select the CD drive from the list that appears and press Enter The CD drive is now the boot drive and the system boots up from the CD 4 A message will appear informing you that continuing to boot from the CD will overwrite all information on the hard drive including saved files and restore the hard drive to its factory configura tion When yo...

Page 89: ...led DISE will hang 2 From the DISE main window click Options Restore Backup to restore an image you created or click Options Restore Factory Backup to restore the factory image Re Installing Individual Drivers and Applications The Drivers and Application CD can be used to selec tively re install drivers and or applications that may have been un installed or corrupted To re install drivers and or a...

Page 90: ...84 L i f e B o o k C S e r i e s N o t e b o o k S e c t i o n S i x ...

Page 91: ...85 7 Care and Maintenance ...

Page 92: ...86 L i f e B o o k C S e r i e s N o t e b o o k S e c t i o n S e v e n ...

Page 93: ...oth Do not use abrasives or solvents Use a soft cloth to remove dust from the screen Never use glass cleaners Storing your Fujitsu notebook If storing your LifeBook notebook for a month or longer turn your LifeBook notebook off fully charge the battery the remove and store all Lithium ion bat teries Store your LifeBook notebook and batteries separately If you store your LifeBook notebook with a ba...

Page 94: ...er auto insert notification function Always use fully charged batteries Eject PCMCIA cards when not in use FLOPPY DISKS AND DRIVES Caring for your Floppy Disks Avoid using the floppy disks in damp and dusty locations Never store a floppy disk near a magnet or magnetic field Do not use a pencil or an eraser on a disk or disk label Avoid storing the floppy disks in extremely hot or cold locations or...

Page 95: ...ng for your Media Player Drive Your media player drive is durable but you must treat it with care Please pay attention to the following points The drive rotates the compact disc at a very high speed Do not carry it around or subject it to shock or vibration with the power on Avoid using or storing the drive where it will be exposed to extreme temperatures Avoid using or storing the drive where it ...

Page 96: ...90 L i f e B o o k C S e r i e s N o t e b o o k S e c t i o n S e v e n ...

Page 97: ...91 8 Specifications ...

Page 98: ...92 L i f e B o o k C S e r i e s N o t e b o o k S e c t i o n E i g h t ...

Page 99: ... Color and Resolution 15 XGA TFT and 14 1 XGA TFT Internal 1024 x 768 pixel resolution 16M colors External 1600 x 1200 max pixel resolution 16M colors Simultaneous Video 1024 x 768 pixel resolution Video RAM ATI RADEON IGP340M integrated graphics chipset The video memory is shared with system memory and is user selectable 16MB 32MB 64MB with 32MB the default Video RAM size can be changed in the BI...

Page 100: ...t output devices One modular modem RJ 11 connector One modular Ethernet RJ 45 jack One IEEE 1394 jack 4 pin type Fast IR up to 4 Mbps compatible infrared port for wireless data transfer One 25 pin D SUB connector for parallel input output devices bi directional output only for ECP One mono microphone jack See Audio specifica tions One Optical Digital Audio Out Headphone jack See Audio specificatio...

Page 101: ...and restore the system to its original state McAfee com Scan for Virus Scan for Virus by McAfee com is a web based antivirus program that can be run from the McAfee com Web site after loading data or programs onto your LifeBook note book It assists in the protection of the data currently residing on your hard disk from destruction or contami nation Your system comes with a free 30 day trial editio...

Page 102: ...ws XP models only Quicken 2003 New User Edition by Intuit is a personal money management program It has features such as portfolio management account registries on line banking and bill paying features This application is for new users who are using Quicken software for the first time Full version upgrade information is available on line BatteryAid Windows 2000 only BatteryAid allows you to contro...

Page 103: ...n the devices not ringing in response to an incoming call In most but not all areas the sum of RENs should not exceed five 5 0 To be certain of the number of devices that may be connected to a line as determined by the total RENs contact the local telephone company For products approved after July 23 2001 the REN for this product is part of the product identifier that has the format US AAAEQ TXXXX...

Page 104: ...r le numéro d enregistrement Le sigle IC placé devant le numéro d enregistrement signifie que l enregistrement s est effectué conformément à une déclaration de conformité et indique que les spécifications techniques d Industrie Canada ont été respectées Il n implique pas qu Industrie Canada a approuvé le matériel Avant de connecter cet équipement à une ligne télépho nique l utilisateur doit vérifi...

Page 105: ...nicians Only C A U T I O N The modem to telephone network connection must be a line cord using a minimum 26 AWG wire W A R N I N G n For continued protection against risk of fire replace only with the same type and rating fuse n Danger of explosion if Lithium clock battery is incor rectly replaced Replace only with the same or equiva lent type recommended by the manufacturer Dispose of used batter...

Page 106: ...100 L i f e B o o k C S e r i e s N o t e b o o k ...

Page 107: ...101 9 Glossary ...

Page 108: ...102 L i f e B o o k C S e r i e s N o t e b o o k S e c t i o n N i n e ...

Page 109: ...rical circuit which passes data between the CPU and the sub assemblies inside your LifeBook notebook Byte 8 bits of parallel binary information Cache Memory A block of memory built into the micro processor which is much faster to access than your system RAM and used in specially structured ways to make your overall data handling time faster CardBus A faster 32 bit version of the PC Card interface ...

Page 110: ...duce the desired results from that particular equipment DVD Digital Video Disc A type of CD ROM that holds up to 4 7GB of data enough for a full length movie DVDs are backward compatible with CD ROMs so that DVD players can play old CD ROMs video CDs and new DVD ROMs DVD R Digital Video Disc Readable DVD R discs can be written to only once then read DVD R discs hold up to 4 7GB of data DVD RW DVD ...

Page 111: ...nel to process sound from all sources MPU 401 A standard for MIDI interfaces and connectors NTSC National TV Standards Commission The standard for TV broadcast and reception for the USA Operating System A group of control programs that convert application commands including driver programs into the exact form required by a specific brand and model of micro processor in order to produce the desired...

Page 112: ...tion to another device through which data is transferred one bit at a time on a single wire with any other wires only for control of the device not for transfer of data Shadow RAM A technique of copying data or applications stored in ROM Read Only Memory into RAM Random Access Memory for access during actual operation RAM is much faster to access than ROM however ROM contents are not lost when pow...

Page 113: ...IBM with the PS 2 series of personal computers Provides resolutions of 720 x 400 VRAM Video Random Access Memory A memory dedicated to video display data and control WEP Wired Equivalent Privacy WEP is a protocol for increasing privacy over wireless LANs The protocol works by encrypting data while being transmitted over radio waves Wi Fi Compatible Wi Fi Wireless Fidelity Identifies that the produ...

Page 114: ...108 L i f e B o o k C S e r i e s N o t e b o o k S e c t i o n N i n e ...

Page 115: ...l 93 Control 39 Conventions Used in the Guide 3 Cursor 18 Cursor Keys 15 D DC Output Cable 25 DC Power Jack 9 25 DIMM 45 Disk care 88 Display 26 78 Display Panel 8 adjusting 26 brightness 26 closing 26 opening 26 power management 26 Display Panel Latch 8 Display Timeout 31 Dolby Headphone 40 Double Clicking 18 Dragging 19 Drivers and Application CD 83 E Emergency Media Player Tray Release 10 Error...

Page 116: ... Panel 8 control panel 21 locking unlocking selector switch 20 21 M Media Player 10 access indicator 14 care 89 Control Panel 39 loading 39 removing 39 Software 38 39 using 40 Media player care 89 tray release 81 Media Player Eject Button 10 Memory capacity 46 extended 46 installing 45 removing 46 system 46 Memory Stick installing 42 Memory Upgrade Module 74 Microphone Jack 47 Modem Jack 47 Modem ...

Page 117: ...tus Indicator Panel 13 Status LCD Panel 8 Stereo Line in Jack 10 Stereo Speakers 8 Suspend 106 Suspend Mode 30 Suspend Resume Button 8 30 77 S Video Out Port 9 48 T Touchpad 18 buttons 18 controls 19 Touchpad Pointing Device 8 Troubleshooting 71 troubleshooting 71 U Universal Serial Bus Port 47 Upgrade 45 USB 47 Using the Media Player 21 V Volume Control 17 W Warranty Information 3 Windows keys 15...

Page 118: ...L i f e B o o k C S e r i e s N o t e b o o k ...

Reviews: