58
L i f e B o o k E S e r i e s – S e c t i o n 4
16. Type
FORMAT D
: to format the hard drive. When
formatting is done, restart your LifeBook.
Your LifeBook will now detect the hard disk drive and
activate it within your system. The drive letters associ-
ated with the hard disk drive will be created and listed
under My Computer and Windows Explorer.
Formatting the Modular Hard Disk Drive
in Windows 2000 Professional
Re-partitioning and formatting your LifeBook’s internal
and/or external hard disk drive can be done using the
Disk Management Utility.
To re-partition and format the modular hard disk drive,
follow these steps:
1. From the
Start
menu, select
Settings
, then select
Control Panel
.
2. Double-click on
Administrative Tools
icon.
3. Select
Computer Management
, then select the
Disk
Management
option. For more information about
using the Disk Management option, see your
Windows 2000 Professional system documentation.
Removing and Installing the Removable Hard Disk
Drive
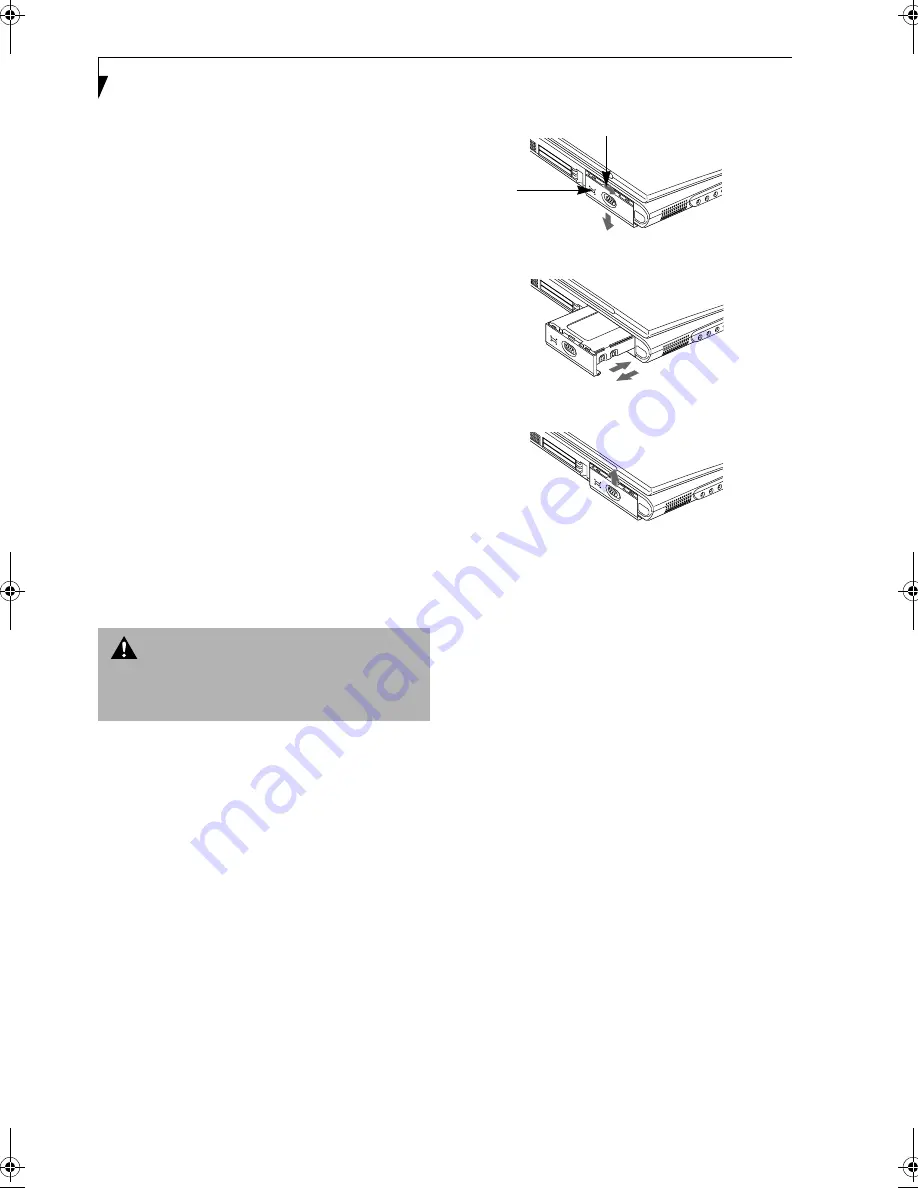
To remove the hard disk drive or to install a new hard
disk drive follow these easy steps: (Figure 4-8)
1. Turn off the LifeBook and disconnect the AC
adapter.
2. Unlock the release button and slide down the cover.
3. Remove the hard disk drive and insert the new one.
4. Slide the cover up to lock.
Figure 4-8 Removing/Installing the removable hard disk drive
W A R N I N G
Be sure to turn off your LifeBook and disconnect the AC
adapter before replacing the hard disk drive, otherwise
you might get an electric shock.
Release Button
Cover
(a)
(b)
(c)
!#
Summary of Contents for LifeBook E-6540
Page 8: ...L i f e B o o k E S e r i e s ...
Page 9: ...1 1 Preface ...
Page 10: ...2 L i f e B o o k E S e r i e s S e c t i o n 1 ...
Page 12: ...L i f e B o o k E S e r i e s S e c t i o n 1 4 ...
Page 13: ...5 2 Getting to Know Your LifeBook ...
Page 14: ...6 L i f e B o o k E S e r i e s S e c t i o n 2 ...
Page 42: ...34 L i f e B o o k E S e r i e s S e c t i o n 2 ...
Page 43: ...35 3 Getting Started ...
Page 44: ...36 L i f e B o o k E S e r i e s S e c t i o n 3 ...
Page 53: ...45 4 User Installable Features ...
Page 54: ...46 L i f e B o o k E S e r i e s S e c t i o n 4 ...
Page 74: ...66 L i f e B o o k E S e r i e s S e c t i o n 4 ...
Page 75: ...67 5 Troubleshooting ...
Page 76: ...68 L i f e B o o k E S e r i e s S e c t i o n 5 ...
Page 90: ...82 L i f e B o o k E S e r i e s S e c t i o n 5 ...
Page 91: ...83 6 Care and Maintenance ...
Page 92: ...84 L i f e B o o k E S e r i e s S e c t i o n 6 ...
Page 96: ...88 L i f e B o o k E S e r i e s S e c t i o n 6 ...
Page 97: ...89 7 Specifications ...
Page 98: ...90 L i f e B o o k E S e r i e s S e c t i o n 7 ...
Page 102: ...94 L i f e B o o k E S e r i e s S e c t i o n 7 ...
Page 103: ...95 8 Glossary ...
Page 104: ...96 L i f e B o o k E S e r i e s S e c t i o n 8 ...
Page 110: ...102 L i f e B o o k E S e r i e s ...
Page 111: ...103 Index ...
Page 112: ...104 L i f e B o o k E S e r i e s ...


