59
U s e r I n s t a l l a b l e F e a t u r e s
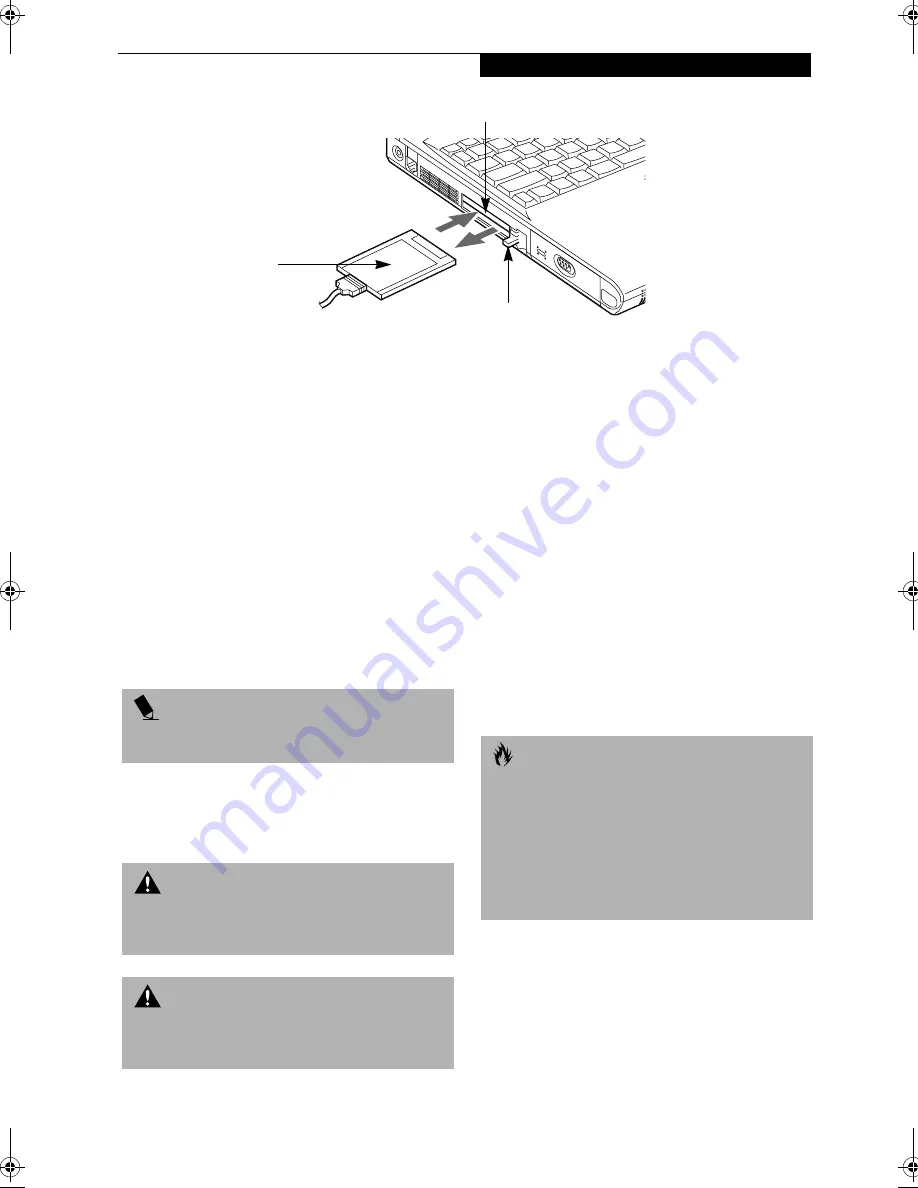
Figure 4-9 Installing/Removing PC Cards
PC Cards
Your LifeBook supports two Type II and one Type III PC
Cards, which can perform a variety of functions
depending on which type of PC Card you install.
Some available PC Cards:
■
Zoomed Video
■
Fax/data modem
■
Local area network (LAN)
■
IDE solid-state disk
■
SCSI
■
Other PC Cards that conform to PCMCIA™ 2.1 or
CardBus standards.
For further information, refer to the instructions
supplied with your PC Card.
INSTALLING PC CARDS
PC Cards are installed in the PC Card slot. To install a
PC Card, follow these easy steps:
1. See your PC Card manual for specific instructions
on the installation of your card. Some PC Cards may
require your LifeBook to be Off while installing
them.
2. Make sure there is no PC Card currently in the slot.
If there is, see Removing PC Cards.
3. Insert your PC Card into the slot with the product
label facing up.
4. Push the card into the slot firmly until it is seated
in the opening. You will hear a click and the Eject
button will pop away from your LifeBook.
5. Flip the Eject button towards the front of
your LifeBook.
6. Lock the PC Card into the slot by sliding the
Lock button toward the front of your LifeBook.
REMOVING PC CARDS
To remove a PC Card, perform the following steps:
1. See your PC Card manual for specific instructions
on removing your card. Some PC Cards may require
your LifeBook to be Off while removing them.
Eject Button
PC Card Slot
PC Card
P O I N T
Windows 2000 Professional does not support Zoomed
video cards.
W A R N I N G
Installing or removing a PC Card during your LifeBook’s
shutdown or bootup process may damage the card
and/or your LifeBook.
W A R N I N G
Do not insert a PC Card into a slot if there is water or
any other substance on the card as you may
permanently damage the card, your LifeBook or both.
C A U T I O N
Windows 98 Second Edition has a shutdown procedure
for PC Cards that must be followed before removing a
card. Review your operating system manual for
the correct procedure.
Windows 2000 Professional PC Cards should be
stopped using the Unplug or Eject Hardware utility on
the taskbar. Refer to your operating system manual for
the correct procedure.
!$
Summary of Contents for LifeBook E-6540
Page 8: ...L i f e B o o k E S e r i e s ...
Page 9: ...1 1 Preface ...
Page 10: ...2 L i f e B o o k E S e r i e s S e c t i o n 1 ...
Page 12: ...L i f e B o o k E S e r i e s S e c t i o n 1 4 ...
Page 13: ...5 2 Getting to Know Your LifeBook ...
Page 14: ...6 L i f e B o o k E S e r i e s S e c t i o n 2 ...
Page 42: ...34 L i f e B o o k E S e r i e s S e c t i o n 2 ...
Page 43: ...35 3 Getting Started ...
Page 44: ...36 L i f e B o o k E S e r i e s S e c t i o n 3 ...
Page 53: ...45 4 User Installable Features ...
Page 54: ...46 L i f e B o o k E S e r i e s S e c t i o n 4 ...
Page 74: ...66 L i f e B o o k E S e r i e s S e c t i o n 4 ...
Page 75: ...67 5 Troubleshooting ...
Page 76: ...68 L i f e B o o k E S e r i e s S e c t i o n 5 ...
Page 90: ...82 L i f e B o o k E S e r i e s S e c t i o n 5 ...
Page 91: ...83 6 Care and Maintenance ...
Page 92: ...84 L i f e B o o k E S e r i e s S e c t i o n 6 ...
Page 96: ...88 L i f e B o o k E S e r i e s S e c t i o n 6 ...
Page 97: ...89 7 Specifications ...
Page 98: ...90 L i f e B o o k E S e r i e s S e c t i o n 7 ...
Page 102: ...94 L i f e B o o k E S e r i e s S e c t i o n 7 ...
Page 103: ...95 8 Glossary ...
Page 104: ...96 L i f e B o o k E S e r i e s S e c t i o n 8 ...
Page 110: ...102 L i f e B o o k E S e r i e s ...
Page 111: ...103 Index ...
Page 112: ...104 L i f e B o o k E S e r i e s ...


