11
G e t t i n g t o K n o w Y o u r L i f e B o o k
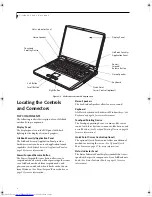
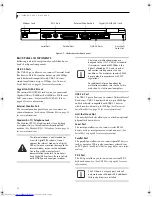
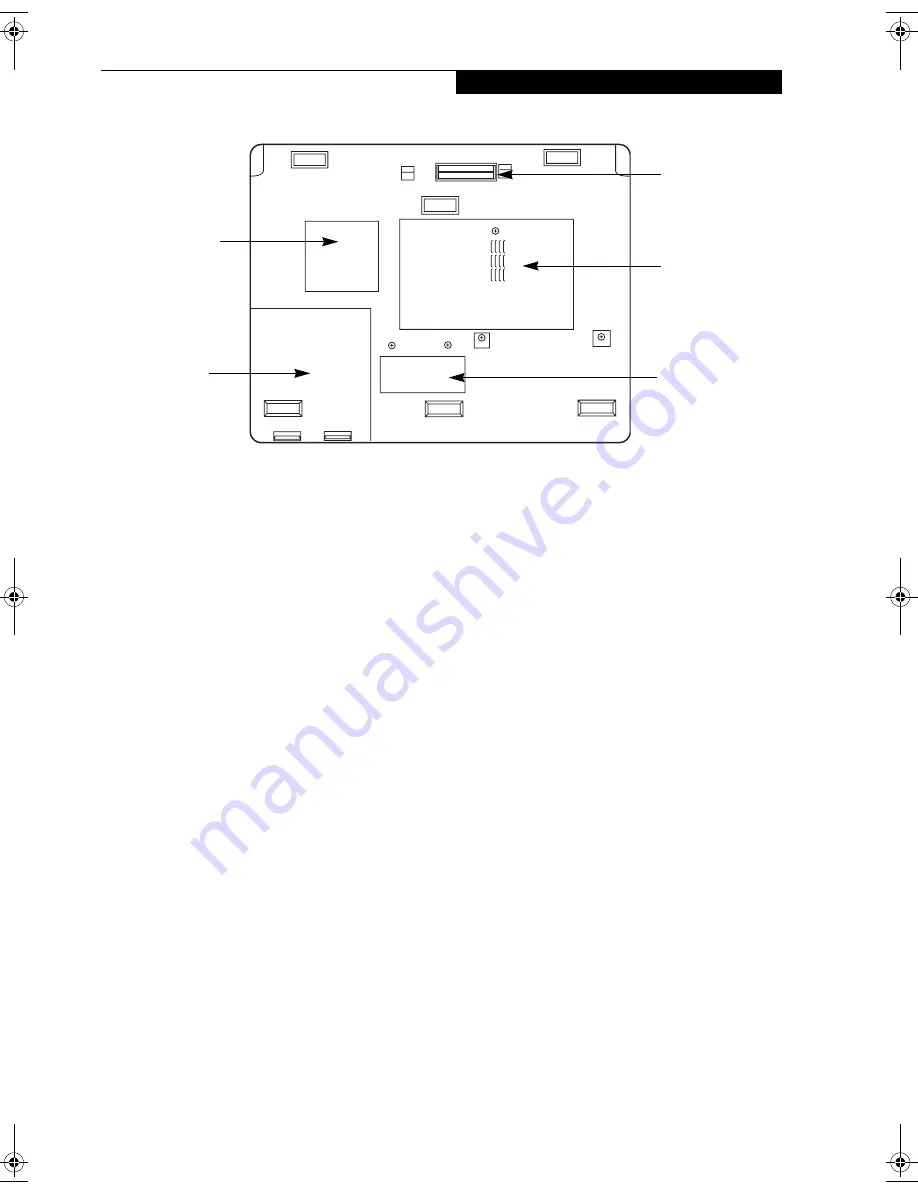
Figure 2-8. LifeBook notebook bottom panel
BOTTOM COMPONENTS
The following is a brief description of your LifeBook
notebook’s bottom panel components.
Port Replicator Connector
This connector allows you to connect the optional Port
Replicator to your notebook.
Memory Upgrade/Wireless Device Compartment
Your LifeBook notebook comes with high speed Double
Data Rate Synchronous Dynamic RAM (DDR SDRAM).
The memory upgrade compartment allows you to
expand the system memory capacity of your LifeBook
notebook, hence improving overall performance. (See
Memory Upgrade Module on page 45 for more informa-
tion).
This compartment also houses the optional wireless
LAN device. Under normal circumstances, it should not
be necessary to open this compartment.
Lithium ion Battery Bay
The battery bay contains the internal Lithium ion
battery. It can be opened for the removal of the battery
when stored over a long period of time or for swapping
a discharged battery with a charged Lithium ion battery.
(See Lithium ion Battery on page 37 for more information)
Main Unit and Configuration Label
The configuration label shows the model number and
other information about your LifeBook notebook. In
addition, the configuration portion of the label has the
serial number and manufacturer information that you
will need to give your support representative. It identi-
fies the exact version of various components of your
notebook.
Memory Upgrade/
Lithium ion
Main Unit and
Certificate of
Port Replicator
Connector
Configuration
Label
Authenticity
(approximate
location)
Battery Bay
Compartment
Wireless LAN
E Series.book Page 11 Friday, May 14, 2004 1:25 PM
Summary of Contents for Lifebook E8010
Page 2: ...L i f e B o o k E 8 0 0 0 N o t e b o o k ...
Page 6: ...L i f e B o o k E 8 0 0 0 N o t e b o o k ...
Page 7: ...1 Preface ...
Page 8: ...L i f e B o o k E 8 0 0 0 N o t e b o o k ...
Page 10: ...2 L i f e B o o k E 8 0 0 0 N o t e b o o k ...
Page 11: ...3 2 Getting to Know Your LifeBook Notebook ...
Page 12: ...4 L i f e B o o k E 8 0 0 0 N o t e b o o k ...
Page 32: ...24 L i f e B o o k E 8 0 0 0 N o t e b o o k ...
Page 33: ...25 3 Getting Started ...
Page 34: ...26 L i f e B o o k E 8 0 0 0 N o t e b o o k ...
Page 42: ...34 L i f e B o o k E 8 0 0 0 N o t e b o o k ...
Page 43: ...35 4 User Installable Features ...
Page 44: ...36 L i f e B o o k E 8 0 0 0 N o t e b o o k ...
Page 61: ...53 5 Troubleshooting ...
Page 62: ...54 L i f e B o o k E 8 0 0 0 N o t e b o o k ...
Page 76: ...68 L i f e B o o k E 8 0 0 0 N o t e b o o k ...
Page 77: ...69 6 Care and Maintenance ...
Page 78: ...70 L i f e B o o k E 8 0 0 0 N o t e b o o k ...
Page 82: ...74 L i f e B o o k E 8 0 0 0 N o t e b o o k ...
Page 83: ...75 7 Specifications ...
Page 84: ...76 L i f e B o o k E 8 0 0 0 N o t e b o o k ...
Page 89: ...81 8 Glossary ...
Page 90: ...82 L i f e B o o k E 8 0 0 0 N o t e b o o k ...
Page 100: ...92 L i f e B o o k E 8 0 0 0 N o t e b o o k ...
Page 101: ...93 Appendix Integrated Wireless LAN User s Guide Optional device ...
Page 102: ...94 L i f e B o o k E 8 0 0 0 N o t e b o o k ...
Page 120: ...112 L i f e B o o k E S e r i e s N o t e b o o k S e c t i o n F i v e ...

