49
U s e r I n s t a l l a b l e F e a t u r e s
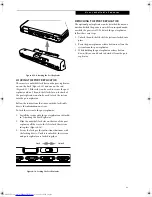
Figure 4-13. Attaching the Port Replicator
LOCKING THE PORT REPLICATOR
There are two anti-theft lock slots on the port replicator:
one on the back (Figure 4-10) and one on the end
(Figure 4-11). Either slot can be used to secure the port
replicator alone. The anti-theft lock slot on the back of
the port replicator can also be used to lock the system
into the port replicator.
Follow the instructions that came with the lock/cable
device for information on its use.
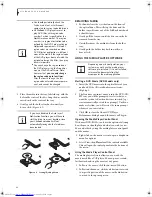
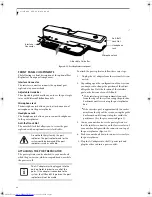
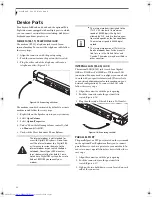
To lock the system to the port replicator:
1. Install the system onto the port replicator as detailed
in “Attaching the Port Replicator”.
2. Slide the anti-theft lock slot on the rear of the port
replicator all the way to the left to lock the system
into place (Figure 4-14).
3. Secure the lock per the instructions that came with
the locking device. Until it is unlocked, the system
and port replicator are locked together.
Figure 4-14. Locking the Port Replicator
DETACHING THE PORT REPLICATOR
The optional port replicator can be detached from your
notebook while the power is on, while in suspend mode,
or while the power is off. To detach the port replicator
follow these easy steps:
1. Unlock the anti-theft lock if the system is locked into
place.
2. Press the port replicator release button to release the
system from the port replicator.
3. While holding the port replicator release button
down, lift your notebook to detach it from the port
replicator.
Lock
Unlock
E Series.book Page 49 Friday, May 14, 2004 1:25 PM
Summary of Contents for Lifebook E8010
Page 2: ...L i f e B o o k E 8 0 0 0 N o t e b o o k ...
Page 6: ...L i f e B o o k E 8 0 0 0 N o t e b o o k ...
Page 7: ...1 Preface ...
Page 8: ...L i f e B o o k E 8 0 0 0 N o t e b o o k ...
Page 10: ...2 L i f e B o o k E 8 0 0 0 N o t e b o o k ...
Page 11: ...3 2 Getting to Know Your LifeBook Notebook ...
Page 12: ...4 L i f e B o o k E 8 0 0 0 N o t e b o o k ...
Page 32: ...24 L i f e B o o k E 8 0 0 0 N o t e b o o k ...
Page 33: ...25 3 Getting Started ...
Page 34: ...26 L i f e B o o k E 8 0 0 0 N o t e b o o k ...
Page 42: ...34 L i f e B o o k E 8 0 0 0 N o t e b o o k ...
Page 43: ...35 4 User Installable Features ...
Page 44: ...36 L i f e B o o k E 8 0 0 0 N o t e b o o k ...
Page 61: ...53 5 Troubleshooting ...
Page 62: ...54 L i f e B o o k E 8 0 0 0 N o t e b o o k ...
Page 76: ...68 L i f e B o o k E 8 0 0 0 N o t e b o o k ...
Page 77: ...69 6 Care and Maintenance ...
Page 78: ...70 L i f e B o o k E 8 0 0 0 N o t e b o o k ...
Page 82: ...74 L i f e B o o k E 8 0 0 0 N o t e b o o k ...
Page 83: ...75 7 Specifications ...
Page 84: ...76 L i f e B o o k E 8 0 0 0 N o t e b o o k ...
Page 89: ...81 8 Glossary ...
Page 90: ...82 L i f e B o o k E 8 0 0 0 N o t e b o o k ...
Page 100: ...92 L i f e B o o k E 8 0 0 0 N o t e b o o k ...
Page 101: ...93 Appendix Integrated Wireless LAN User s Guide Optional device ...
Page 102: ...94 L i f e B o o k E 8 0 0 0 N o t e b o o k ...
Page 120: ...112 L i f e B o o k E S e r i e s N o t e b o o k S e c t i o n F i v e ...


