background image

12

L I F E B O O K   L H 5 3 1   B I O S

BOOT MENU – SELECTING THE OPERATING SYSTEM SOURCE

The Boot Menu is used to select the order in which the 
BIOS searches sources for the operating system. Follow 
the instructions for Navigating Through the Setup 
Utility to make any changes. 

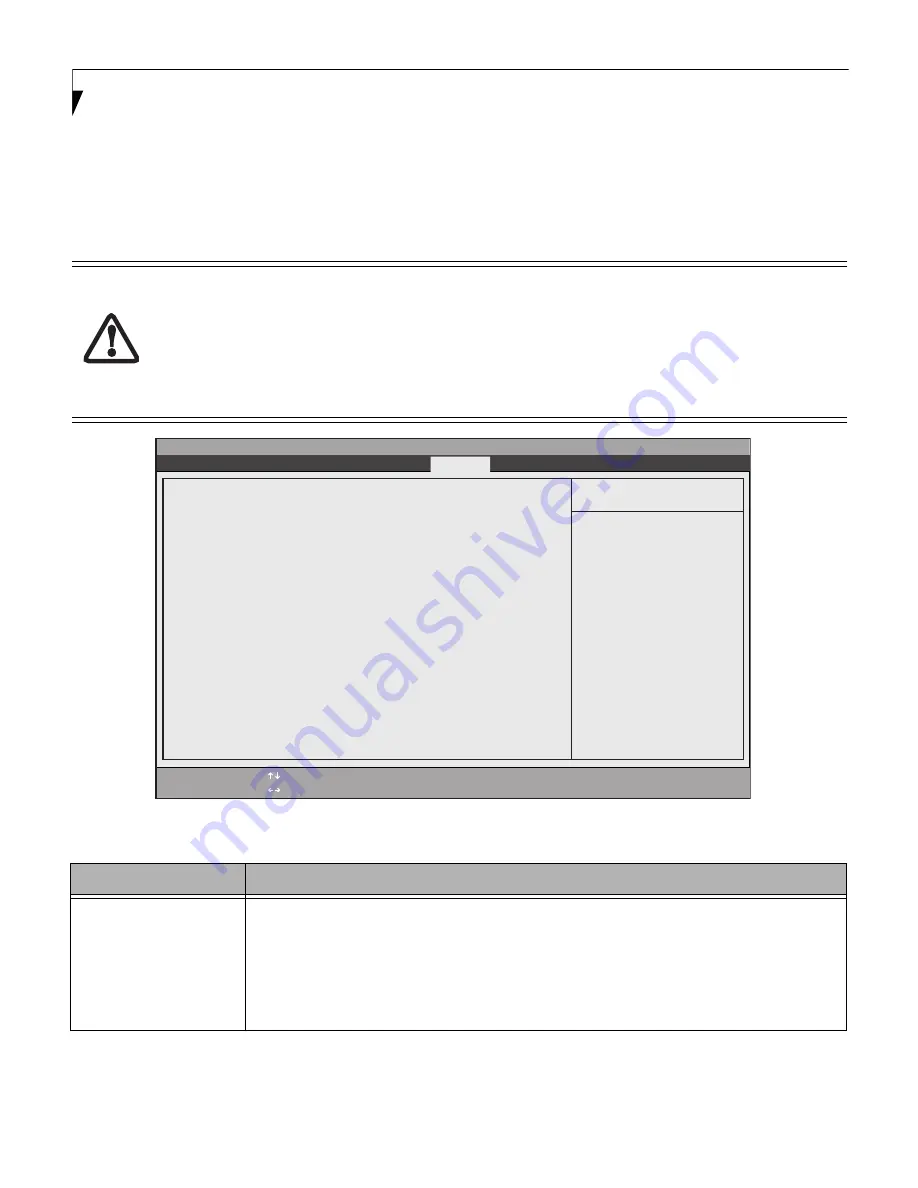
The following table shows devices associated with your 
notebook and the order in which they will be searched 
for the boot device. 

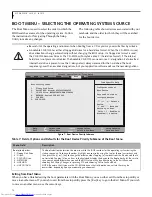
Figure 7.  Boot Device Priority Submenu

Exiting from Boot Menu

When you have finished setting the boot parameters with the Boot Menu, you can either exit from the setup utility or 
move to another menu. If you wish to exit from the setup utility press the [Esc] key to go to the Exit Menu. If you wish 
to move to another menu, use the cursor keys.

Be careful of the operating environment when booting from a CD or you may overwrite files by mistake.

A bootable CD-ROM has either a floppy disk format or a hard drive format. When the CD-ROM is used, 
drive allocations change automatically without changing the BIOS setup. If a floppy disk format is used, 
the CD-ROM becomes Drive A. The CD-ROM will only take drive C: (hard drive format) if the internal 
hard drive is not present or disabled. The bootable CD-ROM can never use a C: designation if a formatted 
internal hard drive is present since the C: designator is always reserved for the hard drive.The boot 
sequence ignores the new drive designations, but your application software will use the new designations.

Phoenix SecureCore(tm) Tiano Setup

F1

 Help

ESC

 Exit

Select Item
Select Menu

-/Space
Enter

F9

 Setup 

Defaults

F10

 Save and Exit

Change Values
Select   Sub-Menu

Item Specific Help

Info    System    Advanced     Security    

 Boot   

   Exit



Configures order of
Boot Device.

Keys used to view or
configure devices.

' and '

': 

Select a

device:
’+’ and ‘-’: Move the
device up or down.
‘Shift + 1’: Enables or
disables(!) a device.

  1:   Floppy Disk Drive
  2:   Drive0 HDD: Hitachi HTS545050B9A300
  3:   CD/DVD Drive: MATSHITADVD-RAM UJ8A0AS
  4:   NETWORK: Realtek PXE B02 D00
  5:   USB HDD:
  6:   USB CD/DVD:


Boot Priority Order:

Table 7: Fields, Options and Defaults for the Boot Device Priority Submenu of the Boot Menu

Menu Field

Description

Boot priority order:
  1:  Floppy Disk Drive
  2:  Drive0:
  3:  CD/DVD Drive:
  4:  NETWORK:
  5:  USB HDD:
  6:  USB CD/DVD:

The boot selections determine the order in which the BIOS searches for the operating system during the 
startup sequence. To change the order, highlight one source by using the [up] or [down] cursor keys and 
then press the [+] or [-] key to change the order number. Tapping [x] removes from the list a device that is 
not installed. Tapping [x] on an item in the Excluded list adds the device to the Boot priority list. Be sure to 
save your changed order when you exit the BIOS setup utility by either going to the Exit Menu and 
choosing Exit Saving Changes, or pressing F10 and choosing Yes to Save and Exit. 
NOTE: Be aware that if you use the CD-ROM drive as the first boot device, certain files may be 
overwritten, depending upon your operating environment.

Summary of Contents for Lifebook LH531

Page 1: ...1 Fujitsu LIFEBOOK L Series BIOS Guide LIFEBOOK L Series Model LH531 Document Date 6 23 2011 Document Part Number FPC58 2944 01 F U J I T S U A M E R I C A I N C ...

Page 2: ... Pressing the F9 key resets all items in the BIOS to the default values 8 Pressing the F10 key saves the current configura tion and exits the BIOS Setup Utility You will be asked to verify this selection before it is executed 9 Pressing the F1 key gives you a general help screen Entering the Setup Utility After a Configuration Change or System Failure If there has been a change in the system confi...

Page 3: ...utility press the F2 key 4 When the setup utility starts with a fault present the system displays the following message Warning Error message Continue 5 Press any key to enter the setup utility The system will then display the Info Menu with current param eters values I n f o M e n u ...

Page 4: ... the parameters listed may be different for your system depending upon the system configuration Product Name LIFEBOOK LH531 Memory Slot 1 2048 MB DDR3 SDRAM Serial Number XXXXXXXX Memory Slot 2 2048 MB DDR3 SDRAM BIOS Version 1 0 XX XX 2011 Onboard MAC Address XX XX XX XX XX XX Processor Type Intel R Core TM i5 2520M CPU 2 50GHz UUID XXXXXXXX XXXX0XXXX XXXXXXXXXXXX Total Memory 4096 MB Panel ID XX...

Page 5: ... Menu Field Description System Time Sets and displays the current time Time is in a 24 hour format of hours minutes seconds with 2 digits for each HH MM SS Example 16 45 57 You may change each segment of the time separately Move between the seg ments with the Tab key and or Shift Tab keys System Date Sets and displays the current date Date is in a month day year numeric format with 2 digits each f...

Page 6: ...menu If you wish to move to another menu use the cursor keys Table 3 Fields Options and Defaults for the Drive0 Submenu of the System Menu Menu Field Options Default Description Drive0 Disabled Enabled Enabled Allows you to enable or disable the hard drive 0 Drive5 Disabled Enabled Enabled Allows you to enable or disable the hard drive 0 Phoenix SecureCore tm Tiano Setup F1 Help ESC Exit Select It...

Page 7: ...aware OS When Disabled is selected Legacy USB support is disabled Anytime USB Charge Disabled AC AC Battery AC Battery When Disabled is selected the Anytime USB Charge feature does not work When AC is selected an external USB device can be charged when the system is shut off only when the AC adapter is plugged in When AC Battery is selected an external USB device can be charged when the system is ...

Page 8: ...h includes hardware enhancements to improve upon software based virtual ization technologies Wake up on LAN Disabled Enabled Disabled Enabled allows the system to wake up when the internal LAN device receives a specific signal while in power off state Selecting Disabled disables this feature FAN Control Normal Silent Normal Allows selection of normal or silent fan control mode Table 4 Fields Optio...

Page 9: ...d on a system with FDE all data and applications on the hard drive will remain encrypted and will effectively be lost Be sure to remember your hard disk password Entering a password incorrectly 3 times in a row causes the keyboard and mouse to be locked out and System Disabled to be displayed If this occurs restart the computer by turning off and on the power with the power switch and use the corr...

Page 10: ...racters in the Enter New Password field and in the Re enter New Password field When a Supervisor Password is set it must be used to access the BIOS setup utility Set User Password Enter This field can only be accessed if the Supervisor Password is set Sets changes or cancels the User Password A User Password may be up to seven characters long and must include only letters or numbers no symbols Pas...

Page 11: ...s no symbols Passwords are NOT case sensitive When a Drive0 Password is set it must be used to access the hard drive if it is used in another system Note that the password will not take effect until the system has been rebooted The Master Password does not provide security it simply allows the user to set the User Password which provides true security Password Entry on Boot Disabled Enabled Enable...

Page 12: ...ew drive designations but your application software will use the new designations Phoenix SecureCore tm Tiano Setup F1 Help ESC Exit Select Item Select Menu Space Enter F9 Setup Defaults F10 Save and Exit Change Values Select Sub Menu Item Specific Help Info System Advanced Security Boot Exit Configures order of Boot Device Keys used to view or configure devices and Select a device and Move the de...

Page 13: ...ugh the Setup Utility Section Discard Changes Selecting Discard Changes will load the previous values in BIOS memory for all menu fields The message Load previous configuration now Yes No will be displayed When confirmed the setup utility will return to the Exit menu To return to another menu follow the directions in the Navigating Through the Setup Utility Section Save Changes Selecting Save Chan...

Reviews: