background image

16

L i f e B o o k   N   S e r i e s   U s e r ’ s   G u i d e

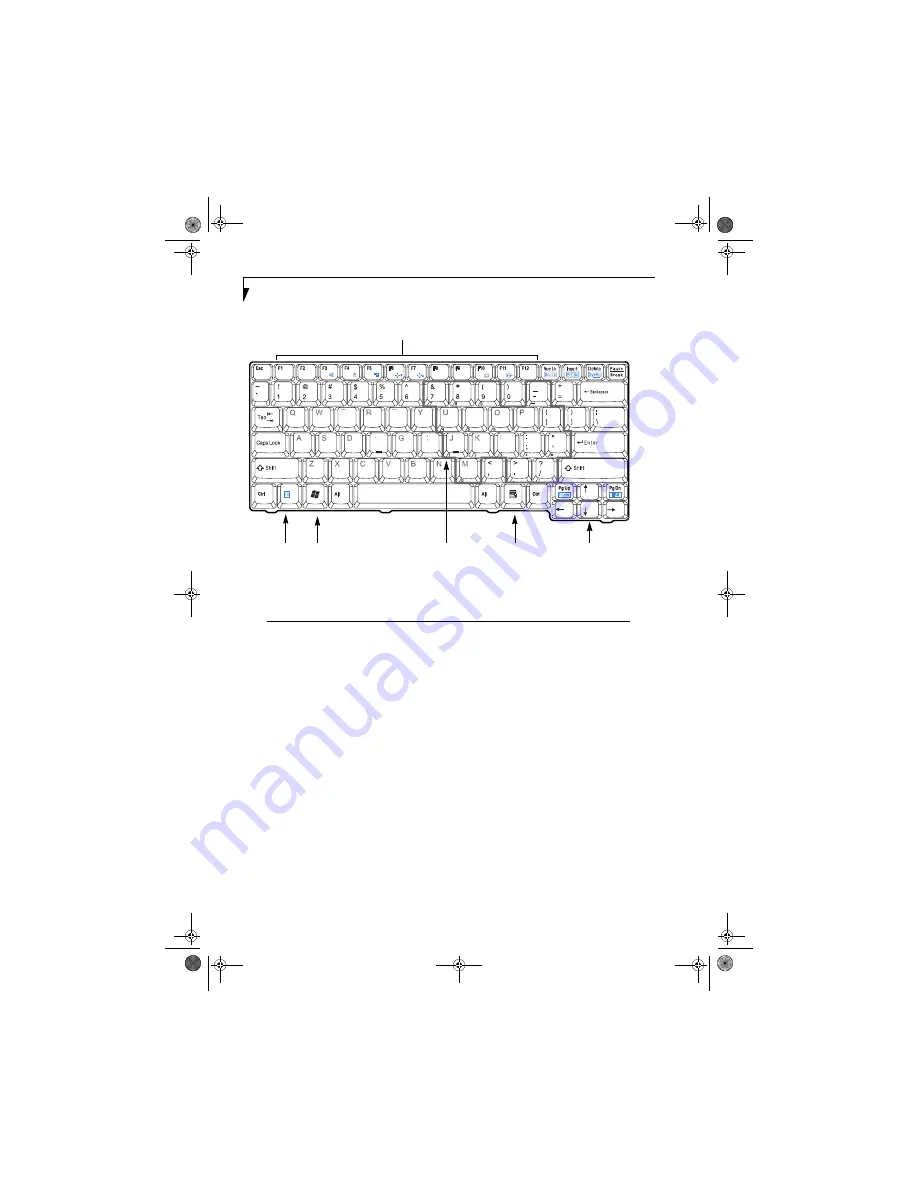
Keyboard 

USING THE KEYBOARD

Your Fujitsu LifeBook notebook has an integrated 84-
key keyboard. The keys perform all the standard func-
tions of a 101-key keyboard, including the Windows 
keys and other special function keys. This section 
describes the following keys. 

Numeric keypad:

 Your LifeBook notebook allows 

certain keys to serve dual purposes, both as standard 
characters and as numeric and mathematical keys. The 
ability to toggle between the standard character and 
numerical keys is controlled through the [NumLk] 
key.

Cursor keys:

 Your keyboard contains four arrow

keys for moving the cursor or insertion point to the 
right, left, up, or down within windows, applications 
and documents. 

Function keys:

 The keys labeled [F1] through [F12] 

are used in conjunction with the [Fn] key to produce 
special actions that vary depending on what program 
is running. 

Windows keys:

 These keys work with your Windows 

operating system and function the same as the 

onscreen Start menu button, or the right button on 
your pointing device.

NUMERIC KEYPAD

Certain keys on the keyboard perform dual functions as 
both standard character keys and numeric keypad keys. 
NumLk can be activated and deactivated by pressing the 
[NumLk] keys. Once this feature is activated you can 
enter numerals 0 through 9, perform addition ( + ), 
subtraction ( - ), multiplication ( * ), or division ( / ), 
and enter decimal points ( . ) using the keys designated 
as ten-key function keys. The keys in the numeric 
keypad are marked on the front edge of the key to indi-
cate their secondary functions.


WINDOWS KEYS

Your LifeBook notebook has two Windows keys: a Start 
key and an Application key. The Start key displays the 
Start menu. This button functions the same as your 
onscreen Start menu button. The Application key func-
tions the same as your right mouse button and displays 
shortcut menus for the selected item. (Please refer to 
your Windows documentation for additional informa-
tion regarding the Windows keys.)

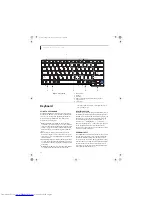
Figure 2-9.  Keyboard

1
2
3
4
5
6

Function Keys
[Fn] Key
Start Key
Numeric Keypad (surrounded by thick gray line)
Application Key
Cursor Keys

Enter

2

3

1

5

6

4

cygnus.book  Page 16  Tuesday, September 30, 2003  4:22 PM

Summary of Contents for Lifebook N-5010

Page 1: ...on Corporation and other rights users Use of this copyright protection technology must be autho rized by Macrovision Corporation and is intended for home and other limited viewing uses only unless autho rized by Macrovision Corporation Reverse engineering or disassembly is prohibited Dolby Headphone manufactured under license from Dolby Laboratories Dolby Pro Logic and the double D symbol are trad...

Page 2: ...L i f e B o o k N S e r i e s U s e r s G u i d e cygnus book Page 2 Tuesday September 30 2003 4 22 PM ...

Page 3: ...Volume Dial 15 Keyboard Using the Keyboard 16 Numeric Keypad 16 Windows Keys 16 Cursor Keys 17 Function Keys 17 Volume Control Controlling the Volume 18 TouchPad Pointing Device Clicking 19 Double Clicking 19 Dragging 20 Scrolling 20 TouchPad Control Adjustment 20 3 GETTING STARTED Power Sources Connecting the AC Adapter 23 Display Panel Opening the Display Panel 24 Adjusting Display Panel Brightn...

Page 4: ...e Module 44 Checking the Memory Capacity 44 Device Ports Communications Ports 45 LAN Port 45 IEEE 1394 Jack 45 Universal Serial Bus USB 2 0 Ports 45 Microphone Jack 45 S Video Out Port 45 Optical Digital Audio Out Connector 45 Headphone Jack 46 External Monitor Port 46 5 TROUBLESHOOTING Troubleshooting Identifying the Problem 49 Specific Problems 50 Troubleshooting Table 50 Power On Self Test Mess...

Page 5: ...Connection using Windows XP Flow of operations 91 Preparation for wireless LAN connection 91 Connection to the network 93 Connection using Windows 2000 Flow of operations 96 Preparation for wireless LAN connection 96 Connection to the network 97 Troubleshooting the WLAN Troubleshooting 100 Wireless LAN Glossary Glossary 103 IP address information Additional information 105 WLAN Specifications Spec...

Page 6: ...L i f e B o o k N S e r i e s U s e r s G u i d e cygnus book Page 4 Tuesday September 30 2003 4 22 PM ...

Page 7: ...1 1 Preface cygnus book Page 1 Tuesday September 30 2003 4 22 PM ...

Page 8: ...2 L i f e B o o k N S e r i e s U s e r s G u i d e cygnus book Page 2 Tuesday September 30 2003 4 22 PM ...

Page 9: ...you should have the following information ready so that the customer support representative can provide you with the fastest possible solution Product name Product configuration number Product serial number Purchase date Conditions under which the problem occurred Any error messages that have occurred Hardware configuration Type of device connected if any Fujitsu Online You can go directly to the ...

Page 10: ...4 L i f e B o o k N S e r i e s U s e r s G u i d e cygnus book Page 4 Tuesday September 30 2003 4 22 PM ...

Page 11: ...5 2 Getting to Know Your LifeBook Notebook cygnus book Page 5 Tuesday September 30 2003 4 22 PM ...

Page 12: ...6 L i f e B o o k N S e r i e s U s e r s G u i d e cygnus book Page 6 Tuesday September 30 2003 4 22 PM ...

Page 13: ...items listed below For a pre configured model you should have LifeBook N Series notebook computer Figure 2 1 Lithium ion battery pre installed AC adapter with AC power cord Figure 2 2 Optical drive Phone Modem RJ 11 telephone cable Drivers and Applications Restore CD Getting Started Guide User s Guide this guide International Limited Warranty Brochure Microsoft associated materials Depending upon ...

Page 14: ...us Volume Indicators The System Status Indicators display symbols that correspond with specific components of your LifeBook notebook The volume indicators display the volume level as selected with the volume dial See Status Indi cator Panel Volume LEDs on page 14 for more informa tion 1 2 3 4 5 6 7 8 9 10 11 12 13 14 15 Figure 2 3 LifeBook notebook with display open 1 2 3 4 5 6 Wireless LAN Switch...

Page 15: ...ted Windows keys See Using the Keyboard on page 16 for more information Touchpad Pointing Device The pointing device is a Touchpad that allows you simple cursor control See TouchPad Pointing Device on page 19 for more information Battery Latch The battery latch is used for releasing the system battery See Replacing the Battery on page 34 for more informa tion Media Drive Eject Button The Media Dri...

Page 16: ... optical digital audio out this jack allows you to download digital audio onto a MiniDisc recorder s SPDIF Sony Philips Digital Interface format See Optical Digital Audio Out Connector on page 45 for more information When used as a headphone jack this jack allows you to connect headphones or powered external speakers See Headphone Jack on page 46 for more information Microphone Jack The microphone...

Page 17: ...rnal Floppy Disk Drive on page 35 for more information Floppy Disk Eject Button The floppy disk eject button allows you to remove a floppy disk from the floppy disk slot See Internal Floppy Disk Drive on page 35 for more information Memory Stick SD Card Slot The Memory Stick Secure Digital SD card slot allows you to install a flash memory card for data storage This architecture allows you to trans...

Page 18: ...and charge the internal Lithium ion battery External Monitor Port The external monitor port allows you to connect an external monitor See External Monitor Port on page 46 for more information S Video Out Port The S Video out port is used to transmit a higher resolution video signal to a compatible TV or VCR See S Video Out Port on page 45 for more information Figure 2 6 LifeBook notebook back pane...

Page 19: ... compartment allows you to expand the system memory capacity of your LifeBook notebook thus improving overall performance Note The memory compartment cover also covers the location of the optional wireless LAN device the memory location is outlined with a dotted line in the illustration above See Memory Upgrade Module on page 43 for more information Lithium ion Battery Bay The battery bay contains...

Page 20: ...er suspend resume button If you are charging your battery the Power indicator remains on even if the notebook is shut off The Power indicator will also remain on if you have an adapter connected and are shut down from Windows but have not turned off using the power suspend resume button BATTERY CHARGING INDICATOR The Battery Charging indicators display whether or not the Lithium ion battery is cur...

Page 21: ...r will flash periodically when your system is checking the media player drive If the Auto Insert Notification function is not active the indicator will only flash when you access the media player drive The default setting is the Auto Insert Notification function active NUMLK INDICATOR The NumLk indicator states that the internal keyboard is set in ten key numeric keypad mode CAPSLOCK INDICATOR The...

Page 22: ...onscreen Start menu button or the right button on your pointing device NUMERIC KEYPAD Certain keys on the keyboard perform dual functions as both standard character keys and numeric keypad keys NumLk can be activated and deactivated by pressing the NumLk keys Once this feature is activated you can enter numerals 0 through 9 perform addition subtraction multiplication or division and enter decimal ...

Page 23: ...al Pointing Device is set to Manual Setting Fn F5 Pressing F5 while holding Fn allows you to toggle between video compensation and no compensation Video compensation controls spacing on the display When it is enabled displays with less than 1024 x 768 or 800 x 600 pixel resolution will still cover the entire screen Fn F6 Pressing F6 repeatedly while holding Fn will lower the brightness of your dis...

Page 24: ... set within individual applications Certain external audio devices you might connect to your system may have hardware volume controls Each source discussed above puts an upper limit on the volume level that must then be followed by the other sources We recommend that you experiment with the various volume controls to discover the optimal sound level Software that contains audio files will also con...

Page 25: ...use cursor to the item you wish to select press the right button once and then immediately release it You also have the option to perform the clicking operation by tapping lightly on the TouchPad once Figure 2 11 Figure 2 11 Clicking DOUBLE CLICKING Double clicking means pushing and releasing the left button twice in rapid succession This procedure does not function with the right button To double...

Page 26: ...after the final tap Next move the object to its new location by moving your finger across the TouchPad and then release your finger Figure 2 13 Figure 2 13 Dragging SCROLLING Using the scroll buttons allows you to scroll up and down a page easily without using the window scroll bars To move up a page press the upper part of the button To move down a page use the lower part of the button Figure 2 1...

Page 27: ...21 3 Getting Started cygnus book Page 21 Tuesday September 30 2003 4 22 PM ...

Page 28: ...22 L i f e B o o k N S e r i e s U s e r s G u i d e cygnus book Page 22 Tuesday September 30 2003 4 22 PM ...

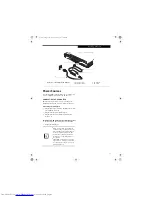
Page 29: ...utlet Figure 3 1 Switching from AC Adapter Power to Battery Power 1 Be sure that you have a charged battery installed 2 Unplug the AC adapter Figure 3 1 Connecting the AC Adapter 1 2 DC Power Jack DC Output Cable 3 4 AC Adapter AC Cable 1 2 3 4 When you run the N Series LifeBook on battery power by default the CPU will slow down approximately by half in order to optimize battery life This feature ...

Page 30: ...level of the display Using the Keyboard to Change Display Brightness Fn F6 Pressing this key combination repeatedly will lower the brightness of your display Fn F7 Pressing this key combination repeatedly will increase the brightness of the display CLOSING THE DISPLAY PANEL 1 Holding the edge of your display panel pull it forward until it is flush with the body of your LifeBook notebook 2 Push dow...

Page 31: ...tructions to start up your notebook This information is in the BIOS program Each time you power up or restart your notebook it goes through a boot sequence which displays a Fujitsu logo until your operating system is loaded During booting your note book is performing a standard boot sequence including a Power On Self Test POST When the boot sequence is completed without a failure and without a req...

Page 32: ...ountry in which you live your first and last name and about how you dial out from where you will be using your notebook For the modem settings enter your current location information where you will be using your LifeBook notebook If you are not connected to a phone line and plan to register at a later time you may click the Skip button and you will go directly to the condition of use page Once you...

Page 33: ...istering You will receive an identification label for your LifeBook notebook which if your notebook is ever lost may help in getting it returned to you You also receive technical support access and useful product mailings Proof of purchase is not required if you register within 30 days of your purchase How do I register With Windows it is a part of the Windows Welcome process If you do not registe...

Page 34: ...sary to maintain system memory and allow for restarting Your LifeBook notebook can be put in Suspend mode by Pressing the Power Suspend Resume button when your system is turned on Selecting Standby from the Windows Shut Down menu Timing out from lack of activity Allowing the battery to reach the Dead Battery Warning condition Your LifeBook notebook s system memory typically stores the file s on wh...

Page 35: ...to restart your LifeBook notebook Your notebook will shut down and then reboot POWER OFF Before turning off the power by choosing Shut Down from the Start menu check that the Hard Drive Optical Drive and PC Card access indicators are all Off See Figure 2 8 on page 14 If you turn off the power while accessing a disk or PC Card there is a risk of data loss To assure that your LifeBook notebook shuts...

Page 36: ...30 L i f e B o o k N S e r i e s U s e r s G u i d e cygnus book Page 30 Tuesday September 30 2003 4 22 PM ...

Page 37: ...31 4 User Installable Features cygnus book Page 31 Tuesday September 30 2003 4 22 PM ...

Page 38: ...32 L i f e B o o k N S e r i e s U s e r s G u i d e cygnus book Page 32 Tuesday September 30 2003 4 22 PM ...

Page 39: ...tdown procedure Low Battery State When the battery is running low a low battery notifica tion message will appear If you do not respond to the low battery message the batteries will continue to discharge until they are too low to operate When this happens your LifeBook notebook will go into Suspend mode There is no guarantee that your data will not be lost once the notebook reaches this point Note...

Page 40: ...ays the battery status via the Battery Status indicator to show the charge level available in that battery If the display is flashing red it means that the battery is damaged and must be replaced so it does not damage any other parts of your LifeBook notebook REPLACING THE BATTERY With the purchase of an additional battery you can have a fully charged spare to swap with one that is not charged Fol...

Page 41: ...ed to format new disks unless they are preformatted Please refer to your operating system manual for step by step instructions on formatting a disk To prevent accidental erasure of the data stored on a disk slide the write protect tab until a small hole is exposed This sets the disk into a protected state where nothing can be added or removed If you want to add or remove data on a protected disk s...

Page 42: ...e eject button on the front of the optical drive This will stop the drive and the holder tray will come out of the notebook a short distance 2 Gently pull the tray out until the disc can easily be removed from the tray 3 Carefully remove the media disc from the holder tray 4 Gently push the holder tray back in until you hear a click Figure 4 5 Optical Drive 1 2 DVD CD Holder Tray DVD CD Eject Butt...

Page 43: ... you wish to view You can do this by using the DVD CD RW Combo Drive control panel and the mouse 1 Right click on the movie screen to open a dropdown menu for options 2 Select View Player for all the controls available This will open the control panel into the bottom of the screen Using the Optical Drive Control Panel The optical drive software allows you to watch the movie much like a VCR player ...

Page 44: ...on again This step is not required if you attached AC power without entering suspend mode 6 Restart your optical drive locate and skip to the chapter of the movie you were last watching 7 Continue watching your DVD movie AUTO INSERT NOTIFICATION FUNCTION The Auto Insert Notification function allows your Life Book notebook to automatically start a DVD CD as soon as it is inserted in the optical dri...

Page 45: ...icks and SD Cards are installed in the Memory Stick SD Card slot Figure 4 1 To install a Memory Stick or SD Card follow these steps 1 See your Memory Stick or SD Card manual for instructions on the installation of your card Some cards may require that your notebook is off while installing them 2 Make sure there is no card currently in the slot If there is see Removing a Memory Stick SD Card 3 Inse...

Page 46: ...s Push the Memory Stick or SD Card in until it unlatches It will then eject from the slot for removal See your Memory Stick or SD Card manual for specific instructions on the removal of your card Some cards may require your LifeBook notebook to be in Suspend Mode or Off while removing them cygnus book Page 40 Tuesday September 30 2003 4 22 PM ...

Page 47: ...on your hard disk drive must be backed up to floppy disks or other data storage media or it will be permanently lost These back up disks can then be used to reinstall and restore your data See your operating system manual for more information on backing up your data files All application software that is installed on the hard disk drive must be reinstalled from the original source The factory inst...

Page 48: ...PC Card perform the following steps 1 See your PC Card manual for specific instructions on removing your card Some PC Cards may require your notebook to be Off while removing them 2 Unlock the PC Card from the slot by first pressing the eject button associated with the slot the card is in When pressed the button will pop up 3 Firmly press the button again until it is flush with the notebook This w...

Page 49: ... from the static guarded sleeve 7 Align the memory upgrade module with the part side up Align the connector edge of the memory upgrade module with the connector slot in the compartment The connector will be pointing toward the rear of the LifeBook notebook 8 Insert the memory upgrade module at a 45 angle Press the connector edge of the module firmly down and into the connector until it lodges unde...

Page 50: ...em memory capacity by either adding or removing a memory upgrade module be sure to check that your notebook has recognized the change You can check the memory capacity by clicking Start Control Panel then double clicking the System icon Select the General tab and check the amount of memory under Computer After installing your added memory module you must complete the Resetting the Save to Disk Par...

Page 51: ...allows you to connect an external mono microphone Your microphone must be equipped with a 1 8 3 5 mm mono mini plug in order to fit into the microphone jack of your LifeBook notebook In order to connect a microphone follow these easy steps See Figure on page 8 for location 1 Align the connector with the port opening 2 Push the connector into the port until it is seated S VIDEO OUT PORT The S Video...

Page 52: ...out connector depending on the connector type The connector on your computer is a Optical Mini Plug 3 5mm diameter mini plug The frequency of the digital sound output from the SPDIF output connector is selectable as 48 0 kHz or 44 1 kHz If a sampling rate convertor is not installed in your digital electronic device e g MD player recording is not possible See the device user manual for more details...

Page 53: ...47 5 Troubleshooting cygnus book Page 47 Tuesday September 30 2003 4 22 PM ...

Page 54: ...48 L i f e B o o k N S e r i e s U s e r s G u i d e cygnus book Page 48 Tuesday September 30 2003 4 22 PM ...

Page 55: ...e you turn it on 6 Go through the boot sequence 7 If the problem has not been resolved refer to the Troubleshooting Table that follows for more detailed troubleshooting information 8 If you have tried the solutions suggested in the Trou bleshooting Table without success contact your support representative Toll free 1 800 8Fujitsu 1 800 838 5487 E mail 8fujitsu us fujitsu com computers Web site www...

Page 56: ... speakers remove the headphones BIOS audio settings are incorrect Set the BIOS setup utility to the default values within the Multimedia Device Configuration menu See BIOS Setup Utility on page 25 for more information Software driver is not config ured correctly Refer to your application and operating system documentation for help DVD CD ROM Drive Problems Notebook fails to recognize DVD CDs DVD C...

Page 57: ...more information Security is set to protect access to floppy disk data Verify your password and security settings Hard Drive Problems You cannot access your hard drive The setup utility is incorrectly set for your internal hard drive Set Primary Master correctly in the BIOS See BIOS Setup Utility on page 25 for more information The wrong drive designator was used by an application when a bootable ...

Page 58: ...pplication software documentation for additional information USB Device Problems You have installed a USB device but your LifeBook notebook does not recog nize the device or the device does not seem to work properly The device is not properly installed Remove and reinstall the device See Device Ports on page 45 for more information The device may have been installed while an application was runnin...

Page 59: ... source or replace that battery The battery or batteries are low Check the Status Indicator Panel to determine the presence and condition of the batteries See Status Volume Indicators on page 14 for more information Use a Power adapter to operate until a battery is charged or install a charged battery The AC adapter is not plugged in properly Verify that your adapter is connected correctly See Pow...

Page 60: ...cording to your operating needs The brightness is turned all the way up Turn down the brightness adjustment The higher the brightness the more power your display uses The batteries are very old Replace the batteries The batteries have been exposed to high temperatures Replace the batteries The batteries are too hot or too cold Restore the LifeBook notebook to normal operating temperature The Charg...

Page 61: ...is not a user serviceable part but has a normal life of 3 to 5 years Video Problems The built in display is blank when you turn on your LifeBook notebook Something is pushing on the Closed Cover switch Clear the Closed Cover switch See Figure on page 8 for location The display angle and bright ness settings are not adequate for your lighting conditions Press the Fn F7 keys repeatedly until you hav...

Page 62: ... compatible with your LifeBook notebook See your monitor documentation and the External Monitor Support portions of the Specifications section on page 71 The application display uses only a portion of your screen and is surrounded by a dark frame You are running an application that does not support 800 x 600 pixel resolution display and display compression is enabled Display compression gives a cl...

Page 63: ...e system there may be a serious fault which might cause you to lose data if you continue Contact your support representative Incorrect Drive A type run SETUP Type of floppy drive A not correctly identified in Setup This means that the floppy disk drive type identified in your setup utility does not agree with the type detected by the Power On Self Test Run the setup utility to correct the inconsis...

Page 64: ... life of 2 to 3 years System BIOS shadowed System BIOS copied to shadow RAM System CMOS checksum bad run SETUP BIOS CMOS RAM has been corrupted or modified incorrectly perhaps by an application program that changes data stored in BIOS memory Run Setup and reconfigure the system System RAM Failed at offset nnnn System memory failed at offset nnnn of in the 64k block at which the error was detected ...

Page 65: ...59 T r o u b l e s h o o t i n g cygnus book Page 59 Tuesday September 30 2003 4 22 PM ...

Page 66: ...nter the BIOS Setup Utility 2 Using the arrow keys go to the Boot menu 3 Arrow down to the Boot Device Priority submenu and press Enter 4 Arrow down to the CD ROM drive in the list and press the space bar or the key to move the CD ROM drive to the top of the list The system attempts to boot from the devices in the order in which they are listed 5 Press F10 then click on Yes to exit the BIOS Setup ...

Page 67: ...oftware If virus protection software is enabled DISE will lock up 2 From the DISE main window click Options Restore Backup to restore an image you created or click Options Restore Factory Backup to restore the factory image DISE shuts down to DOS and restores the image file Re Installing Individual Drivers and Applications The Drivers and Application CD can be used to selec tively re install drive...

Page 68: ...62 L i f e B o o k N S e r i e s U s e r s G u i d e cygnus book Page 62 Tuesday September 30 2003 4 22 PM ...

Page 69: ...63 6 Care and Maintenance cygnus book Page 63 Tuesday September 30 2003 4 22 PM ...

Page 70: ...64 L i f e B o o k N S e r i e s U s e r s G u i d e cygnus book Page 64 Tuesday September 30 2003 4 22 PM ...
Page 71: ...ents Use a soft cloth to remove dust from the screen Never use glass cleaners Storing your LifeBook notebook If storing your LifeBook notebook for a month or longer turn your LifeBook off and remove all Lithium ion batteries Store your LifeBook notebook and batteries sepa rately If you store your notebook with a battery installed the battery will discharge and battery life will be reduced In addit...

Page 72: ...ve clean with a dry soft cloth or with a soft cloth dampened with water or a solution of neutral detergent Never use benzene paint thinner or other volatile material Avoid storing the floppy disk drive in extremely hot or cold locations or in locations subject to severe temperature changes Store at temperatures between 50º F 10ºC and 125ºF 52ºC Keep the floppy disk drive out of direct sunlight and...

Page 73: ...must treat them with care The documentation supplied with your PC Card will provide specific information but you should pay attention to the following points To keep out dust and dirt store PC Cards in their protective sleeves when they are not installed in your LifeBook notebook Avoid prolonged exposure to direct sunlight or excessive heat Keep the cards dry Do not flex or bend the cards and do n...

Page 74: ...68 L i f e B o o k N S e r i e s U s e r s G u i d e cygnus book Page 68 Tuesday September 30 2003 4 22 PM ...

Page 75: ...69 7 Specifications cygnus book Page 69 Tuesday September 30 2003 4 22 PM ...
Page 76: ...70 L i f e B o o k N S e r i e s U s e r s G u i d e cygnus book Page 70 Tuesday September 30 2003 4 22 PM ...
Page 77: ...K colors External 1600 x 1200 pixel resolution 16M colors at 70Hz Simultaneous Video XGA SVGA VGA compatible 1400 x 1050 16M colors max Graphics Accelerator Card ATI Mobility RADEON 9600 M10 controller with 64 MB dedicated memory external frame buffer 8x AGP supported AUDIO AC97 Codec Sigmatel 9766 Stereo headphone jack 1 Vrms or less minimum impedance 32 Ohms Mono microphone jack 100mVrms or less...

Page 78: ...0 ready WFM 2 0 compliant POWER Batteries Main 12 cell Lithium ion battery rechargeable 92W 14 4V 6450 mAh FPCBP74 Adapters AC Adapter Autosensing 100 240V AC 120W supplying 19V DC 6 32A to the LifeBook notebook Fujitsu Model FPCAC36AP which includes an AC cable Power Management Conforms to ACPI Advanced Configuration Power Interface Electrostatic Discharge ESD 9 kV DIMENSIONS Overall Dimensions 1...

Page 79: ...ite of Internet tools Norton AntiVirus from Symantec Your system is preinstalled with a free 90 day trial version of Symantec s Norton AntiVirus 2003 Norton AntiVirus is a program designed to protect your Life Book notebook from computer viruses It assists in the protection of the data currently residing on your hard disk from destruction or contamination The 90 day trial version is activated upon...

Page 80: ...74 L i f e B o o k N S e r i e s U s e r s G u i d e cygnus book Page 74 Tuesday September 30 2003 4 22 PM ...

Page 81: ...75 8 Glossary cygnus book Page 75 Tuesday September 30 2003 4 22 PM ...

Page 82: ...76 L i f e B o o k N S e r i e s U s e r s G u i d e cygnus book Page 76 Tuesday September 30 2003 4 22 PM ...
Page 83: ... to the 32 bit PCI architecture CMOS RAM Complementary metal oxide semiconductor random access memory This is a technology for manufacturing random access memory which requires very low levels of power to operate COMM Port Abbreviation for communication port This is your serial interface connection Command An instruction which you give your operating system Example run a particular application or ...

Page 84: ... ESD Electrostatic Discharge The sudden discharge of elec tricity from a static charge which has built up slowly Example the shock you get from a doorknob on a dry day or the sparks you get from brushing hair on a dry day Extended Memory All memory more than the 640KB recognized by MS DOS as system memory FCC Federal Communication Commission Floppy Disk A spinning platter of magnetic data storage ...

Page 85: ...andard for TV broadcast and reception for the USA Operating System A group of control programs that convert application commands including driver programs into the exact form required by a specific brand and model of micro processor in order to produce the desired results from that particular equipment Parallel Port A connection to another device through which data is transferred as a block of bit...

Page 86: ...Read Only Memory into RAM Random Access Memory for access during actual operation RAM is much faster to access than ROM however ROM contents are not lost when power is removed Shadowing allows permanently stored information to be rapidly accessed Smart Card Smart Cards are the same size and shape as credit cards but they contain an integrated microprocessor chip The chip can hold a variety of diff...

Page 87: ...onal computers VRAM Video Random Access Memory A memory dedicated to video display data and control WFM Wired for Management is Intel s broad based initiative to reduce the total cost of ownership TCO of business computing without sacrificing power and flexibility Write Protect Prevent alteration of the binary state of all bits in a storage media Example all information on a device such as a flopp...

Page 88: ...telephone may result in the devices not ringing in response to an incoming call In most but not all areas the sum of RENs should not exceed five 5 0 To be certain of the number of devices that may be connected to a line as determined by the total RENs contact the local telephone company For products approved after July 23 2001 the REN for this product is part of the product identifier that has the...

Page 89: ...matériel terminal Cette confor mité est confirmée par le numéro d enregistrement Le sigle IC placé devant le numéro d enregistrement signifie que l enregistrement s est effectué conformé ment à une déclaration de conformité et indique que les spécifications techniques d Industrie Canada ont été respectées Il n implique pas qu Industrie Canada a approuvé le matériel Avant de connecter cet équipemen...

Page 90: ... AWG or larger telecommunications line cord Danger of explosion if Lithium CMOS battery is incorrectly replaced Replace only with the same or equivalent type rec ommended by the manufacturer Dispose of used batteries according to the manu facturer s instruction For continued protection against risk of fire replace only with the same type and rating fuse Hg LAMP S INSIDE THIS PRODUCT CONTAIN MERCUR...

Page 91: ...85 Appendix Integrated Wireless LAN User s Guide Optional device cygnus book Page 85 Tuesday September 30 2003 4 22 PM ...

Page 92: ...86 L i f e B o o k N S e r i e s U s e r s G u i d e cygnus book Page 86 Tuesday September 30 2003 4 22 PM ...

Page 93: ...o Part 15 of the FCC Rules These limits are designed to provide reasonable protection against harmful interference in a residential installa tion This equipment generates uses and can radiate radio frequency energy If not installed and used in accordance with the instructions it may cause harmful interference to radio communications However there is no guarantee that interfer ence will not occur i...

Page 94: ...meters inside a building The range may be shorter depending upon the installation factors such as walls and columns Unauthorized access can be prevented with the use of an SSID and an encryption key also known as a WEP key Wireless LAN Modes Using this Device Ad Hoc Mode See Figure 1 Ad Hoc Mode refers to a type of wireless network that involves connecting multiple computers without the use of an ...

Page 95: ...ge is affected by such factors as obstructions walls type of construc tion material reflective objects etc A professionally performed site survey is highly recommended when determining optimal access point placement Distance the main unit of this personal computer is from other electric appliances If the main unit of the person computer is installed near a powered on elec tric appliance the comput...

Page 96: ...eactivation using Windows 1 Right click the Wireless Network icon in the sys tem tray it looks like a bar graph 2 Click on Disable Radio Wireless communications on off switching will be deactivated and the trans mission of radio waves from the wireless LAN will be stopped STARTING TRANSMISSION To communicate using the wireless LAN function set the computer to a status from which it can transmit as...

Page 97: ...ss LAN switch is switched on 2 Click the Start button first and then Control Panel 3 If the Control Panel is in Category view switch to Classic view by clicking Switch to Classic View under Control Panel the left frame If you are already in Classic view Switch to Category View will be displayed instead 4 Double click the Network Connections icon A list of currently installed networks will be displ...

Page 98: ... network key in this case are as follows 0 9 A Z a f For ad hoc connection Assign the same net work key to all the personal computers to be connected For access point infrastructure connection Assign the identical network key that is pro grammed into the access point For this set ting refer to the access point manual or contact your network administrator d Confirm the Network key by re entering th...

Page 99: ...lose the Network Connection window Following this operation confirm the names of the computer and the workgroup as follows Confirming the computer and work group names 1 Click the Start button then Control Panel 2 If the Control Panel is in Category view switch to Classic view by clicking Switch to Classic View under Control Panel the left frame If you are already in Classic view Switch to Categor...

Page 100: ...utton first and then My Com puter 2 Double click Local disk C 3 Right click the work folder or whichever folder you want to share and then click Sharing and Security in the menu displayed The Folder Name Properties window will be displayed 4 Click Sharing if it isn t already selected 5 Click the link stating If you understand the secu rity risks but want to share files without running the wizard c...

Page 101: ...ll not be displayed Profile Name The current configuration profile is displayed Network Type Configured Network Type Access Point or AdHoc will be displayed Current Mode Indicates the frequency and data rate currently used by the radio Current Channel The channel number currently used by the radio Link Status Displays the current connected state of the WLAN module Encryption Type Displays the encr...

Page 102: ...dministrator for data settings 1 Right click the Atheros Wireless Utility icon in the system tray in the lower right corner of your screen 2 Click Open Client Utility The Atheros Wireless Configuration Utility window will be displayed 3 Select the Profile Management tab 4 Click the New button The Profile Management window will appear 5 Enter the following information required to estab lish connect...

Page 103: ...ion window will be displayed 3 Right click Local Area Connection and click Properties in the menu displayed The Local Area Connection Properties window will be dis played 4 Click Internet Protocol TCP IP and then click Properties The Properties window will be dis played 5 Set the IP address For ad hoc connection Select Use the following IP address then enter data in IP address and Subnet mask See ...

Page 104: ...hen click the OK button Processing will return to the Wireless Network Connection Properties window and File and Printer Sharing for Microsoft Networks will be added to the list 9 Click the OK button Setting the file sharing function The procedure for setting the file sharing function is laid down below taking the work folder within drive C as an example 1 Double click My Computer on the Desktop a...

Page 105: ...ll find the current operating status of the radio When the radio is turned off or the computer is not yet connected some of the conditions will not be displayed Profile Name The current configuration profile is displayed Network Type Configured Network Type Access Point or AdHoc will be displayed Current Mode Indicates the frequency and data rate currently used by the radio Current Channel The cha...

Page 106: ...wing pages Windows XP Confirming the status of the radio waves on page 95 Windows 2000 Confirming the status of the radio waves on page 99 Radio wave transmission has stopped Check if the wireless switch is turned ON Also verify Disable Radio is not checked in Network setting window Refer to Starting Transmis sion on page 90 The computer to be connected is turned off Check if the computer to be co...

Page 107: ...se of using TCP IP protocol you can check IP address as follows 1 Windows XP Click Start All programs Accessories Command prompt Windows 2000 Click Start button Program Accessories Command prompt 2 In Command prompt or MS DOS prompt window input IPCONFIG command as follows then press Enter key Example In case of C drive being the hard disk C ipconfig Enter Check that the IP address is correctly di...

Page 108: ...gning parameters on page 91 When restricting the access of wireless LAN clients using IEEE802 1X authentication put a check mark on Enable network access control using IEEE 802 1X When using at home remove a check mark on Enable network access control using IEEE802 1X For the method of setting related with IEEE802 1X authentication refer to the access point manual Problem Possible Cause Possible S...

Page 109: ... address is a unique address within a closed network LAN Local Area Network An environment connecting computers within a rela tively small range such as the same floor and building MAC address Media Access Control Address A physical address inherent to a network card For Ethernet the top three bytes are controlled assigned as a vendor code The remaining three bytes comprise the code uniquely to av...

Page 110: ...ess LAN Upon authentication the access point checks whether the same network key is set to the client If the client uses a wrong network key or the network key itself is not set authentication is unsuccessful allowing no communications with the access point SSID Security Set Identifier See Network name Subnet mask TCP IP network is controlled by being divided into multiple smaller networks subnets...

Page 111: ...IP address is expressed with four values in the range between 1 and 255 Set the each computer as follows The value in paren theses is a subnet mask Example Computer A 192 168 100 2 255 255 255 0 Computer B 192 168 100 3 255 255 255 0 Computer C 192 168 100 4 255 255 255 0 Computer X 192 168 100 254 255 255 255 0 IP addressing is much more complicated than can be briefly explained in this document ...

Page 112: ...oadcast packet traffic type of applications used etc The number of 10 provided by this document is meant only as a guideline and not a limitation of the technology Item Specification Type of network Conforms to IEEE 802 11a 802 11g Wi Fi based Transfer rate Automatic switching 54 Mbps maximum data rate Active frequency 802 11b g 2400 2473 MHz 802 11a 4900 5850 MHz Number of channels 802 11a 8 inde...

Page 113: ...107 Index cygnus book Page 107 Tuesday September 30 2003 4 22 PM ...

Page 114: ...108 L i f e B o o k N S e r i e s U s e r s G u i d e cygnus book Page 108 Tuesday September 30 2003 4 22 PM ...
Page 115: ... Jack 23 DC power jack 12 Device Ports 45 72 DISE 60 Disk care 66 Display 24 55 56 Display Panel 8 adjusting 24 brightness 24 closing 24 latch 8 opening 24 Display Timeout 29 Docking Port 13 Dolby Headphone 38 Double Clicking 19 Dragging 20 Drive Image Special Edition 73 Drive Image Special Edition DISE 60 Drivers and Application Restore CD 61 DVD CD ROM care 66 drive 36 tray release 37 DVD CD RW ...

Page 116: ...13 43 installing 43 removing 44 upgrade module 43 Memory Stick installing 39 Memory Upgrade Module 52 Microphone Jack 10 45 Modem Jack 45 Modem port 12 Modem Result Codes 58 mouse 51 52 N Numeric Keypad 16 NumLk Indicator 15 P Parallel Port 79 PC Card 42 52 53 care 67 installing 42 removing 42 slot 11 type II 42 unlock 42 PC Cards removing 40 Pointing Device 9 POST 79 Power 72 AC adapter 23 button...

Page 117: ... USB 45 52 ports 12 V Video 71 Video RAM 71 Volume Control 18 W Windows keys 16 Application key 16 Start keys 16 Windows Product Activation 27 Wireless LAN Ad Hoc Mode 88 Before Using the Wireless LAN 88 Broadcom Wireless LAN 88 Connection to the network Windows 2000 97 Connection using Windows 2000 96 Connection using Windows XP 91 For better communications 89 Infrastructure Mode 88 IP address in...

Page 118: ...112 L i f e B o o k N S e r i e s U s e r s G u i d e cygnus book Page 112 Tuesday September 30 2003 4 22 PM ...
Reviews: