64
4.
Insert the card into the slot with the label
facing up.
5.
Push the card firmly into the slot until it is
seated in the connector.
Removing PC Cards
See your PC Card manual for specific instructions
on removing your card. Some cards may require
your notebook to be in Suspend Mode or Off
during removal.
Windows has a shutdown procedure for
PC Cards that must be followed before
removing a card. (Review your operating
system manual for the correct procedure.)
It is good practice to remove devices
using the Unplug or Eject Hard-ware icon
in the system tray.
If the dialog box states that the device
cannot be removed, you must save all of
your open files, close any open
applications and shut down your
notebook.
1.
Unlock the card from the slot by pressing the
eject button associated with the slot in which
the card is located. When pressed, the button
will pop out.
2.
Firmly press the button again until it is flush
with the notebook. This will eject the card
slightly out of the slot allowing you to remove
the card.
If the PC Card has an external connector and
cable, do not pull the cable when removing
the card.
Installing ExpressCard™
There are two different width ExpressCard™: 34
mm and 54 mm. The connector inside the slot is
located on the left-hand side of the slot. If you
insert a 34 mm card, be sure to align it with the
left side of the slot when inserting it.
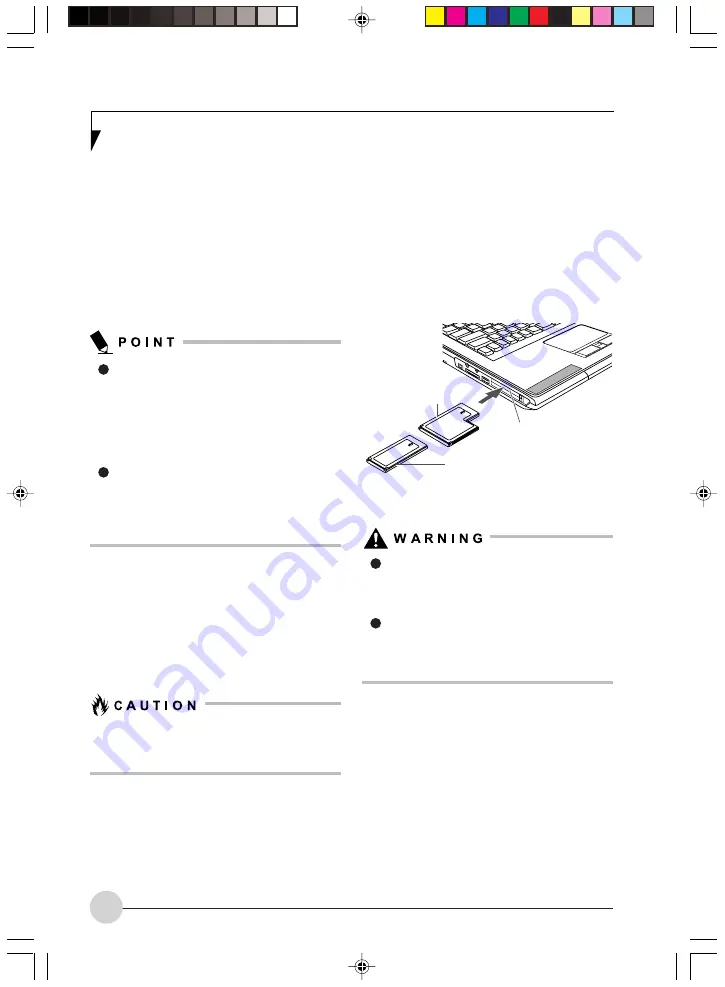
ExpressCard™ are installed in the
ExpressCard™ slot (the top slot).
(Figure 5-6).
Installing or removing an ExpressCard™
during your notebook’s shutdown or
bootup process may damage the card
and/or your notebook.
Do not insert an ExpressCard™ into a slot
if there is water or any other substance
on the card as you may permanently
damage the card, your notebook, or both.
Figure 5-8. Installing/Removing ExpressCard™
ExpressCard™ Slot
(top slot)
34 mm ExpressCard™
54 mm ExpressCard™
LB_Topaz 05 (55-66)
11/10/05, 8:34 AM
64
Summary of Contents for LifeBook N Series
Page 9: ...1 Preface 1 LB_Topaz 01 01 04 11 10 05 8 30 AM 1 ...
Page 10: ...2 LB_Topaz 01 01 04 11 10 05 8 30 AM 2 ...
Page 12: ...4 LB_Topaz 01 01 04 11 10 05 8 30 AM 4 ...
Page 13: ...5 Getting to Know Your Computer 2 LB_Topaz 02 05 18 11 10 05 8 31 AM 5 ...
Page 14: ...6 LB_Topaz 02 05 18 11 10 05 8 31 AM 6 ...
Page 26: ...18 LB_Topaz 02 05 18 11 10 05 8 31 AM 18 ...
Page 27: ...19 Getting Started 3 LB_Topaz 03 19 22 11 10 05 8 31 AM 19 ...
Page 28: ...20 LB_Topaz 03 19 22 11 10 05 8 31 AM 20 ...
Page 30: ...22 LB_Topaz 03 19 22 11 10 05 8 31 AM 22 ...
Page 31: ...23 TV Tuner User s Guide 4 LB_Topaz 04 23 54 11 10 05 8 33 AM 23 ...
Page 32: ...24 LB_Topaz 04 23 54 11 10 05 8 33 AM 24 ...
Page 63: ...55 User Installable Devices and Media 5 LB_Topaz 05 55 66 11 10 05 8 34 AM 55 ...
Page 64: ...56 LB_Topaz 05 55 66 11 10 05 8 34 AM 56 ...
Page 74: ...66 LB_Topaz 05 55 66 11 10 05 8 34 AM 66 ...
Page 75: ...67 Troubleshooting 6 LB_Topaz 06 67 80 11 10 05 8 34 AM 67 ...
Page 76: ...68 LB_Topaz 06 67 80 11 10 05 8 34 AM 68 ...
Page 89: ...81 Care and Maintenance 7 LB_Topaz 07 81 86 11 10 05 8 35 AM 81 ...
Page 90: ...82 LB_Topaz 07 81 86 11 10 05 8 35 AM 82 ...
Page 100: ...vi ...
Page 101: ...1 前言 1 ...
Page 102: ...2 ...
Page 104: ...4 ...
Page 105: ...5 筆記本電腦概述 2 ...
Page 106: ...6 ...
Page 118: ...18 ...
Page 119: ...19 準備工作 3 ...
Page 120: ...20 ...
Page 122: ...22 ...
Page 123: ...23 電視調諧器 使用者指南 4 ...
Page 124: ...24 ...
Page 155: ...55 用戶自行安裝設備和 媒體 5 ...
Page 156: ...56 ...
Page 166: ...66 ...
Page 167: ...67 故障排除 6 ...
Page 168: ...68 ...
Page 181: ...81 保養與維修 7 ...
Page 182: ...82 ...
Page 192: ...vi ...
Page 193: ...1 前言 1 ...
Page 194: ...2 ...
Page 196: ...4 ...
Page 197: ...5 筆記本電腦概述 2 ...
Page 198: ...6 ...
Page 210: ...18 ...
Page 211: ...19 準備工作 3 ...
Page 212: ...20 ...
Page 214: ...22 ...
Page 215: ...23 電視調諧器 使用者指南 4 ...
Page 216: ...24 ...
Page 247: ...55 用戶自行安裝設備和 媒體 5 ...
Page 248: ...56 ...
Page 258: ...66 ...
Page 259: ...67 故障排除 6 ...
Page 260: ...68 ...
Page 273: ...81 保養與維修 7 ...
Page 274: ...82 ...


