19
G e t t i n g t o K n o w Y o u r L i f e B o o k
Hot-swapping
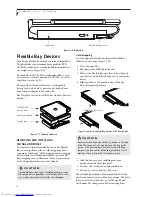
To hot-swap Flexible Bay devices while the system is
powered on, follow these steps:
1. Prior to performing the hot-swap, make sure you
have a charged main battery installed, or an AC
Adapter is powering the system.
2. If your system is in Suspend mode, press the
Suspend/Resume button to resume operation.
3. Click the Unplug or Eject Hardware icon (Windows
2000 Professional) or the Safely Remove Hardware
icon (Windows XP Home) in the lower right-hand
corner of the screen.
4. From the list that appears, click the device you want
to remove.
5. Pull out the Flexible Bay eject lever. This will push
your device out slightly, allowing you to remove the
device.
6. Slide your device out until it is clear of the bay.
This will require light force.
7. Press the Suspend/Resume button so that the
computer goes into suspend state.
8. Slide the device you are installing into your
notebook until it clicks into place.
9. It is now safe to turn your notebook back on.
10. You can now access and use the device.
Your LifeBook notebook will automatically detect the
new device and activate it within your system. The drive
letters associated with the device will be created and
listed under My Computer and Windows Explorer.
C A U T I O N
Be careful when aligning and seating devices in the bay.
If the fit is incorrect, you may damage the bay or the
device. If the device does not move easily in the bay,
remove it, and check for dirt or foreign objects. It will
require a firm push to latch the device in place.
Summary of Contents for LifeBook P-2040
Page 7: ...1 Preface ...
Page 8: ...L i f e B o o k P S e r i e s ...
Page 10: ...2 L i f e B o o k P S e r i e s S e c t i o n O n e ...
Page 11: ...3 2 Getting to Know Your LifeBook Notebook ...
Page 12: ...4 L i f e B o o k P S e r i e s S e c t i o n T w o ...
Page 31: ...23 3 Getting Started ...
Page 32: ...24 L i f e B o o k P S e r i e s S e c t i o n T h r e e ...
Page 40: ...32 L i f e B o o k P S e r i e s S e c t i o n T h r e e ...
Page 41: ...33 4 User Installable Features ...
Page 42: ...34 L i f e B o o k P S e r i e s S e c t i o n F o u r ...
Page 55: ...47 5 Troubleshooting ...
Page 56: ...48 L i f e B o o k P S e r i e s S e c t i o n F i v e ...
Page 70: ...62 L i f e B o o k P S e r i e s S e c t i o n F i v e ...
Page 71: ...63 6 Care and Maintenance ...
Page 72: ...64 L i f e B o o k P S e r i e s S e c t i o n S i x ...
Page 76: ...68 L i f e B o o k P S e r i e s S e c t i o n S i x ...
Page 77: ...69 7 Specifications ...
Page 78: ...70 L i f e B o o k P S e r i e s S e c t i o n S e v e n ...
Page 83: ...75 8 Glossary ...
Page 84: ...76 L i f e B o o k P S e r i e s S e c t i o n E i g h t ...

