19
G e t t i n g t o K n o w Y o u r T a b l e t P C
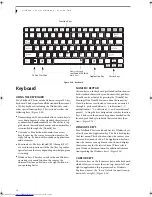
FUNCTION KEYS
Your notebook has 12 function keys, F1 through F12.
The functions assigned to these keys differ for each
application. You should refer to your software docu-
mentation to find out how these keys are used.
(Figure 2-16)
[Fn] Key
The [Fn] key provides extended functions for the
notebook and is always used in conjunction with
another key.
■
[Fn+F3]: Pressing [F3] while holding [Fn] will toggle
the Audio Mute on and off.
■
[Fn+F4]: Pressing [F4] while holding [Fn] will toggle
the built-in pointing device on and off. Note that the
[Fn+F4] combination only works if Manual Setting is
selected in the BIOS. (See “Entering the BIOS Setup
Utility” on page 30)
■
[Fn +F5]: Pressing [F5] while holding [Fn] allows
you to toggle between video compensation and no
compensation. (Video compensation controls spacing
on the display. When it is enabled, displays with less
than 1024 x 768 or 800 x 600 pixel resolution will still
cover the entire screen.)
■
[Fn+F6]: Pressing [F6] repeatedly while holding [Fn]
will lower the brightness of your display. Note that
adjusting the brightness using the keyboard changes
the system setting.
■
[Fn+F7]: Pressing [F7] repeatedly while holding [Fn]
will increase the brightness of the display.
■
[Fn+F8]: Pressing [F8] repeatedly while holding [Fn]
will decrease the volume of your notebook.
■
[Fn+F9]: Pressing [F9] repeatedly while holding [Fn]
will increase the volume of your notebook.
■
[Fn+F10]: Pressing [F10] while holding [Fn] allows
you to change your selection of where to send your
display video. Each time you press the combination
of keys you will step to the next choice. The choices,
in order, are: built-in display panel only, both built-in
display panel, and external monitor or external moni-
tor only.
P Series.book Page 19 Wednesday, July 6, 2005 2:29 PM
Summary of Contents for LIFEBOOK P Series
Page 6: ...L i f e B o o k P S e r i e s ...
Page 7: ...1 1 Preface ...
Page 8: ...2 L i f e B o o k P S e r i e s N o t e b o o k ...
Page 10: ...4 L i f e B o o k P S e r i e s N o t e b o o k ...
Page 11: ...5 2 Getting to Know Your LifeBook ...
Page 12: ...6 L i f e B o o k P S e r i e s N o t e b o o k S e c t i o n T w o ...
Page 32: ...26 L i f e B o o k P S e r i e s N o t e b o o k S e c t i o n T w o ...
Page 33: ...27 3 Using Your LifeBook ...
Page 34: ...28 L i f e B o o k P S e r i e s N o t e b o o k S e c t i o n T h r e e ...
Page 41: ...35 4 User Installable Features ...
Page 42: ...36 L i f e B o o k P S e r i e s N o t e b o o k S e c t i o n F o u r ...
Page 54: ...48 L i f e B o o k P S e r i e s N o t e b o o k S e c t i o n F o u r ...
Page 55: ...49 5 Troubleshooting ...
Page 56: ...50 L i f e B o o k P S e r i e s N o t e b o o k S e c t i o n F i v e ...
Page 68: ...62 L i f e B o o k P S e r i e s N o t e b o o k S e c t i o n F i v e ...
Page 69: ...63 6 Care and Maintenance ...
Page 70: ...64 L i f e B o o k P S e r i e s N o t e b o o k S e c t i o n S i x ...
Page 74: ...68 L i f e B o o k P S e r i e s N o t e b o o k S e c t i o n S i x ...
Page 75: ...69 7 Specifications ...
Page 76: ...70 L i f e B o o k P S e r i e s N o t e b o o k S e c t i o n S e v e n ...
Page 81: ...75 8 Glossary ...
Page 82: ...76 L i f e B o o k P S e r i e s N o t e b o o k S e c t i o n E i g h t ...
Page 89: ...83 Appendix A Integrated Wireless LAN User s Guide Optional Device ...
Page 90: ...84 L i f e B o o k P S e r i e s N o t e b o o k A p p e n d i x A ...
Page 104: ...98 L i f e B o o k P S e r i e s N o t e b o o k A p p e n d i x A ...
Page 105: ...99 Appendix B Using the Fingerprint Swipe Sensor ...
Page 106: ...100 L i f e B o o k T S e r i e s T a b l e t P C A p p e n d i x B ...
Page 114: ...108 L i f e B o o k T S e r i e s T a b l e t P C A p p e n d i x B ...
Page 118: ...112 L i f e B o o k P S e r i e s N o t e b o o k I n d e x ...
Page 119: ......
Page 120: ......


