75
W I r e l e s s L A N U s e r ’ s G u i d e
CONNECTING WINDOWS 2000 SYSTEMS
This chapter describes how to set the wireless LAN
connection for computers running Windows 2000.
Workflow
The proper setup of the wireless LAN requires several
steps which must be performed in the proper order.
Following is a general outline of the steps that must be
performed. Each step is detailed later in this procedure.
1. Setting parameters
■
Setting the profile
■
Setting the encryption
2. Network settings
■
Setting the protocol and checking the network
■
Setting file and printer sharing
■
Checking the connection
Setting Parameters
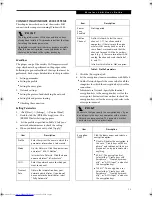
1. Click [Start]-> [Settings] -> [Control Panel].
2. Double-click the [PRISM Settings] icon. The
[PRISM Wireless Settings] appears.
3. Set the profile as specified in Table 3. Ask your
network administrators to check the setting.
4. When you finish your entry, click [Apply].
Table 3: Profile Parameters
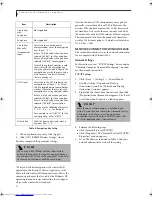
5. Click the [Encryption] tab.
6. Set the encryption items in accordance with Table 4.
■
AdHoc Network: Specify the same value for all the
computers for which the encryption key is used for
connection.
■
Infrastructure Network: Specify the identical
encryption keys to the encryption keys set for the
access point. For instructions on how to check the
encryption keys set for the access point, refer to the
access point manual.
P O I N T
The integrated wireless LAN device and drivers have
already been installed. This procedure outlines the steps
for setting the device parameters.
Updated drivers and/or utilities may become available
after this manual is printed; see any addenda or fliers
that may be included in the system packaging.
Item
Description
Profile
Enter the system file name in which the
parameter information is to be saved.
Mode
Ad Hoc Network:
Click the down arrow
and select “802.11 AdHoc”.
Infrastructure Network:
Click the down
arrow and select “Infrastructure”.
SSID
Enter the network name to which you
want to connect
Transmit
Rate
Obtain the information from your
network administrator. If you do not
have a network administrator, select
“Fully Automatic”.
Power
Save
Enabled
Not supported.
AdHoc
Channel
AdHoc Network:
Select the same
channel, 1-11, for all connected
computers. If there is more than one
wireless LAN nearby (such as on the
same floor), we recommend that the
channels for each LAN be 5 numbers
apart (e.g., if there are two other LANs
nearby, the channels used should be 1,
6, and 11).
Infrastructure Network:
Not an option.
P O I N T
Make sure that you specify the encryption keys. If you
do not specify the keys, any computer with a wireless
LAN card can be connected. This presents a risk that
your data may be stolen or destroyed.
Item
Description
Encryption
(WEP)
Click the down arrow and select an
encryption option.
■
Disable:
Disables the encryption. In
this case, “Create keys with Pass-
phrase” and subsequent items are
greyed out, and you cannot enter
anything.
■
40 bit*:
The encryption is set.
Select either “Create keys with
Passphrase”, “Create keys manu-
ally”, or “ASCII Input”, and enter
the encryption keys.
■
104 bit*:
The encryption is set.
Select either “Create keys with
Passphrase”, “Create keys manu-
ally”, or “ASCII Input”, and enter
the encryption keys.
Item
Description
B5FH-6611-01EN-00.book Page 75 Thursday, September 26, 2002 11:21 AM
Summary of Contents for LifeBook P1000
Page 2: ...L i f e B o o k P 1 0 0 0 N o t e b o o k ...
Page 6: ...L i f e B o o k P 1 0 0 0 N o t e b o o k ...
Page 7: ...1 Preface ...
Page 8: ...L i f e B o o k P 1 0 0 0 N o t e b o o k ...
Page 10: ...2 L i f e B o o k P 1 0 0 0 N o t e b o o k S e c t i o n O n e ...
Page 11: ...3 2 Getting to Know Your LifeBook Notebook ...
Page 12: ...4 L i f e B o o k P 1 0 0 0 N o t e b o o k S e c t i o n T w o ...
Page 27: ...19 3 Getting Started ...
Page 28: ...20 L i f e B o o k P 1 0 0 0 N o t e b o o k S e c t i o n T h r e e ...
Page 36: ...28 L i f e B o o k P 1 0 0 0 N o t e b o o k S e c t i o n T h r e e ...
Page 37: ...29 4 User Installable Features ...
Page 38: ...30 L i f e B o o k P 1 0 0 0 N o t e b o o k S e c t i o n F o u r ...
Page 45: ...37 5 Troubleshooting ...
Page 46: ...38 L i f e B o o k P 1 0 0 0 N o t e b o o k S e c t i o n F i v e ...
Page 58: ...50 L i f e B o o k P 1 0 0 0 N o t e b o o k S e c t i o n F i v e ...
Page 59: ...51 6 Care and Maintenance ...
Page 60: ...52 L i f e B o o k P 1 0 0 0 N o t e b o o k S e c t i o n S i x ...
Page 63: ...55 7 Specifications ...
Page 64: ...56 L i f e B o o k P 1 0 0 0 N o t e b o o k S e c t i o n S e v e n ...
Page 68: ...60 L i f e B o o k P 1 0 0 0 N o t e b o o k S e c t i o n S e v e n ...
Page 69: ...61 8 Glossary ...
Page 70: ...62 L i f e B o o k P 1 0 0 0 N o t e b o o k S e c t i o n E i g h t ...
Page 78: ...70 L i f e B o o k P 1 0 0 0 N o t e b o o k S e c t i o n E i g h t ...
Page 79: ...71 Appendix Integrated Wireless LAN User s Guide ...
Page 80: ...72 L i f e B o o k P 1 0 0 0 N o t e b o o k A p p e n d i x ...
Page 100: ...92 L i f e B o o k P 1 0 0 0 N o t e b o o k ...


