44
3
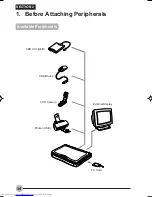
Connect the display cable to the CRT display.
Refer to the CRT display manual for the details on connection.
4
Connect the CRT display power cable and switch the display power on.
5
Connect the AC adapter to the PC and switch the PC power on.
Critical Point
If you turn the power on after connecting an external display, you may experience the
following phenomena:
•
The same screen image is displayed on both of the liquid crystal display on the PC unit and the
external display.
•
“Add New Hardware Wizard” dialog box appears.
•
In such cases, follow the instruction on the display to install the driver for the external display.
WARNING
•
Your notebook default screen size resolution is set at 1024 x 512. If you enable your external
monitor (by pressing Fn + F10) you may notice that the screen size and icons are elongated.
This phenomenon is normal. You may choose to set higher or lower resolution of the external
monitor to 1024 x 768 or 800 x 600 while disabling the LCD screen.
6
Select the display to use.
When you push down the [F10] key while pressing down the [Fn] key, you can select the display
to use in the order of LCD to CRT to the simultaneous display to LCD. And you can select the
display also from “Display Property” in the operating system.
05NYX E(33-44)
17/05/2001, 8:43 AM
44


