16
L i f e B o o k P 7 0 0 0 N o t e b o o k – S e c t i o n T w o
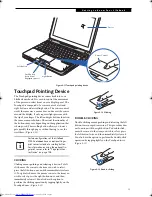
DRAGGING
Dragging means pressing and holding the left button,
while moving the cursor. To drag, move the cursor to the
item you wish to move. Press and hold the left button
while moving the item to its new location and then
release it. Dragging can also be done using the
Touchpad. First, tap the Touchpad twice over the item
you wish to move making sure to leave your finger on
the pad after the final tap. Next, move the object to its
new location by moving your finger across the
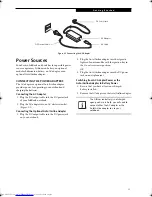
Touchpad, and then release your finger. (Figure 2-14)
Figure 2-14 Dragging
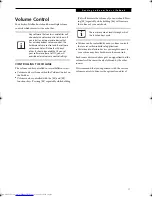
SCROLLING
Using the Scrolling button allows you to navigate
through a document quickly without using the window’s
scroll bars. This is particularly useful when you are
navigating through on-line pages. To use the Scrolling
button, press the crescent shape at the top or bottom of
the button to scroll up or down a page. When you have
reached the desired section of the page, release the
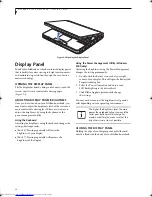
button. (Figure 2-15)
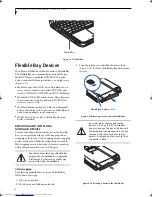
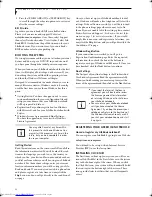
If you have an optional fingerprint sensor in the location
of the Scrolling button, you can scroll by sliding your
finger up and down the right side of the
touchpad.(Figure 2-16)
Figure 2-15 Scrolling with scrolling button
Figure 2-16 Scrolling with Touchpad
TOUCHPAD CONTROL ADJUSTMENT
If you need to change or adjust any of the touchpad
control functions, you can customize them from the
Mouse properties dialog box in the Control Panel. Click
on Start, select Settings > Control Panel, then double-
click Mouse.
■
I
f the interval between clicks is too
long, the double-click will not be
executed.
■
Parameters for the Touchpad can be
adjusted from the Mouse Properties
dialog box located in the Windows
Control Panel.
P7010.book Page 16 Tuesday, April 20, 2004 2:26 PM
Summary of Contents for Lifebook P7010
Page 2: ...L i f e B o o k P 7 0 0 0 N o t e b o o k ...
Page 6: ...L i f e B o o k P 7 0 0 0 N o t e b o o k ...
Page 7: ...1 Preface ...
Page 8: ...L i f e B o o k P 7 0 0 0 N o t e b o o k ...
Page 10: ...2 L i f e B o o k P 7 0 0 0 N o t e b o o k S e c t i o n O n e ...
Page 11: ...3 2 Getting to Know Your LifeBook Notebook ...
Page 12: ...4 L i f e B o o k P 7 0 0 0 N o t e b o o k S e c t i o n T w o ...
Page 28: ...20 L i f e B o o k P 7 0 0 0 N o t e b o o k S e c t i o n T w o ...
Page 29: ...21 3 Getting Started ...
Page 30: ...22 L i f e B o o k P 7 0 0 0 N o t e b o o k S e c t i o n T h r e e ...
Page 37: ...29 4 User Installable Features ...
Page 38: ...30 L i f e B o o k P 7 0 0 0 N o t e b o o k S e c t i o n F o u r ...
Page 55: ...47 5 Using the Integrated Wireless LAN ...
Page 56: ...48 L i f e B o o k P 7 0 0 0 N o t e b o o k S e c t i o n F I v e ...
Page 73: ...65 6 Troubleshooting ...
Page 74: ...66 L i f e B o o k P 7 0 0 0 N o t e b o o k S e c t i o n S i x ...
Page 88: ...80 L i f e B o o k P 7 0 0 0 N o t e b o o k S e c t i o n S i x ...
Page 89: ...81 7 Care and Maintenance ...
Page 90: ...82 L i f e B o o k P 7 0 0 0 N o t e b o o k S e c t i o n S e v e n ...
Page 94: ...86 L i f e B o o k P 7 0 0 0 N o t e b o o k S e c t i o n S e v e n ...
Page 95: ...87 8 Specifications ...
Page 96: ...88 L i f e B o o k P 7 0 0 0 N o t e b o o k S e c t i o n E i g h t ...
Page 100: ...92 L i f e B o o k P 7 0 0 0 N o t e b o o k S e c t i o n E i g h t ...
Page 104: ...96 L i f e B o o k P 7 0 0 0 N o t e b o o k S e c t i o n E i g h t ...
Page 105: ...97 9 Glossary ...
Page 106: ...98 L i f e B o o k P 7 0 0 0 N o t e b o o k S e c t i o n N i n e ...
Page 111: ...103 Appendix A Using the Fingerprint Sensor Optional Device ...
Page 112: ...104 L i f e B o o k P 7 0 0 0 N o t e b o o k A p p e n d i x ...
Page 120: ...112 L i f e B o o k P 7 0 0 0 N o t e b o o k A p p e n d i x ...


