68
L i f e B o o k P 7 0 0 0 N o t e b o o k – S e c t i o n S i x
TROUBLESHOOTING TABLE
Problem
Page
Audio Problems . . . . . . . . . . . . . . . . . . . . . . . . . . page 68
DVD/CD-RW Drive Problems . . . . . . . . . . . . . . page 68
Floppy Disk Drive Problems . . . . . . . . . . . . . . . . page 69
Hard Drive Problems . . . . . . . . . . . . . . . . . . . . . . page 69
Keyboard or Mouse Problems. . . . . . . . . . . . . . . page 69
Memory Problems . . . . . . . . . . . . . . . . . . . . . . . . page 70
Modem Problems . . . . . . . . . . . . . . . . . . . . . . . . . page 70
Problem
Page
USB Device Problems . . . . . . . . . . . . . . . . . . . . . page 70
PC Card Problems . . . . . . . . . . . . . . . . . . . . . . . . page 70
Power Failures . . . . . . . . . . . . . . . . . . . . . . . . . . . page 71
Shutdown and Startup Problems . . . . . . . . . . . . page 72
Video Problems . . . . . . . . . . . . . . . . . . . . . . . . . . page 73
Miscellaneous Problems . . . . . . . . . . . . . . . . . . . page 74
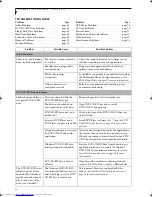
Problem
Possible Cause
Possible Solutions
Audio Problems
There is no sound coming
from the built-in speakers.
The software volume control is
set too low.
Adjust the sound volume control settings in your
software, operating system and applications.
Headphones are plugged into
your notebook.
Plugging in headphones disables the built-in
speakers; remove the headphones.
BIOS audio settings
are incorrect.
Set the BIOS setup utility to the default values within
the Multimedia Device Configuration menu. (See
BIOS Setup Utility on page 25 for more information)
Software driver is not
configured correctly.
Refer to your application and operating system
documentation for help.
DVD/CD-RW Drive Problems
LifeBook notebook fails to
recognize DVD/CD-RW
drive
Protective sheet is still in the
DVD/CD-RW drive tray.
Remove the protective sheet from the tray.
The disc is not pushed down
onto raised center of the drive.
Open DVD/CD-RW tray and re-install
DVD/CD-RW disc properly.
DVD/CD-RW drive tray is not
latched shut.
Push on the front of the DVD/CD-RW drive tray
until it latches.
Incorrect DVD Player or no
DVD Player software is installed.
Install DVD Player software. (See “Using the DVD/
CD-RW Drive Software” on page 35 for more infor-
mation.)
Wrong drive designator was used
for DVD/CD-RW drive in the
application.
Verify the drive designator used by the application is
the same as the one used by the operating system.
When the operating system is booted from a DVD/
CD, drive designations are automatically adjusted.
Windows DVD/CD-RW auto
insertion function is disabled.
Start the DVD/CD-RW drive from the desktop or
application software or re-enable the Windows
DVD/CD-RW auto insertion function. (See Auto
Insert Notification Function on page 36 for more
information)
DVD/CD-RW disc is dirty or
defective.
Wipe disc with non-abrasive cleaning cloth and
reinsert. It if still will not work try a different disc.
The DVD/CD-RW Access
indicator on the Status
Indicator Panel blinks at
regular intervals when no
disc is in the tray or the
drive is not installed.
The Windows DVD/CD-RW
auto insertion function is active
and is checking to see if a DVD/
CD-RW disc is ready to run.
This is normal. However, you may disable this
feature. (See Auto Insert Notification Function on
page 36 for more information)
P7010.book Page 68 Tuesday, April 20, 2004 2:26 PM
Summary of Contents for Lifebook P7010
Page 2: ...L i f e B o o k P 7 0 0 0 N o t e b o o k ...
Page 6: ...L i f e B o o k P 7 0 0 0 N o t e b o o k ...
Page 7: ...1 Preface ...
Page 8: ...L i f e B o o k P 7 0 0 0 N o t e b o o k ...
Page 10: ...2 L i f e B o o k P 7 0 0 0 N o t e b o o k S e c t i o n O n e ...
Page 11: ...3 2 Getting to Know Your LifeBook Notebook ...
Page 12: ...4 L i f e B o o k P 7 0 0 0 N o t e b o o k S e c t i o n T w o ...
Page 28: ...20 L i f e B o o k P 7 0 0 0 N o t e b o o k S e c t i o n T w o ...
Page 29: ...21 3 Getting Started ...
Page 30: ...22 L i f e B o o k P 7 0 0 0 N o t e b o o k S e c t i o n T h r e e ...
Page 37: ...29 4 User Installable Features ...
Page 38: ...30 L i f e B o o k P 7 0 0 0 N o t e b o o k S e c t i o n F o u r ...
Page 55: ...47 5 Using the Integrated Wireless LAN ...
Page 56: ...48 L i f e B o o k P 7 0 0 0 N o t e b o o k S e c t i o n F I v e ...
Page 73: ...65 6 Troubleshooting ...
Page 74: ...66 L i f e B o o k P 7 0 0 0 N o t e b o o k S e c t i o n S i x ...
Page 88: ...80 L i f e B o o k P 7 0 0 0 N o t e b o o k S e c t i o n S i x ...
Page 89: ...81 7 Care and Maintenance ...
Page 90: ...82 L i f e B o o k P 7 0 0 0 N o t e b o o k S e c t i o n S e v e n ...
Page 94: ...86 L i f e B o o k P 7 0 0 0 N o t e b o o k S e c t i o n S e v e n ...
Page 95: ...87 8 Specifications ...
Page 96: ...88 L i f e B o o k P 7 0 0 0 N o t e b o o k S e c t i o n E i g h t ...
Page 100: ...92 L i f e B o o k P 7 0 0 0 N o t e b o o k S e c t i o n E i g h t ...
Page 104: ...96 L i f e B o o k P 7 0 0 0 N o t e b o o k S e c t i o n E i g h t ...
Page 105: ...97 9 Glossary ...
Page 106: ...98 L i f e B o o k P 7 0 0 0 N o t e b o o k S e c t i o n N i n e ...
Page 111: ...103 Appendix A Using the Fingerprint Sensor Optional Device ...
Page 112: ...104 L i f e B o o k P 7 0 0 0 N o t e b o o k A p p e n d i x ...
Page 120: ...112 L i f e B o o k P 7 0 0 0 N o t e b o o k A p p e n d i x ...

