background image

38

L i f e B o o k   S   S e r i e s   -   S e c t i o n   3

Using the Hibernation Feature
1.

From the Start menu, select Settings (in
Windows 2000), and then select Control
Panel.

2.

From the Control Panel select Power Options.

3.

Select the Advanced tab. Select Hibernate
from the pull down menu for Power buttons.

DISPLAY TIMEOUT

The Video Timeout is one of the power
management parameters. This feature saves
power by turning off the display if there is no
keyboard or pointer activity for the user selected
timeout period. Any keyboard or pointer activity
will cause the display to restart automatically. This
feature is independent of the Power/Suspend/
Resume button and can be enabled and disabled
in Windows and the BIOS setup utility.

HARD DISK TIMEOUT

The Hard Disk Timeout is another one of the
power management parameters. This feature
saves power by turning off the hard drive if there
is no hard drive activity for the user selected
timeout period. Any attempt to access the hard
drive will cause it to restart automatically. This
feature is independent of the Power/ Suspend
Resume button and can be enabled and disabled
in Windows and BIOS setup utility.

WINDOWS POWER MANAGEMENT

Power Management
The Power Options icon located in the Windows
Control Panel allows you to configure some
power management settings. For example, you
can use Power Management to set the timeout
values for turning off the display and hard disks
whether you are running the notebook on battery
power or one of the adapters. The settings may
also be changed in the BIOS.

RESTARTING THE  SYSTEM

If your system is on and you need to restart it, be
sure that you use the following procedure.

1.

Click Start, then click Shut Down.

2.

Select the Restart option from within the
Windows Shut Down dialog box.

3.

Click OK to restart your notebook. Your
notebook will shut down and then reboot.

POWER OFF

Before turning off the power, check that the Hard
Drive, Optical Drive, PC Card and Floppy Disk
Status Indicators are all Off. If you power-off while
accessing a disk or PC Card there is a risk of
data loss. To ensure that the notebook shuts down
without error, use the Windows shutdown
procedure.

Using the correct procedure to shut down from
Windows allows your notebook to complete its
operations and turn off power in the proper
sequence to avoid errors. The proper sequence
is:

1.

Click the Start button, and then click Shut
Down.

2.

Select the Shut Down option from within the
Windows Shut Down dialog box.

3.

Click OK to shut down your notebook.

If you are going to store your notebook for a
month or more, see Care and Maintenance
section.

Turning off your notebook without exiting
Windows, or turning it on within 10 seconds
of being shut off may cause an error when
you start the next time.

Be sure to close all files, exit all applications,
and shut down your operating system prior
to turning off the power. If files are open when
you turn the power off, you will lose any
changes that have not been saved, and may
cause disk errors.

LB_GARLICS 03 (29-38)

21/7/03, 6:24 PM

38

Summary of Contents for LIFEBOOK S Series

Page 1: ...d Micro Devices Inc ATI and RADEON are registered trademarks of ATI Technologies Inc Broadcom are trademarks or registered trademarks of Broadcom Corporation All other trademarks mentioned herein are the property of their respective owners Copyright 2003 Fujitsu All rights reserved No part of this publication may be copied reproduced or translated without prior written consent of Fujitsu No part o...

Page 2: ...he purpose of the grounding type plug 9 Do not allow anything to rest on the power cord Do not locate this product where persons will walk on the cord 10 If an extension cord is used with this product make sure that the total ampere rating of the equipment plugged into the extension cord does not exceed the extension cord ampere rating Also make sure that the total rating of all products plugged i...

Page 3: ...place only with the same or equivalent type recommeded by the manufacturer Dispose of the used battery according to the manufacturer s instructions 15 Use only the proper type of power supply cord set provided in your accessories box for this unit It should be a detachable type UL listed CSA certified BS1363 ASTA SS145 certified rated 10A 250V minimum VDE approved or its equivalent Maximum length ...

Page 4: ...rvice or repair to the designated service centers High Safety Required Use This Product is designed developed and manufactured as contemplated for general use including without limitation general office use personal use household use and ordinary industrial use but is not designed developed and manufactured as contemplated for use accompanying fatal risks or dangers that unless extremely high safe...

Page 5: ...do so would result in your modem being operated in a non compliant manner Call Attempts Retries Applications software shall be configured so that no more than 3 attempts are made to establish a connection to a given number Note if the modem can detect service tones up to 10 attempts can be made If the call sequence is unsuccessful there shall be a delay of at least 30 minutes before attempting to ...

Page 6: ... equipped with pulse dialing while the New Zealand standard is DTMF tone dialing There is no guarantee that Telecom lines will always continue to support pulse dialing It is strongly recommended that pulse dialing is not used Some parameters required for compliance with Telecom s Telepermit requirements are dependent on the equipment PC associated with this device The associated equipment shall be...

Page 7: ...elect Phone and Modem Options 2 Double click New Location 3 Choose Australia in Country region pull down menu bar 4 Select Phone system as Tone Dialing 5 Click OK and Apply B If you are located in New Zealand 1 Click start select Control panel select Phone and Modem Options 2 Double click New Location 3 Choose New Zealand in Country region pull down menu bar 4 Select Phone system as Tone Dialing 5...

Page 8: ...viii L i f e B o o k S S e r i e s LB_GARLICS 00 Intro 21 7 03 5 57 PM 8 ...

Page 9: ...yboard USING THE KEYBOARD 16 NUMERIC KEYPAD 16 WINDOWS KEYS 17 CURSOR KEYS 17 FUNCTION KEYS 17 Touchpad Pointing Device CLICKING 18 DOUBLE CLICKING 19 DRAGGING 19 TOUCHPAD CONTROL ADJUSTMENT 19 SCROLLING 19 Volume Control CONTROLLING THE VOLUME 20 Flexible Bay Devices REMOVING AND INSTALLING MODULAR DEVICES 22 LifeBook Security Application Panel SETTING UP YOUR LIFEBOOK SECURITY PANEL 23 PASSWORDS...

Page 10: ...S 48 TO REMOVE A MEMORY UPGRADE MODULE 49 CHECKING THE MEMORY CAPACITY 49 Port Replicator BACK PANEL COMPONENTS 50 FRONT PANEL COMPONENTS 51 ATTACHING THE PORT 51 DETACHING THE PORT REPLICATOR 51 Device Ports MODEM RJ 11 TELEPHONE JACK 52 INTERNAL LAN RJ 45 JACK 52 PARALLEL PORT 52 SERIAL PORT 53 PS 2 PORT 53 DOCKING PORT 53 UNIVERSAL SERIAL BUS PORTS 53 IEEE 1394 PORT 4 PIN TYPE 53 INFRARED PORT ...

Page 11: ...n using Windows XP FLOW OF OPERATIONS 100 PREPARATION FOR WIRELESS LAN CONNECTION 100 CONNECTION TO THE NETWORK 102 Connection using Windows 2000 FLOW OF OPERATIONS 106 PREPARATION FOR WIRELESS LAN CONNECTION 106 CONNECTION TO THE NETWORK 107 Troubleshooting the Wireless LAN TROUBLESHOOTING 111 Wireless LAN Glossary GLOSSARY 114 IP address information ADDITIONAL INFORMATION 116 LB_GARLICS 00 TOC 2...

Page 12: ...xii L i f e B o o k S S e r i e s LB_GARLICS 00 TOC 21 7 03 6 06 PM 12 ...

Page 13: ...1 Preface 1 LB_GARLICS 01 01 04 21 7 03 6 22 PM 1 ...

Page 14: ...L i f e B o o k S S e r i e s S e c t i o n 1 2 LB_GARLICS 01 01 04 21 7 03 6 22 PM 2 ...

Page 15: ...upport a variety of optional features Conventions Used in the Guide Keyboard keys appear in brackets Example Fn F1 ESC ENTER and CTRL Pages with additional information about a specific topic are cross referenced within the text Example See page xx On screen buttons or menu items appear in bold Example Click OK to restart your LifeBook notebook DOS commands you enter appear in Courier type Example ...

Page 16: ...L i f e B o o k S S e r i e s S e c t i o n 1 4 LB_GARLICS 01 01 04 21 7 03 6 22 PM 4 ...

Page 17: ...5 Getting to Know Your LifeBook NoteBook 2 LB_GARLICS 02 05 15 21 7 03 6 22 PM 5 ...

Page 18: ...L i f e B o o k S S e r i e s S e c t i o n 2 6 LB_GARLICS 02 05 15 21 7 03 6 22 PM 6 ...

Page 19: ...eo Speaker Status Indicator Panel LifeBook Security Application Panel Power Suspend Resume Button Stereo Speaker Keyboard Touchpad Pointing Scroll Button Right Button Display Panel Latch Left Button Power Suspend Resume Button The Power Suspend Resume button allows you to suspend notebook activity without powering off resume your LifeBook notebook from suspend mode and power on your notebook when ...

Page 20: ...hone jack allows you to connect headphones or powered external speakers Microphone Jack The microphone jack allows you to connect an external mono microphone PC Card Slot The PC Card Slot allows you to install one Type II PC Card PC Card Eject Button Figure 2 5 LifeBook notebook left side panel PC Card Slot Headphone Jack Air Vents Microphone Jack LB_GARLICS 02 05 15 21 7 03 6 23 PM 8 ...

Page 21: ...ight Saver Flexible Bay Eject Lever The Flexible Bay eject lever releases the Flexible Bay device Emergency Tray Release The EmergencyTray Release allows you to open the CD tray without powering on your LifeBook notebook Anti theft Lock Slot The anti theft lock slot allows you to attach an optional physical lock down device Anti Theft Lock Slot Figure 2 6 LifeBook notebook right side panel Flexibl...

Page 22: ...BX manufacturer s documentation for details Some hotels have Digital PBX systems Be sure to find out BEFORE you connect your modem The internal Modem supports V 92 This is a modem driver software setting The performance and function of V 92 will depend on your local service provider Infrared Port The fast IrDA compatible port allows you to communicate with another IrDA compatible infrared device w...

Page 23: ...wire is used to connect between your LifeBook and a peripheral such as a digital video camera LAN RJ 45 Jack The internal LAN RJ 45 jack is used for an internal Fast Ethernet 10 100 Base TX connection Wireless LAN Switch The Wireless LAN Switch turns the wireless LAN antenna on and off if your notebook is equipped with an optional integrated wireless LAN module External Monitor Port The external m...

Page 24: ...attery bay contains the internal Lithium ion battery It can be opened for the removal of the battery when stored over a long period of time or for swapping a discharged battery with a charged Lithium ion battery Main Unit and Configuration Label The configuration label shows the model number and other information about your LifeBook notebook In addition the configuration portion of the label has t...

Page 25: ...t your system is either in Save to Disk mode or that your LifeBook notebook has been turned off Figure 2 9 Status Indicator Panel If you are charging your battery the Power indicator will remain on even if your notebook is shut off AC ADAPTER INDICATOR The AC Adapter indicator states whether your notebook is operating from the AC adapter or the batteries This icon has two different states that can...

Page 26: ...CCESS INDICATOR The Hard Drive Access indicator states whether your internal hard drive is being accessed 1 PC CARD ACCESS INDICATOR The PC Card Access indicator states whether or not your notebook is accessing a PC Card The indicator will flash if your software tries to access a PC Card even if there is no card installed Batteries subjected to shocks vibration or extreme temperatures can be perma...

Page 27: ...tates that your keyboard is set to type in all capital letters SCRLK INDICATOR The ScrLk indicator states that your scroll lock is active If you are using the optional external numerical keypad pressing the NumLk key will activate the external keypad The indicator will come on however it will not change any of the functionality of your keyboard keys LB_GARLICS 02 05 15 21 7 03 6 23 PM 15 ...

Page 28: ...ugh F12 are used in conjunction with the Fn key to produce special actions that vary depending on what program is running Windows keys These keys work with your Windows operating system and function the same as the onscreen Start menu button or the right button on your pointing device NUMERIC KEYPAD Certain keys on the keyboard perform dual functions as both standard character keys and numeric key...

Page 29: ...tended functions for the notebook and is always used in conjunction with another key Fn F3 Pressing F3 while holding Fn will toggle the Audio Mute on and off Fn F4 Pressing F4 while holding Fn will toggle the internal pointing device on and off Note that the Fn F4 combination only works if Manual Setting is selected in the BIOS Advanced menu Keyboard Mouse Features Internal Pointing Device Fn F6 P...

Page 30: ...the Touch pad will be disabled or enabled depending on the specifications in your BIOS settings Figure 2 13 Clicking Left Button Scroll Button Cursor Control Right Button Cursor Touchpad Pointing Device The Touchpad pointing device comes built into your Fujitsu LifeBook notebook It is used to control the movement of the pointer to select items on your display panel The Touchpad is composed of a cu...

Page 31: ... button while moving the item to its new location and then release it Dragging can also be done using the Touchpad First tap the Touchpad twice over the item you wish to move making sure to leave your finger on the pad after the final tap Next move the object to its new location by moving your finger across the Touchpad and then releasing your finger Figure 2 15 Figure 2 15 Dragging TOUCHPAD CONTR...

Page 32: ...hat are set within individual applications Certain external audio devices you might connect to your system may have hardware volume controls Each source discussed above puts an upper limit on the volume level that must then be followed by the other sources We recommend that you experiment with the various volume controls to discover the optimal sound level Any software that contains an audio playe...

Page 33: ...DVD CDs Modular DVD CD RW combo drive This allows you to access movies software and audio DVD CDs as well as to write to CDs Modular CD ROM drive This allows you to access software data or audio CDs Modular Lithium ion battery This is a rechargeable battery that can be used to power your LifeBook notebook when an adapter is not connected Weight Saver This is used to fill the bay when no device is ...

Page 34: ...t is now safe to turn your notebook back on 7 You can now access and use the device Your LifeBook notebook will automatically detect the new device and activate it within your system The drive letters associated with the device will be created and listed under My Computer and Windows Explorer Hot swapping Under Windows 2000 Professional Windows XP Home and Windows XP Professional hot swapping is p...

Page 35: ... buttons to enter your password Figure 2 20 Figure 2 20 LifeBook Security Application Panel Security Application Launcher buttons for entering passwords and launching applications Enter button Enter Button After entering the button strokes push this button to enter the password into the LifeBook notebook Figure 2 20 PASSWORDS The user and supervisor password may be set on this notebook A superviso...

Page 36: ...tem resumes from Off or suspend state You always need to push the Power Suspend Resume button to input the user password Your system will not begin the boot sequence without entering your supervisor user password From Off State 1 Turn on your system 2 When the Security Indicator flashes enter the password and press the Enter button For example if the password is 22222 press button number 2 five ti...

Page 37: ...r and doesn t want to give anybody the utility to set a password on their computer In this case if passwords supervisor user or both are set the passwords must first be cleared BEFORE removing the application To clear passwords follow the same procedure in Setting Passwords except this time select Remove enter the current password then click Next When asked to confirm select Yes Removing the appli...

Page 38: ...launcher the LifeBook Application Panel is very flexible giving you a variety of options To set up the panel to best suit your needs we have provided the Application Panel Setup utility that quickly and easily helps you make the most of this valuable feature To configure your LifeBook Application Panel with Application Panel Setup If you are in Windows XP Classic View or Windows 2000 1 Click on St...

Page 39: ...owser box If you wish to return to launching your default email application with the E Mail button select Start a Mail Program from the E Mail tab and browse to the location of the application Be aware that you will erase the settings for the other application If you wish to go back to launching the other application from this button you will need to reconfigure it as described above If your syste...

Page 40: ...L i f e B o o k S S e r i e s S e c t i o n 2 28 LB_GARLICS 02 16 28 21 7 03 6 24 PM 28 ...

Page 41: ...Getting Star ted with your LifeBook Notebook 29 Getting Started with your LifeBook Notebook 3 LB_GARLICS 03 29 38 21 7 03 6 24 PM 29 ...

Page 42: ...30 L i f e B o o k S S e r i e s S e c t i o n 3 LB_GARLICS 03 29 38 21 7 03 6 24 PM 30 ...

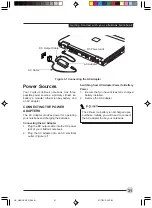
Page 43: ...he AC Adapter 1 Plug the DC output cable into the DC power jack of your LifeBook notebook 2 Plug the AC adapter into an AC electrical outlet Figure 3 1 Figure 3 1 Connecting the AC Adapter The Lithium ion battery is not charged upon purchase Initially you will need to connect the AC adapter to use your notebook Switching from AC Adapter Power to Battery Power 1 Be sure that you have at least one c...

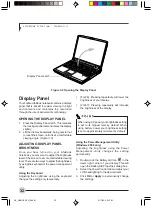
Page 44: ... resolution through the use of activematrix technology OPENING THE DISPLAY PANEL 1 Press the Display Panel latch This releases the locking mechanism and raises the display slightly 2 Lift the display backwards being careful not to touch the screen until it is at a comfortable viewing angle Figure 3 2 ADJUSTING DISPLAY PANEL BRIGHTNESS Once you have turned on your LifeBook notebook you may want to ...

Page 45: ...rd until it is flush with the body of your LifeBook notebook 2 Push down until you hear a click This will engage the locking mechanism and prevent your display panel from opening unexpectedly The higher the brightness level the more power the notebook will consume and the faster your batteries will discharge For maximum battery life make sure that the brightness is set as low as possible LB_GARLIC...

Page 46: ...rt up your notebook This information is in the BIOS program Each time you power up or restart your notebook it goes through a boot sequence which displays a Fujitsu logo until your operating system is loaded During booting your notebook is performing a standard boot sequence including a POST If the sequence is completed without a failure and without a request for the BIOS Setup Utility the system ...

Page 47: ...etup menus to review or alter the current settings Changing Video RAM Size Your system is set up to use 16MB of video RAM by default but you can change the allocated amount from within the BIOS To change the amount of video RAM perform the following steps 1 Enter the BIOS Setup Utility as detailed above 2 Using the arrow keys go to the Advanced menu Scroll down to select Miscellaneous Configuratio...

Page 48: ...s and your system will enter Suspend mode If your LifeBook is suspended pushing the Power Suspend Resume button returns your notebook to active operation You can tell whether the system is Suspended by looking at the Power indicator If the indicator is visible and not flashing your notebook is fully operational If the indicator is visible and flashing your notebook is in Suspend mode If the indica...

Page 49: ...o Disk mode The resume function of the button cannot be disabled The Suspend or Hibernation Save to Disk mode should not be used with certain PC Cards Check your PC Card documentation for more information When PC Cards or external devices are in use Hibernation Save to Disk mode cannot return to the exact state prior to suspension because all of the peripheral devices will be re initialized when t...

Page 50: ... disks whether you are running the notebook on battery power or one of the adapters The settings may also be changed in the BIOS RESTARTING THE SYSTEM If your system is on and you need to restart it be sure that you use the following procedure 1 Click Start then click Shut Down 2 Select the Restart option from within the Windows Shut Down dialog box 3 Click OK to restart your notebook Your noteboo...

Page 51: ...39 User Installable Features 4 LB_GARLICS 04 39 47 21 7 03 6 25 PM 39 ...

Page 52: ...L i f e B o o k S S e r i e s S e c t i o n 4 40 LB_GARLICS 04 39 47 21 7 03 6 25 PM 40 ...

Page 53: ...u do not need to discharge the battery completely before recharging The charge times will be significantly longer if your notebook is in use while the battery is charging If you want to charge the battery more quickly put your notebook into Suspend mode or turn it off while the adapter is charging the battery Low Battery State When the battery is running low a low battery notification message will...

Page 54: ...eBook notebook into Suspend mode until you can provide a new power source You should provide a charged battery an AC power adapter as soon as possible When you are in Suspend mode there must always be at least one power source active If you remove all power sources while your LifeBook notebook is in Suspend mode any data that has not been saved to the hard drive will be lost REPLACING THE BATTERY ...

Page 55: ...bay 4 Slide the new battery into the bay Figure 4 2 Figure 4 2 Installing a Battery 5 Press the battery down until it clicks into place Figure 4 1 Removing a Battery Battery Bay Release Latch If the Lithium ion battery connector is not fully seated you may not be able to use your notebook or charge your battery Figure 4 2 Installing a Battery Battery Bay Release Latch LB_GARLICS 04 39 47 21 7 03 6...

Page 56: ...ou to access movie software data or audio DVD CDs and to write data onto recordable CD R and CD RW discs DVD A DVD player gives you access to movie software data and audio DVD CDs CD ROM A CD ROM drive allows you to access software data or audio CDs Figure 4 3 Optical Drive Install your media player software before first using the optical drive Media Holder Tray Media Eject Button Do not operate y...

Page 57: ...ebook a short distance 2 Gently pull the tray out until a media disc can easily be placed in the tray 3 Place the media into the tray label side up with the hole in the center of the disc Snap the disc onto the raised circle in the center of the tray 4 Gently push the holder tray back in until you hear a click Figure 4 4 Figure 4 4 Loading Ejecting Media There may be a protective sheet in the tray...

Page 58: ...it Failure to do so could result in damage to the card socket 1 See your PC Card manual for specific instructions on the installation of your card Some PC Cards may require your notebook to be Off while installing them 2 Make sure there is no PC Card currently in the slot If there is see Removing PC Cards 3 Insert your PC Card into the slot with the product label facing up 4 Push the card into the...

Page 59: ...sh the PC Card slightly out of the slot allowing you to remove the card If the dialog box states that the device cannot be removed you must save all of your open files close any open applications and shut down your notebook If the PC Card has an external connector and cable do not pull the cable when removing the card LB_GARLICS 04 39 47 21 7 03 6 25 PM 47 ...

Page 60: ...the Memory Compartment Cover Do not remove any screws from the memory upgrade module compartment except the ones specifically shown in the directions for installing and removing the memory upgrade module The memory upgrade module can be severely damaged by electrostatic discharge ESD Be sure you are properly grounded when handling and installing the module 5 Remove the memory upgrade module from t...

Page 61: ...have changed the system memory capacity by either adding or removing a memory upgrade module be sure to check that your notebook has recognized the change Your LifeBook S2000 notebook is designed to share system memory with video memory using Unified Memory Architecture UMA technology UMA allows you to select the amount of memory you want to devote to video The factory set default is 16 MB but you...

Page 62: ...keyboard mouse port allows you to connect external PS 2 devices such as an external PS 2 keyboard or mouse Figure 4 12 Port Replicator back panel USB 2 0 Ports The USB ports allow you to connect Universal Serial Bus devices There are two USB 2 0 ports on the Port Replicator USB 2 0 ports allow you to connect any USB 2 0 device for up to 480Mbps transfer rate USB 2 0 is backward compatible with USB...

Page 63: ...he connector on top of the Port Replicator 2 Push your notebook down to connect it to the Port Replicator securely Figure 4 14 Figure 4 13 Port Replicator front panel Docking Port Port Replicator Release Latch Do not hold the system by the Port Replicator The Port Replicator and or the system could be damaged if the Port Replicator is used as a handle DETACHING THE PORT REPLICATOR The Port Replica...

Page 64: ... the internal modem or your entire LifeBook notebook Consult your PBX manufacturer s documentation for details Some hotels have Digital PBX systems Be sure to find out BEFORE you connect your modem Figure 4 16 Connecting a Modem INTERNAL LAN RJ 45 JACK The internal LAN RJ 45 jack is used for an internal Fast Ethernet connection You may need to configure your notebook to work with your particular n...

Page 65: ...s DOCKING PORT The docking port is used for the connection of your notebook to port replicator In order to connect your notebook to these device follow the instructions that came with your docking port UNIVERSAL SERIAL BUS PORTS The Universal Serial Bus 2 0 ports USB allow you to connect USB devices such as external game pads pointing devices keyboards and or speakers In order to connect a USB dev...

Page 66: ...t or a wireless headphone is being used nearby Direct sunlight fluorescent light or incandescent light shines directly on the port Do not move either device while communication is active as it may interrupt data transmission Be careful not to scratch the infrared port lens Dirt scratches or other surface marks can degrade operation HEADPHONE JACK The headphone jack allows you to connect headphones...

Page 67: ...ort until it is seated 3 Tighten the two hold down screws located on each end of the connector Pressing the Fn F10 keys allows you to change your selection of where to send your display video Each time you press the key combination you will step to the next choice starting with the built in display panel only moving to the external monitor only finally moving to both the built in display panel and...

Page 68: ...L i f e B o o k S S e r i e s S e c t i o n 4 56 LB_GARLICS 04 48 56 21 7 03 6 26 PM 56 ...

Page 69: ...57 Troubleshooting 5 LB_GARLICS 05 57 74 21 7 03 6 26 PM 57 ...

Page 70: ...L i f e B o o k S S e r i e s S e c t i o n 5 58 LB_GARLICS 05 57 74 21 7 03 6 26 PM 58 ...

Page 71: ...blem has not been resolved refer to the Troubleshooting Table that follows for more detailed troubleshooting information 8 If you have tried the solutions suggested in the Troubleshooting Table without success contact your support representative Before you place the call you should have the following information ready so that the customer support representative can provide you with the fastest pos...

Page 72: ...ke a speaker If the Mute box is checked click on it to uncheck it TROUBLESHOOTING TABLE Optical Drive Problems Problem Possible Cause Possible Solution Audio Problem LifeBook notebook fails to recognize DVD CD RW CD ROM s Protective sheet is still in the optical drive tray DVD CD RW CD ROM is not pushed down onto raised center circle of the drive Media tray is not latched shut Incorrect DVD Player...

Page 73: ...e The Windows DVD CD RW CD ROM auto insertion function is active and is checking to see if a DVD CD RW CD ROM is ready to run Port Replicator AC adapter is not plugged in Notebook is not properly seated in the Port Replicator Start the DVD CD RW CD ROM from the desktop or application software or re enable the Windows DVD CD RW CD ROM auto insertion function Wipe DVD CD RW CD ROM with a non abrasiv...

Page 74: ...oard Your external device is not properly installed Your operating system software is not set up with the correct software driver for that device Your operating system software is not set up with the correct software driver for that device Your system has crashed Revise BIOS settings to set both Primary Master and Primary Slave correctly Verify drive designator used by application is in use by the...

Page 75: ...ook is not aware of its installation Your software may not have the correct software driver active You may have the wrong I O address selected for your device Your device and another device are assigned the same I O address Parallel port is set to output only Remove and re install your memory upgrade module Check for Power On Self Test POST messages See your application software documentation for ...

Page 76: ...es are low The power adapter AC adapter is not plugged in properly Remove and re install the card Close the application and restart your notebook See your software documentation and activate the correct driver See your PC Card documentation to determine the required I O address Change the settings in the BIOS Check all I O addresses located within the BIOS setup utility and any other installed har...

Page 77: ...e the AC cord to a different outlet check for a line switch or tripped circuit breaker for the AC outlet Try a different power adapter or install a charged optional second battery Press any button on the keyboard or move the mouse to restore operation If that fails push the Power Suspend Resume button Check your power management settings or close your applications and go to the Power Options menu ...

Page 78: ...d to high temperatures The batteries are too hot or too cold Use both the primary battery and an optional second battery and or use a power adapter for this application if possible Check the power management and or setup utility settings in the Power Options menu and adjust according to your operating needs Turn down the brightness adjustment The higher the brightness the more power your display u...

Page 79: ...ected Power On Self Test POST has detected a problem Enable the button from the setup utility Hold the button longer This may need to be a few seconds if your application is preventing the CPU from checking for button pushes Close all applications and try the button again Set the operating source by pressing the ESC key while the Fujitsu logo is on screen or use the F2 key and enter the setup util...

Page 80: ...led to notice the display come on and go off again Make sure you select Save Changes And Exit when exiting the BIOS setup utility Contact your support representative for repairs This is not a user serviceable part The part has a normal life span of 3 to 5 years Check the status indicator panel to verify that the Security icon is blinking If it is blinking enter your password Pressing F10 while hol...

Page 81: ...s a paper clip is stuck between the display and the keyboard If the spots are very tiny and few in number this is normal for a large LCD display If the spots are numerous or large enough to interfere with your operation needs Contact your support representative Press any button on the keyboard or move the mouse to restore operation If that fails push the Power Suspend Resume button Check your powe...

Page 82: ...onitor is not compatible with your LifeBook notebook Application software often has its own set of error message displays Display compression gives a clearer but smaller display for applications that do not support 800 x 600 1024 x 768 pixel resolution You can fill the screen but have less resolution by changing your display compression setting See the Video Features submenu located within the Adv...

Page 83: ...ccessfully tested Failing Bits nnnn The hex number nnnn This is a map of the bits at the memory address in System Extended or Shadow memory which failed the memory test Each 1 one in the map indicates a failed bit This is a serious fault that may cause you to lose data if you continue Contact your support representative Fixed Disk x Failure or Fixed Disk Controller Failure where x 1 4 The fixed di...

Page 84: ...ur support representative Parity Check 2 nnnn Parity error found in the I O bus BIOS attempts to locate the address and display it on the screen If it cannot locate the address it displays This is a potentially data destroying failure Contact your support representative Press F1 to resume F2 to SETUP Displayed after any recoverable error message Press the F1 key to continue the boot process or the...

Page 85: ...adowed Video BIOS successfully copied to shadow RAM EMERGENCY OPTICAL DRIVE TRAY RELEASE If for some reason the eject button fails you can open the optical drive tray with a paper clip or similar tool inserted into the eject hole in the far right side of the front of the tray Straighten one side of a paper clip and push it gently into the hole The tray will pop out a short distance MODEM RESULT CO...

Page 86: ...L i f e B o o k S S e r i e s S e c t i o n 5 74 LB_GARLICS 05 57 74 21 7 03 6 27 PM 74 ...

Page 87: ...75 Caring for your LifeBook Notebook 6 LB_GARLICS 06 75 80 21 7 03 6 27 PM 75 ...

Page 88: ...L i f e B o o k S S e r i e s S e c t i o n 6 76 LB_GARLICS 06 75 80 21 7 03 6 27 PM 76 ...

Page 89: ...n access to the interior of any electrical products and do not permit them to handle any cables Do not expose your LifeBook notebook to direct sunlight for long periods of time as temperatures above 140 F 60 C may damage your notebook Keep the covers closed on the connectors and slots when they are not in use Do not put heavy or sharp objects on the computer If you are carrying your LifeBook noteb...

Page 90: ... other metal objects Doing so may cause an explosion or fire Do not drop puncture disassemble mutilate or incinerate the battery Recharge batteries only as described in this manual and only in ventilated areas Do not leave batteries in hot locations for more than a day or two Intense heat can shorten battery life Do not leave a battery in storage for longer than 6 months without recharging it Incr...

Page 91: ...e is durable but you must treat it with care Please pay attention to the following points The drive rotates the compact disk at a very high speed Do not carry it around or subject it to shock or vibration with the power on Avoid using or storing the drive where it will be exposed to extreme temperatures Avoid using or storing the drive where it is damp or dusty Avoid using or storing the drive nea...

Page 92: ...L i f e B o o k S S e r i e s S e c t i o n 6 80 LB_GARLICS 06 75 80 21 7 03 6 27 PM 80 ...

Page 93: ...81 Glossary 7 LB_GARLICS 07 81 92 21 7 03 6 27 PM 81 ...

Page 94: ...L i f e B o o k S S e r i e s S e c t i o n 7 82 LB_GARLICS 07 81 92 21 7 03 6 27 PM 82 ...

Page 95: ...its per second Used to describe data transfer rates Boot To start up a computer and load its operating system from disk ROM or other storage media into RAM Bus An electrical circuit which passes data between the CPU and the sub assemblies inside your LifeBook notebook Byte 8 bits of parallel binary information Cache Memory A block of memory built into the microprocessor which is much faster to acc...

Page 96: ...ppy disk in a hard housing with a shutter it is commonly called a diskette Disk Drive The hardware which spins the disk and has the heads and control circuitry for reading and writing the data on the disk Diskette A floppy disk in a hard housing with a shutter DMA Direct Memory Access Special circuitry for memory to memory transfers of data which do not require CPU action DMI Desktop Management In...

Page 97: ... is inside the hard drive unit Infrared Light just beyond the red portion of the visible light spectrum which is invisible to humans Infrastructure A name of a wireless LAN configuration This type of communication uses an access point Another type of communication is called AdHoc IP Address An address used for computers to communicate in the TCP IP environment Current IPv4 version 4 uses four valu...

Page 98: ...ll sources MPU 401 A standard for MIDI interfaces and connectors MTU Maximum Transmission Unit The maximum data size that can be transferred at a time through the Internet or other networks You can set a smaller MTU size to obtain successful communication if you have difficulty transferring data due to the fact that the maximum size is too large NTSC National TV Standards Commission The standard f...

Page 99: ...nd receive data between computers Method of sending and receiving data Process used to handle communication errors Conditions required for communication are organized in procedures for correct transfer of information RAM Random Access Memory A hardware component of your LifeBook notebook that holds binary information both program and data as long as it has the proper power applied to it RAM Module...

Page 100: ... some portion of your hardware On your LifeBook notebook this is an LCD screen just above the keyboard Stereo audio A system using two channels to process sound from two different sources SVGA Super VGA S Video Super Video A component video system for driving a TV or computer monitor System Clock An oscillator of fixed precise frequency which synchronizes the operation of the system and is counted...

Page 101: ...Area Network A wireless interconnection of computers and peripherals within a single limited geographic location which can pass programs and data amongst themselves Write Protect Prevent alteration of the binary state of all bits in a storage media Example all information on a device such as a floppy diskette a block of space in a storage media such as a partition of a hard drive a file or directo...

Page 102: ...ne company This equipment is designed to be connected to the telephone network or premises wiring using a standard jack type USOC RJ11C A plug and jack used to connect this equipment to the premises wiring and telephone network must comply with the applicable FCC Part 68 rules and requirements adopted by the ACTA A compliant telephone cord and modular plug is provided with this product It is desig...

Page 103: ...lass B digital apparatus meets all requirements of Canadian Interference Causing Equipment Regulations CET appareil numérique de la class B respecte toutes les exigence du Réglement sur le matérial brouilleur du Canada Notice to Users of the Canadian Telephone Network NOTICE This equipment Modem Fujitsu Media Devices MBH7MD33 meets the applicable Industry Canada Terminal Equipment Technical Specif...

Page 104: ...on on an interface may consist of any combination of devices subject only to the requirement that the sum of the Ringer Equivalence Numbers of all the devices does not exceed five UL Notice This unit requires an AC adapter to operate Use only UL Listed Class 2 Adapters with an output rating of 16 VDC with a current of 3 75 A AC Adapter output polarity For Authorized Repair Technicians Only The mod...

Page 105: ...93 Integrated Wireless LAN User s Guide Appendix LB_GARLICS 08 93 105 21 7 03 6 28 PM 93 ...

Page 106: ...L i f e B o o k S S e r i e s A p p e n d i x 94 LB_GARLICS 08 93 105 21 7 03 6 28 PM 94 ...

Page 107: ...an those specified by the manufacturer It is the responsibility of the user to correct any FCC REGULATORY INFORMATION interference caused by such unauthorized modification substitution or attachment The Manufacturer and its authorized resellers or distributors will assume no liability for any damage or violation of government regulations arising from failure to comply with these guidelines Federal...

Page 108: ...e maintained to ensure RF exposure compliance In order to comply with RF exposure limits established in the ANSI C95 1 standards the distance between the antennas and the user should not be less than 20 cm 8 inches Export restrictions This product or software contains encryption code which may not be exported or transferred from the US or Canada without an approved US Department of Commerce export...

Page 109: ...ore using this device read this manual carefully to ensure correct operation of the device Keep this manual in a safe place for reference while using the device Figure 1 Ad Hoc Mode Network Wireless LAN Modes Using this Device Ad Hoc Mode See Figure 1 The Ad Hoc Mode refers to the network connecting two computers using wireless LAN cards This connection is called an Ad Hoc network Using an Ad Hoc ...

Page 110: ...AN access point which is sold separately The wireless LAN network is in the Infrastructure mode when it uses an access point and such a connection is called the Infrastructure Network By using an access point you can set and use a different communication channel for each network group Each channel is given a different radio frequency and it eliminates the collision of communications and provides a...

Page 111: ...equipment generating strong high frequency energy in particular the personal computer may be highly susceptible to the energy and unable to communicate properly If a broadcasting station or wireless communications equipment is present nearby and this prevents the computer from communicating properly moving the main unit of the computer is suggested Radio interference may also occur if the intensit...

Page 112: ... the network contact the network administrator for data settings Wireless channels 1 to 11 are used for the IEEE802 11b compliant wireless LAN adopted by this personal computer If you are to use infrastructure connection network connection via an access point a channel number greater than 11 may have been preassigned or automatically assigned to the wireless channel to be used for the access point...

Page 113: ...manual or contact your network administrator b For ad hoc connection check the following field For infrastructure connection clear the check mark for the following field This is a computer to computer ad hoc network wireless access points are not used 10 Enter the WEP key for encoding communications data a Check the Data encryption WEP enabled check box For ad hoc connection Clear the check mark f...

Page 114: ...or the setting method relating to IEEE 802 11x authentication refer to the manual of the access point which you are using 12 After completion of setting operations click the OK button Processing will return to the Wireless Network Connection Properties window 13 Verify that the network name entered in step 7 above is added in Preferred Networks and then click the OK button 14 Close the Wireless Ne...

Page 115: ... the Computer Name tab 5 Confirm the settings of Full computer name and Workgroup To modify the computer name and or the work group name you need to be logged in from Windows as an administrator a The setting of Full computer name denotes the name for identifying the computer Any name can be assigned for each personal computer Enter the desired name in less than 15 ASCII character code format Iden...

Page 116: ...File and Printer Sharing for Microsoft Networks will be added to the list 10 Click the Close button To share a file and or the connected printer you need to be logged in as an administrator Setting the file sharing function The procedure for setting the file sharing function follows with the work folder in drive C as an example 1 Click the Start button first and then My Computer 2 Double click Loc...

Page 117: ...omputer The My Computer window will be displayed in the left frame 2 Click My Network Places in the Other Places list The window My Network Places will be displayed 3 Click View workgroup computers under Network Tasks in the left frame 4 Double click the personal computer to which your personal computer is to be connected The folder that was specified in Setting the file sharing function on page 1...

Page 118: ...N connection If there is the administrator of the network contact the network administrator for data settings Wireless channels 1 to 11 are used for the IEEE802 11b compliant wireless LAN adopted by this personal computer If you are to use infrastructure connection network connection via a access point a channel number greater than 11 may have been preassigned or automatically assigned to the wire...

Page 119: ...he characters that can be used for the Network key are 0 9 A Z a z _ If you wish to use a hexadecimal number enter the network key in a string consisting of 10 or 26 characters The characters that can be used for the network key are 0 9 A F a f For ad hoc connections enter the same network key for all computers connected to the network For infrastructure connection enter the value to match the acc...

Page 120: ...setting of Full computer name denotes the name for identifying the computers on the network Any name can be assigned The computer name will be identified more easily if the model number the user name and other factors are already set Workgroup denotes the group name of the network 5 To change the name click Properties then proceed in accordance with the instruction messages displayed on the screen...

Page 121: ...played The Properties window will be displayed 3 Select the Sharing tab if it isn t already selected 4 Select Share this folder then enter data as required Share name Enter the name of the folder to be shared Comment Enter explanatory statements or notes about the folder to be shared User limit Enter the number of users who share the folder Permissions Click the Permissions button to set permissio...

Page 122: ...lick the Computers Near Me icon The personal computers connected to the network will be listed 3 Double click the name of the personal computer to which you wish to connect your own personal computer The folder that specified in Setting the file sharing function on page 102 will be displayed 4 Double click the folder to be accessed The contents of the folder will be displayed LB_GARLICS 09 106 116...

Page 123: ...nce to the destination computer or removing any obstacles for better sight Infrastructure connection Retry connection after shortening the distance to the access point or removing any obstacles for better sight Check if the wireless switch is turned ON Also verify Disable Radio is not checked in Network setting window Check if the computer to be connected is turned ON If there is any other wireles...

Page 124: ... OK 4 Double click the icon of connected computer In case of using TCP IP protocol you can check IP address as follows 1 Windows XP Click Start All programs Accessories Command prompt Windows 2000 Click Start button Program Accessories Command prompt 2 In Command prompt or MS DOS prompt window input IPCONFIG command as follows then press Enter key Example In case of C drive being the hard disk C i...

Page 125: ...ording to the access point In case of Windows XP check the setting of Enable network access control using IEEE 802 11X Refer to Assigning parameters on page 99 When restricting the access of wireless LAN clients using IEEE802 11X authentication put a check mark on Enable network access control using IEEE 802 11X When using at home remove a check mark on Enable network access control using IEEE802 ...

Page 126: ...freely be used without radio communication license Infrastructure A designation of Wireless LAN network configurations It indicates a form of communication using an Access Point IP address An address used by computers for communicating in TCP IP environment IP addresses have global and private addresses A global address is a unique address in the world A private address is a unique address within ...

Page 127: ...nnection PPP to be used over an Ethernet Protocol A procedure or rule of delivering data among computers Ordered data communication is allowed by making all conditions required for communication including the method of data transmission reception and actions upon communication errors into procedures Shared key authentication One of the network authentication types for wireless LAN Upon authenticat...

Page 128: ...check the IP address to be set for the computer If no access point is found in the network An IP address is expressed with four values in the range between 1 and 255 Set the each computer as follows The value in paren theses is a subnet mask Example Computer A 192 168 100 2 255 255 255 0 Computer B 192 168 100 3 255 255 255 0 Computer C 192 168 100 4 255 255 255 0 Computer X 192 168 100 254 255 25...

Reviews: