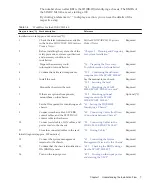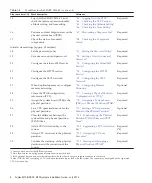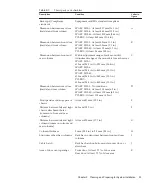
Table
1-5
Workflow
for
connections
through
crossbar
boxes
(continued)
Step
(work
time
(*1))
Work
description
Reference
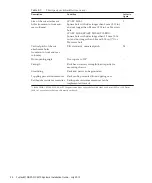
30
Confirm
the
start/stop
of
the
physical
partition
and
the
connection
of
the
console.
Required
*1
Average
work
time
for
the
8BB
configuration/16BB
configuration.
Work
time
is
written
in
the
order
of
the
8BB
configuration
to
16BB
configuration.
*2
Time
required
for
mounting
optional
components
is
not
included.
*3
If
the
optional
components
are
ordered
together
with
the
SPARC
M10-4S,
they
are
shipped
mounted
to
the
chassis.
*4
If
the
chassis
is
shipped
mounted
on
the
rack,
the
BB-ID
has
been
set.
*5
A
cable
connection
between
the
racks
is
required
when
two
racks
are
configured
together.
*6
One
CD-ROM
disk
containing
a
CPU
Activation
certificate
is
provided
with
the
system.
The
system
may
be
shipped
with
a
registered
CPU
Activation
key.
Note
-
The
SPARC
M10
systems
have
Oracle
Solaris
preinstalled.
According
to
the
purpose,
either
use
the
preinstalled
Oracle
Solaris
as
is
or
reinstall
it.
To
reinstall
Oracle
Solaris,
install
the
latest
Oracle
VM
Server
for
SPARC.
For
the
latest
information
on
the
supported
Oracle
Solaris
versions
and
SRU,
see
the
Fujitsu
M10/SPARC
M10
Systems
Product
Notes
.
Table
1-6
Workflow
when
connecting
the
PCI
expansion
unit
Step
(work
time
(*1))
Work
description
Reference
Installation
work
(approx.
38
minutes
(*2))
1
Check
the
latest
information
available
in
the
Fujitsu
M10/SPARC
M10
Systems
Product
Notes
.
Fujitsu
M10/SPARC
M10
Systems
Product
Notes
Required
2
Before
installing
the
system,
check
the
safety
precautions,
system
specifications,
and
necessary
conditions
for
installation.
Required
1.4
Workflow
when
Connecting
the
PCI
Expansion
Unit
The
PCI
expansion
unit
is
a
2U
chassis
with
11
PCI
slots.
It
can
be
connected
to
all
models
of
the
SPARC
M10-1,
SPARC
M10-4,
and
SPARC
M10-4S.
It
can
be
connected
during
installation
work
for
the
SPARC
M10
system.
This
section
describes
the
flow
from
PCI
expansion
unit
installation
to
component
status
checks.
By
clicking
a
reference
in
"
"
to
display
a
section,
you
can
see
the
details
of
the
respective
step.
Fujitsu
M10/SPARC
M10
Systems
Installation
Guide
・
July
2015
12
Summary of Contents for M10 Series
Page 1: ...Fujitsu M10 SPARC M10 Systems Installation Guide Manual Code C120 E678 12EN July 2015 ...
Page 10: ...Fujitsu M10 SPARC M10 Systems Installation Guide July 2015 x ...
Page 156: ...Fujitsu M10 SPARC M10 Systems Installation Guide July 2015 142 ...
Page 176: ...Fujitsu M10 SPARC M10 Systems Installation Guide July 2015 162 ...
Page 208: ...Fujitsu M10 SPARC M10 Systems Installation Guide July 2015 194 ...
Page 240: ...Fujitsu M10 SPARC M10 Systems Installation Guide July 2015 226 ...
Page 252: ...Fujitsu M10 SPARC M10 Systems Installation Guide July 2015 238 ...
Page 290: ...Fujitsu M10 SPARC M10 Systems Installation Guide July 2015 276 ...
Page 310: ...Fujitsu M10 SPARC M10 Systems Installation Guide July 2015 296 ...
Page 336: ...Fujitsu M10 SPARC M10 Systems Installation Guide July 2015 322 ...
Page 368: ...Fujitsu M10 SPARC M10 Systems Installation Guide July 2015 354 ...
Page 374: ...Fujitsu M10 SPARC M10 Systems Installation Guide July 2015 360 ...


