Operation and Cleaning
5-4 C156-E228-02EN
If you insert an optical disk cartridge with the printed shutter facing
upward by pressing on the rear of cartridge at the left edge, you may
hear an audible click but the drive may not become READY. In
such a case, press the cartridge further by pressing on the back of the
cartridge from the center (somewhere near the notched section of the
panel front) until the LED indication lamp goes on. If this happens,
the cartridge has been normally inserted.
5.1.4 Removing an optical disk cartridge
Remove an optical disk cartridge as described below.
(1) While the drive is powered on:
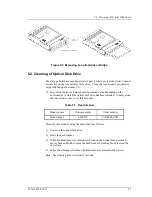
1) Press the eject switch to remove an optical disk cartridge (see Figure 5.3).
Notes:
1. No optical disk cartridge can be removed if the SCSI command inhibits
ejection.
2. Remove an optical disk cartridge after it is completely ejected.
3. Be careful not to let a cartridge drop out of the drive when it is ejected. This
may happen depending on the ambient environment and the cartridge's
condition even if the drive installation conditions are met.
(2) While the drive is powered off:
While the drive is powered off, you cannot remove an optical disk cartridge by
pressing the eject switch.
To remove a cartridge in such a case, insert an accessory eject jig or a pin about 1
mm in diameter into the manual eject hole (see Figure 5.1) and push on it.
Notes:
1. NEVER eject a cartridge while the BUSY LED lamp is on. The data may be
destroyed or the drive may be damaged.
2. Note that a cartridge may drop out of the drive when it is ejected.
3. Do not carry the optical disk drive around while a cartridge is loaded in it.
Summary of Contents for MCM3064SS
Page 1: ...C156 E228 02EN MCM3064SS MCM3130SS MCP3064SS MCP3130SS OPTICAL DISK DRIVES PRODUCT MANUAL ...
Page 4: ...This page is intentionally left blank ...
Page 8: ...This page is intentionally left blank ...
Page 20: ...This page is intentionally left blank ...
Page 30: ...This page is intentionally left blank ...
Page 42: ...Specifications 2 12 C156 E228 02EN Figure 2 3 Example of alternate processing ...
Page 47: ...3 2 Mounting Requirements C156 E228 02EN 3 5 Figure 3 2 Outer dimensions 1 of 2 ...
Page 49: ...3 2 Mounting Requirements C156 E228 02EN 3 7 Figure 3 3 Outer dimensions 1 of 3 ...
Page 51: ...3 2 Mounting Requirements C156 E228 02EN 3 9 Figure 3 3 Outer dimensions 3 of 3 ...
Page 82: ...Installation 4 16 C156 E228 02EN Figure 4 6 SCSI connection check ...
Page 84: ...This page is intentionally left blank ...
Page 98: ...This page is intentionally left blank ...
Page 148: ...SCSI BUS 7 46 C156 E228 02EN Figure 7 21 Bus phase sequence 1 of 2 ...
Page 149: ...7 8 Bus Sequence C156 E228 02EN 7 47 Figure 7 21 Bus phase sequence 2 of 2 ...
Page 158: ...This page is intentionally left blank ...
Page 166: ...This page is intentionally left blank ...
Page 168: ...This page is intentionally left blank ...
Page 169: ......
Page 170: ......


