background image

42

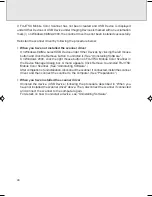
Error message

The specified scanner is being used.

An input-output error occurred in the scanner.

The memory is insufficient.

– Parameter error (internal)

– The calling procedure is invalid (internal).

– A range specification is invalid (internal).

– The calculation result exceeded the value that

can be expressed (internal).

– A user definition is not registered (internal).

General fault related to response to
MSG_XXXXXX

General fault related to response to DAT_XXXXXX

Explanation and action to be taken

– Check whether this scanner is being

used by another software program.

– Check whether the scanner driver has

been started twice.

– Terminate all software programs, then

start them and perform scanning.

A failure occurred during a scan operation
using this scanner. The failure may have
occurred in the image scanner.

Turn off the power to all devices once. Then,
turn on the power to the computer and then
turn the power on to other devices.

Then, try scanning again.

Memory used for scanning is insufficient.

Memory may be insufficient due to the
number of programs operating in the
background and registered device drivers,
or because of a software program such as a
photopaint program for which a large
capacity of GDI memory is allocated by
setting.

Change the software setting, cancel the
registration of device drivers having no
direct bearing on scanning, or stop
operating background programs.

This program error occurs during exchange
of a command between the scanner driver
and this scanner.

Restart the computer and retry.

This program error occurs during transmis-
sion of an internal message.

A submessage shown on page 44 is also
displayed.

This program error occurs during transmis-
sion of an internal message.

05_Scanner (34-49)

8/15/01, 8:40 AM

42

Summary of Contents for Mobile Color Scanner

Page 1: ... and statements as to performance in this document are Fujitsu estimates intended for general guidance They may require adjustment in particular circumstances and should therefore not be taken as formal offers or commitments Microsoft Windows Windows 98 Windows Me and Windows 2000 Professional are registered trademarks of Microsoft Corporation in the United States and other countries Microsoft Int...

Page 2: ...ion Handle the equipment in accordance with this User s Manual Using this product in mission critical situations This product is designed and manufactured for general use in applications such as office automation equipment personal devices and household appliances It is not intended for mission critical use Customers considering the use of these products for mission critical applications must have...

Page 3: ...scanning certain items or reproducing certain items with a scanner may be punishable by law Give special attention to the following items when using a scanner Acts prohibited by law The reproduction of bills coins government securities and bonds local bonds and others is prohibited Even if any of the above is stamped with the word sample reproduction thereof is still prohibited Law against forging...

Page 4: ...owing are the warning levels and their meanings Icon Meaning This indicates a hazardous situation that could result in death or serious personal injury if the user does not perform the procedure correctly This indicates a hazardous situation that could result in personal injury if the user does not perform the procedure correctly This warning signal also indicates that damage to the product or oth...

Page 5: ...ong shock or vibration or one that is uneven Otherwise the scanner may fall or tip over resulting in injuries Do not leave the device for a long time in locations where the temperature may rise sharply or in locations where the device is exposed to direct sunlight e g in a car with the windows closed on a sunny day Otherwise the cover may overheat deform or melt or the scanner may overheat resulti...

Page 6: ...resentative related to Fujitsu products Continuing to use the scanner may cause a fire or electric shock Never open any panel or cover secured with screws High voltage inside the scanner may cause an electric shock Do not modify the scanner or replace any part Otherwise it could lead to fire Do not use a highly flammable spray near the scanner Otherwise it could lead to fire Read this guide carefu...

Page 7: ...scanner from the computer and contact the store where you purchased the scanner or Fujitsu service representative in charge of Fujitsu products Do not disassemble or repair the scanner Do not install the scanner in a location exposed to direct sunlight for long periods of time or locations subject to abrupt temperature changes such as in locations near an air conditioner Install the scanner in an ...

Page 8: ...15 FUJITSU Launch 15 Coordinating Processing with FUJITSU Launch 16 Screens Displayed during Use of the Scanner 18 Conditions for Originals the Scanner Can Scan 21 Scanning an Original 21 Scanning an Original 22 Original Sizes the Scanner Can Scan 22 Scanning start position 23 Scanning a Large Original 28 Checking Whether the Scanner Can Scan the Original You Want to Scan 28 Before Scanning an Ori...

Page 9: ...Troubleshooting 38 Checking the Connection 38 Error Messages 41 Submessages 44 Before Assuming that the Scanner is Faulty 45 Problems after scanning 48 Specifications 50 Hardware Specifications 50 Operating Environment 51 Scanner Driver Operating Environment 51 Use Environmental Requirements 51 Before Making Inquiries 52 Glossary 53 ...

Page 10: ...J J J J J J KKKKKKKKKKKKKKKKKKKK LLLLLLLLLLLLLLLLLLLLLL Features of the Mobile Color Scanner The Mobile Color Scanner has the following features Compact and lightweight The scanner is compact and lightweight measuring 142 mm wide 30 mm high and 30 mm deep and weighing only about 100 g High scan resolution The basic scan resolution is 600 x 600 dpi at maximum You can select output resolution from 1...

Page 11: ...osition Scan result The scan result has been placed in position If an original is scanned sideways If an original is scanned on the skew If an original is scanned upside down Scanning an image independently of the scanning speed This scanner uses the automatic resolution adjustment function to scan a fine image without distortion or dropouts independently of the scanner operation speed ...

Page 12: ... status the screen for scanning appears allowing you to start scanning an original right away Connect the cable Start the computer Press the scan button Start scanning Install the scanner driver then restart the computer FUJITSU launch is resident on the taskbar Conformance with TWAIN The scanner conforms to TWAIN which is a standard for scanner drivers and can directly scan images from numerous a...

Page 13: ... Scanner Accessory pack Calibration sheet User s Manual this manual Core for electromagnetic interference Original holder Carrying case Setup CD with Scanner Driver Ready lamp When this lamp is on scanning is enabled Scan button Pressing this button starts scanning Pressing this button once again stops scanning Cable USB connector ...

Page 14: ...ar the USB connector as shown in the figure below and fit the loop into the groove in the core 2 Close the core and press it until it snaps in place Ready lamp When this lamp is on scanning is enabled Scan button Pressing this button starts scanning Pressing this button once again stops scanning USB connector Mobile scanner Cable Main rollers When the main rollers move animage is scanned Scan wind...

Page 15: ...he computer on and insert the setup disk in the disk drive 3 Proceed in accordance with the messages displayed on the screen and restart the computer 4 Connect the scanner to the computer Connect the scanner to the computer 5 Perform calibration To use the scanner first perform calibration operation to determine the white and black level values Use the calibration sheet supplied with the scanner C...

Page 16: ...g the main menu INSTALL SOFTWARE Displays the software for operating the scanner Click the name of the software to be installed Installation starts Scanner Driver Program required to use the scanner This area displays an explanation of the item at the cursor under INSTALL SOFTWARE EXIT Terminates the main menu Installing the Scanner Driver If the main menu does not appear after you insert the setu...

Page 17: ...rocedural sequence below If you have connected the scanner disconnect the scanner then install the scanner driver and connect the scanner by following the procedure below Insert the Scanner Driver CD into CD ROM drive Preparations Turn on the computer Notes Guide Do not connect the scanner at this time ...

Page 18: ...6 Click on Scanner Driver Click Next Click Next ...

Page 19: ...7 Wait until the files have been copied Click on EXIT Click Start Shut Down Windows ...

Page 20: ... the computer before installing the scanner driver check the connection referring to Checking the Connection Click Restart OK Connect the scanner for the first time at this step After the computer restarts connect the scanner to the computer Notes Guide ...

Page 21: ...e following screen appears If the above screen does not appear check the connection referring to Checking the Connection Guide Caution In a Windows 2000 environment when you connect the scanner to the computer the following screen appears ...

Page 22: ...click OK Be sure not to move the scanner while the following screen is being displayed When the above screen appears slowly move the scanner from the white area to the black area Move the scanner while ensuring that it does not become separated from the sheet Notes Guide ...

Page 23: ...click OK If the calibration termination screen does not appear after you move the scanner to the bottom move the scanner to the top again Continue scanning the sheet until the termination screen appears Scanning is complete Guide ...

Page 24: ...his error message is displayed click OK slowly move the scanner from the black area to the white area of the calibration sheet again When the scanner reaches the end of the sheet continue scanning by moving the scanner in the opposite direction on the sheet Caution ...

Page 25: ...le Color Scanner Have ready the original of the material you want to scan For details of the scanning range of this scanner see Original Sizes the Scanner Can Scan Place the scanner on the original Press the scan button ...

Page 26: ...ner while ensuring that it does not become separated from the sheet Press the scan button again at the position you want to stop scanning The scanned image is automatically saved on the screen of your computer under the following icon To change the data save destination see Coordinating Processing with FUJITSU Launch Guide ...

Page 27: ... right of the screen of the computer as the following icon FUJITSU launch periodically monitors the status of this scanner to check such items as whether the scanner is scanning After the scanner scans an original data is saved as a file or copied onto the Clipboard and software is started in accordance with the settings made using FUJITSU launch Click the right mouse button on the icon on the tas...

Page 28: ... desired option Save to file is selected as the initial setting Save to options Save to file Save to Clipboard Launch application Saves the scanned image to the file specified for Save folder in the Detailed setting dialog box Copies the scanned image onto the Clipboard Saves the scanned image to the file specified for Save folder in the Detailed setting dialog box and automatically starts the app...

Page 29: ...ication field is left blank Click the Browse button A dialog box appears In this dialog box you can specify the destination folder and application Specify the file type with which an image is to be scanned and data is to be saved for Save file type When specifying saving in JPEG you can select Normal or Fine Click the Quick scan check box to turn it on to start scanning using the settings made in ...

Page 30: ...transfers it when the Transfer button on the preview screen is clicked Direction Specifies whether to automatically recognize the direction of the scanned image or manually set the scanning direction Resolution Specifies the number of pixels dots per inch Image Size scan length Selects the size of the original to be scanned Unit Selects the unit to be used in the preview window Reverse B W check b...

Page 31: ...e tone of each of R red G green and B blue ICM Image Color Management check box When turned on adjusts colors using the Windows color management system Sample screen Displays the image on which the settings on the Image Adjustment page are reflected Apply button Reflects image processing for the Sample image in the preview window Gamma Adjusts the density curve for the entire screen Brightness Adj...

Page 32: ...tion Zoom in icon Scales up the image Zoom out icon Scales down the image Rotate icon Rotates the image 90 degrees clockwise at one time Help icon Displays Online Help End button Terminates the driver screen without scanning Select Area icon Selects an area to be transferred to the application Move Image icon Moves the image and displays another area Mirroring icon Flips the image horizontally so ...

Page 33: ...graphic film It can however scan an OHP film original that is clearly visible when placed on white paper If a thin original is scanned when placed on top of another form the image on that other form may also end up being scanned together with the original image Always remove clips and staples because they cause scanner failures If ink on an original has not dried be sure to wait until the ink is c...

Page 34: ... including margins To use the photograph image stitching function an area of at least 20 mm must be scanned twice For this reason the maximum width for stitching is 190 mm 2 When scanning at 600 dpi the maximum length of an original the scanner can scan is 346 mm Scanning an Original To scan an original use software that supports TWAIN For information on the conditions and sizes of originals to be...

Page 35: ...om the edge of an original the edge may come into contact with the scanning window or a main roller for scanning may slip off from the original In this case use the original holder supplied with the scanner or change the scanning direction and scan the original When scanning a small original such as a business card a thin original an original that tears easily or an original you do not want to soi...

Page 36: ...or another item in the File menu 3 Select FUJITSU Mobile Color Scanner from the Source list in the displayed dialog and click the Select button 4 Click Acquire or another item in the File menu 5 The driver screen appears Set the items required for scanning If you want to adjust scanned image before transfering it to the software turn the Adjust image check box on 6 Click the Scan button or press t...

Page 37: ...ess Image Type Halftone The scanner may not be able to convert scanned characters depending on the character size design or contained image data In this case check Manual under Direction and scan the original again When Manual is checked under Direction on the driver screen Scan the original as follows If you move the scanner in the direction opposite to the direction indicated by the above arrow ...

Page 38: ...canning in progress Click the Cancel button in the Scanning dialog Data that has been scanned is not saved If you move the scanner too quickly the scanner cannot normally scan the original To properly scan the original move the scanner at an appropriate speed If the scanned image shrinks If the speed at which the scanner moves is fast this scanner automatically adjusts the scanned resolution so th...

Page 39: ...e and rotate horizontally flip and cut the image on the preview screen if required 6 Click theTransfer button on the driver screen to transfer the image to the software During scanning or calibration of this scanner do not place the computer in the suspend not operating or standby state ...

Page 40: ... scan at one time This scanner stitches the images of an original mainly consisting of text called a document below using the character image stitching function and photographic and picture images using the photograph image stitching function Checking Whether the Scanner Can Scan the Original You Want to Scan For information on the conditions and sizes for originals this scanner can scan see Condi...

Page 41: ...d line Do not scan a document in horizontal line orientation together with that in vertical line orientation Scan two documents to be stitched by aligning the beginning of the lines ABCDEFGHIJKLMNOPQRSTUVWX YZABCDEFGHIJKLMNOPQRSTUV WXYZABCDEFGHIJKLMNOPQRST UVWXYZABCDEFGHIJKLMNOPQR STUVWXYZABCDEFGHIJKLMNOP QRSTUVWXYZABCDEFGHIJKLMN OPQRSTUVWXYZABCDEFGHIJKL MNOPQRSTUVWXYZABCDEFGHIJ KLMNOPQRSTUVWXYZAB...

Page 42: ...inal so that an area of at least 20 mm must be scanned twice Scan an original from the top to the bottom Scan the left side of the original for the first pass and then scan the right side for the second pass Second scan First scan ABCDEFGHIJKLMNOPQRSTUVWX ABCDEFGHIJKLMNOPQRSTUVWX ABCDEFGHIJKLMNOPQRSTUVWX NOPQRSTUVWX The overlapping area must be at least 20 mm Guide ...

Page 43: ...een If one of the following settings is made the scanner cannot scan the original and displays an error message Scan the original after changing the setting For character image stitching Resolution 150 dpi Image Type Halftone Direction Manual For photograph image stitching Image Type Halftone Direction Manual 2 Specify a size for Image Size Select one of the following image sizes for Image Size A4...

Page 44: ...ng progress 5 Scan the second and subsequent images Using the same method as that followed in scanning the first image to start scanning press the scan button of the pen scanner or click the Scan button on the driver screen When the second or subsequent image has been scanned the image is stitched to the previous image When stitching is successfully completed The following message is displayed und...

Page 45: ...es may shrink and not be stitched successfully Move this scanner at an appropriate speed to scan the original Scan characters straight instead of on the skew If a stitched portion contains in addition to characters noncharacters such as tables drawings or pictures images may not be stitched successfully if the number of characters in such stitched portion is small Scan the original so that the sti...

Page 46: ...ic shock Note the following points when cleaning the scanner Use only water or neutral detergent Use of a such volatile liquids such as benzene or thinner may result in the discoloration or deformation of the cover You need not apply oil Do not lubricate Cleaning the Surfaces Wipe any dirt on the surface of the scanner with a cloth dampened with water or watered down neutral detergent and squeezed...

Page 47: ...rinters Disconnecting the Scanner from the Computer Disconnect this scanner from the USB connector of the computer Carrying or Storing the Scanner Put the scanner in the carrying case supplied with it when carrying or storing it Performing Calibration If the scanner is unable to scan images in detail is connected to another computer or the scanner driver is reinstalled perform calibration Press th...

Page 48: ... properly first uninstall the currently installed scanner driver 1 Select Settings from the Start menu and click Control Panel The Control Panel dialog appears 2 Double click Add Remove Programs The Add Remove Programs Properties dialog appears 3 On Windows 98 Me select FUJITSU Mobile Color Scanner from the list on the Install Uninstall page and click the Add Remove button On Windows 2000 Click th...

Page 49: ...e Programs Properties dialog appears 3 On Windows 98 Me select a software program to be uninstalled from the list on the Install Uninstall page and click the Add Remove button On Windows 2000 Click the Change Remove Programs button select a software program to be uninstalled from the displayed list and click Change Remove button A confirmation dialog appears Click Yes 4 Restart the computer After ...

Page 50: ...le using the scanner Checking the Connection After connecting this scanner to the computer check whether the scanner driver has been installed successfully following the procedure below 1 Select Settings from the Start menu and click Control Panel Troubleshooting 2 Double click System in the Control Panel ...

Page 51: ...perties dialog On Windows 2000 Click the Device Manager button on the Hardware tab in the System Properties dialog Verify that FUJITSU Mobile Color Scanner has been created under Imaging Devices in the displayed Device Manager page This completes the checking procedure ...

Page 52: ...nstalling Software On Windows 2000 click the right mouse button on FUJITSU Mobile Color Scanner in the Device Manager dialog box A menu appears Click Remove to uninstall FUJITSU Mobile Color Scanner See Uninstalling Software After completion of uninstallation disconnect the scanner if connected install the scanner driver and then connect the scanner to the computer See Preparations When you have i...

Page 53: ...ect value A standard value has been set An error occurred during scanning Explanation and action to be taken A value outside the range or an unappropriate character was found in an item in the initial value data file Item XXXXX indicated by Entry XXXXX If the file has been rewritten intentionally the setting may be invalid for the item If it has not been rewritten the file may have been destroyed ...

Page 54: ...The failure may have occurred in the image scanner Turn off the power to all devices once Then turn on the power to the computer and then turn the power on to other devices Then try scanning again Memory used for scanning is insufficient Memory may be insufficient due to the number of programs operating in the background and registered device drivers or because of a software program such as a phot...

Page 55: ...n 1 minute at a time Uncheck Auto for Direction or set an item other than Halftone Image Type then make the setting again Image data transfer could not catch up with the scanning speed of this scanner because the system processing speed was low and image data dropouts occurred Terminate running software programs to improve system performance or slowly move the scanner for scanning Check whether th...

Page 56: ...lid function was specified Invalid MSG DG DAT combination An invalid value was specified An invalid DG DAT MSG procedure was specified Explanation and action to be taken Submessages following error messages General fault related to response to MSG_XXXXXX internal and General fault related to response to DAT_XXXXXX internal These submessages indicate the details of individual program errors occurri...

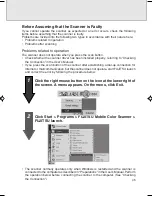
Page 57: ... Connection in the User s Manual If you press the scan button of the scanner after establishing a dial up connection for Internet or mail communication but the scanner does not operate start FUJITSU launch and correct the error by following the procedure below 1 Click the right mouse button on the icon at the lower right of the screen A menu appears On the menu click Exit 2 Click Start Programs FU...

Page 58: ... the Device Manager tab in the System Properties dialog On Windows 2000 click the Device Manager button on the Hardware page in the System Properties dialog 4 Check that USB Device is displayed under Other Devices on the Device Manager page 2 Double click System in the Control Panel dialog ...

Page 59: ...ect USB Device and click the Remove button 6 Connect the scanner to the computer Although the setup disk is inserted the main menu does not appear Start Explorer and double click Instmenu exe on the setup disk ...

Page 60: ...er Can Scan and Original Sizes the Scanner Can Scan If the original does not satisfy any condition the scanned image may be affected Check the original for wrinkles and creases The scanned image is dark The optical unit of the scanner may be dirty Clean the optical unit Refer to Cleaning the Optical Unit Perform calibration See Preparations A commercial software program cannot read scanned images ...

Page 61: ... be scanned as data with a specific degree of whiteness In this case set a high value for Brightness on the Image Adjustment page on the driver screen Refer to Screens Displayed during the Use of the Scanner For an original consisting of monochrome text set a low value for Threshold on the Main page on the driver screen Refer to Screens Displayed during the Use of the Scanner It takes time to scan...

Page 62: ...g 105 mm wide x 364 mm long with stitching 420 mm wide x 364 mm long Minimum scanning size 13 mm wide x 13 mm long A6 two A6 size sheets in portrait orientation business cards postcards photographs free and custom In Stitching mode A4 Portrait A4 Landscape B4 Portrait B4 Landscape Letter Portrait Letter Landscape and Free Color 16 770 000 colors gray scale 256 shades of gray halftone dither matrix...

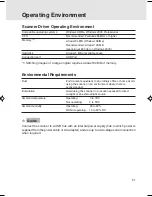
Page 63: ... 64 MB of memory Environmental Requirements Dust Environment equivalent to an ordinary office or home Avoid using the scanner in an environment where there is excessive dust Illumination Avoid using the scanner in a location exposed to direct sunlight or an external light source Ambient temperature Operating 5 to 35 C Not operating 0 to 50 C Ambient humidity Operating 20 to 80 RH Not operating 10 ...

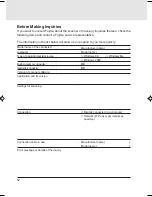
Page 64: ...kly Model name of the connected computer Type of operating system in use Built in memory capacity Hard disk capacity Version of scanner software Application and its version Settings for scanning Connection Connection cable in use Error message or details of the inquiry Manufacturer name Model name M Windows 98 M Windows Me M Windows 2000 MB MB M Directly connected to a computer M Network Write as ...

Page 65: ...the cable Resolution Resolution is expressed as the number of pixels dots per inch dpi If the resolution is higher the image can be read in greater detail but the memory requirement also increases Select a suitable resolution for the digitized image Scanner driver Program for making this Mobile Color Scanner available for software compatible with scanners This scanner driver conforms to TWAIN whic...

Reviews: