background image

2

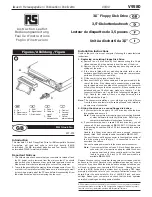
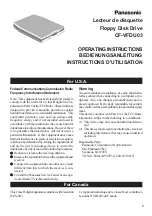
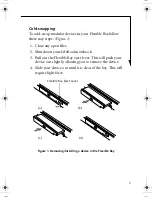
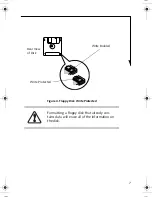
Your modular floppy disk drive installs in the system’s 
Flexible Bay.

The proper connection of your modular floppy disk drive is 
determined by the computer’s power state when you connect 
the floppy disk drive (system suspended, running, or off).

In the following steps, the floppy disk drive is referred to as a 
“modular device” or “Flexible Bay device”; all modular 
devices use the same procedure.

There are two ways to remove and install your floppy disk 
drive in the Flexible Bay:

Cold-swapping:

 Swapping Flexible Bay devices while your 

LifeBook notebook is powered off.

Hot-swapping:

 Swapping Flexible Bay devices while your

system is active using the device removal icon from your 
taskbar (In Windows XP systems, the utility is called Safely 
Remove Hardware
; in Windows 2000 systems, it is called 
Unplug or Eject Hardware.) Note that if the weight saver is 
installed rather than a modular device, it is not necessary 
to use BayManager when removing it.

You should never leave your Flexible Bay 
empty when the notebook is in operation. If 
left empty, dust or foreign matter may accu-
mulate inside the notebook. 

INTRODUCTION

REMOVING AND INSTALLING THE DRIVE 

B5FY-3341-02EN-00.fm  Page 2  Tuesday, February 3, 2004  8:46 AM

Summary of Contents for Modular Floppy Disk Drive

Page 1: ...ith your Fujitsu computer We recommend that you read this document before using the floppy disk drive even if you are already familiar with portable computers and accessories I N S T R U C T I O N S Modular Floppy Disk Drive Installation and User s Guide F u j i t s u C o m p u t e r S y s t e m s ...

Page 2: ... Bay Cold swapping Swapping Flexible Bay devices while your LifeBook notebook is powered off Hot swapping Swapping Flexible Bay devices while your system is active using the device removal icon from your taskbar In Windows XP systems the utility is called Safely Remove Hardware in Windows 2000 systems it is called Unplug or Eject Hardware Note that if the weight saver is installed rather than a mo...

Page 3: ... 2 Shut down your LifeBook notebook 3 Pull out the Flexible Bay eject lever This will push your device out slightly allowing you to remove the device 4 Slide your device out until it is clear of the bay This will require light force Figure 1 Removing Installing a device in the Flexible Bay a b Flexible Bay Eject Lever d c ...

Page 4: ...through the Unplug or Eject Hardware utility under Windows XP hot swapping is provided through the Safely Remove Hardware utility The icon for the utility appears on the taskbar Click on the icon and follow the on screen instructions Be careful when aligning and seating devices in the bay If the fit is incorrect you may damage the bay or the device If the device does not move easily in the bay rem...

Page 5: ...jecting a 3 5 Floppy Disk 2 Push the disk into the drive until the Eject button pops out and you hear a click Ejecting a Disk To eject a disk from the disk drive follow these easy steps 1 Check that the Floppy Disk Drive Access indicator is off see Figure 3 When there is no disk in the drive the Eject button is flush with your drive USING THE FLOPPY DISK DRIVE Eject Button Floppy Disk Drive Access...

Page 6: ...d Refer to the operating system manual for instructions on disk formatting To prevent accidental erasure of the data stored on a disk slide the write protect tab until a small hole is exposed This sets the disk into a protected state where nothing can be added or removed If you want to add or remove data on a protected disk slide the write protect tab to close the small hole see Figure 4 If you ej...

Page 7: ...7 Figure 4 Floppy Disk Write Protected Formatting a floppy disk that already con tains data will erase all of the information on the disk Write Protected Write Enabled Rear View of Disk ...

Page 8: ...8fujitsu us fujitsu com Fujitsu and the Fujitsu logo are registered trademarks of Fujitsu Ltd Microsoft and Windows are registered trademarks of the Microsoft Corpora tion All other trademarks mentioned herein are the property of their respec tive owners We cannot guarantee the accuracy of the contents of this document We disclaim liability for errors omissions or future changes 2003 Fujitsu Compu...

Reviews: