46
L i f e B o o k N 6 4 0 0 S e r i e s U s e r ’ s G u i d e
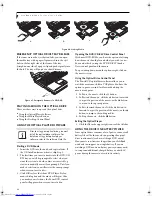
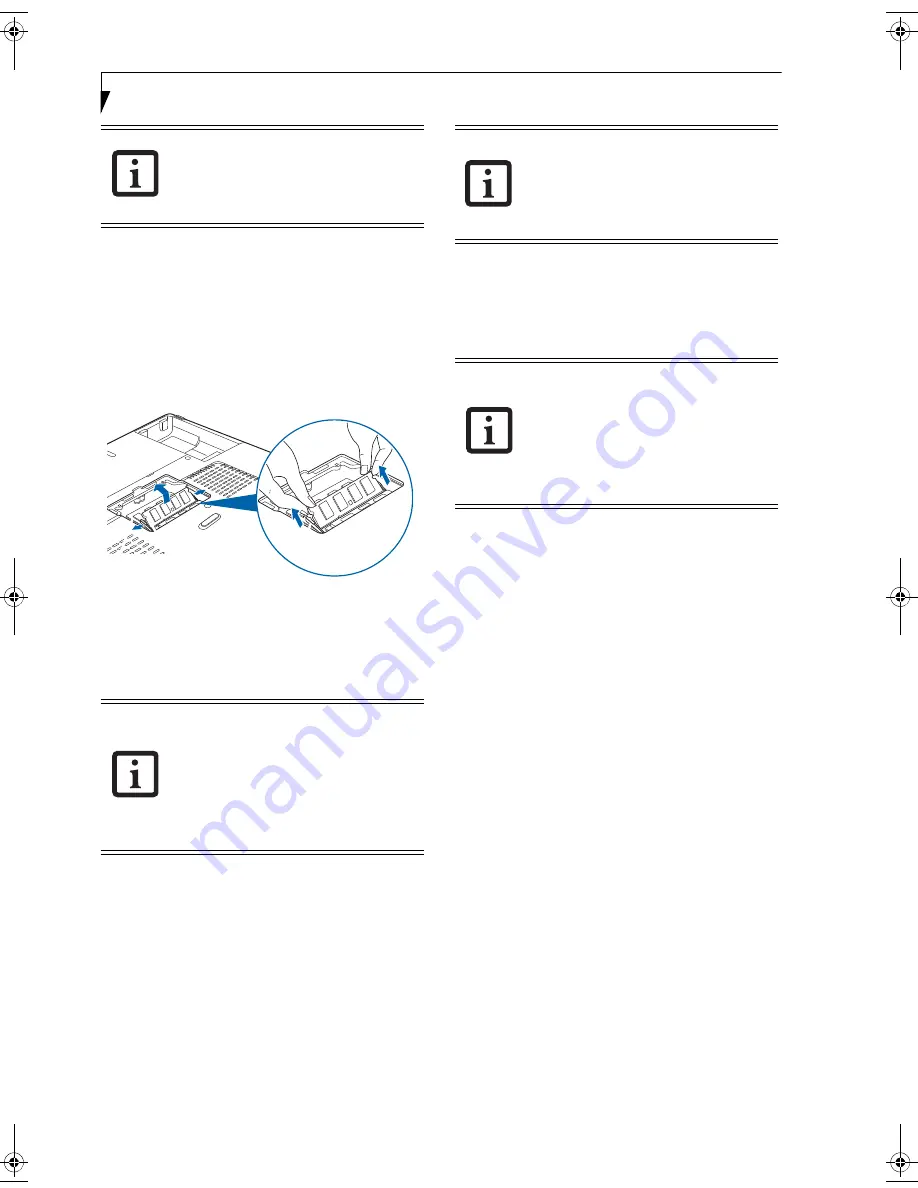
REMOVING A MEMORY UPGRADE MODULE
1. Perform steps 1 through 5 of Installing a Memory
Upgrade Module.
2. Pull the clips sideways away from each side of the
memory upgrade module at the same time.
3. While holding the clips out, remove the module
from the slot by lifting it up and pulling towards the
rear of your LifeBook notebook.
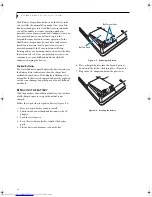
(Figure 4-13)
Figure 4-13. Removing a Memory Upgrade Module
4. Store the memory upgrade module in a static
guarded sleeve.
5. Replace the cover by following steps 9 and 10 of
Installing a Memory Upgrade Module.
CHECKING THE MEMORY CAPACITY
Once you have changed the system memory capacity by
replacing the installed module with a larger one, be sure
to check that your notebook has recognized the change.
Check the memory capacity by clicking [Start] ->
Control Panel -> System and Maintenance -> System.
The amount of memory is displayed next to “Memory -
RAM:”
The amount of memory displayed should be approxi-
mately the total of all memory modules installed. There
may be a discrepancy which is allocated for fixed video
memory.
ENABLING/DISABLING TURBO MEMORY
Turbo Memory is an optional module that is used to act
as a cache for frequently-accessed applications and
information. If you have Turbo Memory installed in
your system, it can be enabled or disabled as follows:
Enabling Windows ReadyBoost™
To enable Windows ReadyBoost for Intel® Turbo Mem-
ory, perform the following simple steps:
1.
Click on Start -> All Programs.
2.
Locate the Intel Turbo Memory program group.
3.
Select Intel Turbo Memory Console.
4.
Select [Continue] when you see the Microsoft®
Windows User Account Control prompt that says
“A program needs your permission to continue. If
you started this program, continue.”
5.
Select [Enable Windows ReadyBoost].
6.
Reboot your system.
The memory upgrade module is not
something you should routinely remove
from your notebook. Once it is installed,
you should leave it in place unless you
want to increase system memory capacity.
After installing your added memory
module, you must complete the Resetting
the Save-to-Disk Parameters procedure in
order for the Save-to-Disk mode to
operate properly on your LifeBook
notebook.
(See Hibernation (Save-to-
Disk) Feature on page 31 for more
information)
If the total memory displayed is incorrect,
check that your memory upgrade module
is properly installed.
(If the module is
properly installed and the capacity is still
not correctly recognized, see
Troubleshooting on page 53.
NVCache Partition:
Please note that the
NVCache partition on your hard disk drive
is dedicated to the Turbo Memory module.
If you see the NVCache partition, DO
NOT copy any data to it or use this
partition directly. Doing so could result in
data loss or corruption, for which Fujitsu is
not responsible.
N6460-Baikal.book Page 46 Friday, June 1, 2007 2:50 PM
Summary of Contents for N6460 - LifeBook
Page 1: ...C o p y r i g h t Fujitsu LifeBook N6460 Notebook User s Guide ...
Page 2: ...C o p y r i g h t ...
Page 8: ...L i f e B o o k N 6 4 0 0 S e r i e s U s e r s G u i d e ...
Page 9: ...1 1 Preface ...
Page 10: ...2 L i f e B o o k N 6 4 0 0 S e r i e s U s e r s G u i d e ...
Page 12: ...4 L i f e B o o k N 6 4 0 0 S e r i e s U s e r s G u i d e ...
Page 13: ...5 2 Getting to Know Your LifeBook Notebook ...
Page 14: ...6 L i f e B o o k N 6 4 0 0 S e r i e s U s e r s G u i d e ...
Page 31: ...23 3 Getting Started ...
Page 32: ...24 L i f e B o o k N 6 4 0 0 S e r i e s U s e r s G u i d e ...
Page 40: ...32 L i f e B o o k N 6 4 0 0 S e r i e s U s e r s G u i d e ...
Page 41: ...33 4 User Installable Features ...
Page 42: ...34 L i f e B o o k N 6 4 0 0 S e r i e s U s e r s G u i d e ...
Page 58: ...50 L i f e B o o k N 6 4 0 0 S e r i e s U s e r s G u i d e ...
Page 59: ...51 5 Troubleshooting ...
Page 60: ...52 L i f e B o o k N 6 4 0 0 S e r i e s U s e r s G u i d e ...
Page 73: ...65 6 Care and Maintenance ...
Page 74: ...66 L i f e B o o k N 6 4 0 0 S e r i e s U s e r s G u i d e ...
Page 78: ...70 L i f e B o o k N 6 4 0 0 S e r i e s U s e r s G u i d e ...
Page 79: ...71 7 System Specifications ...
Page 80: ...72 L i f e B o o k N 6 4 0 0 S e r i e s U s e r s G u i d e ...
Page 85: ...77 8 Glossary ...
Page 86: ...78 L i f e B o o k N 6 4 0 0 S e r i e s U s e r s G u i d e ...
Page 93: ...85 Appendix A Integrated Wireless LAN User s Guide Optional Device ...
Page 94: ...86 L i f e B o o k N 6 4 0 0 S e r i e s U s e r s G u i d e ...
Page 104: ...96 L i f e B o o k N 6 4 0 0 S e r i e s U s e r s G u i d e ...
Page 105: ...97 Appendix B Using the Fingerprint Sensor ...
Page 106: ...98 L i f e B o o k N 6 4 0 0 N o t e b o o k A p p e n d i x B ...
Page 114: ...106 L i f e B o o k N 6 4 0 0 N o t e b o o k A p p e n d i x B ...
Page 115: ...107 Index ...
Page 116: ...108 L i f e B o o k N 6 4 0 0 S e r i e s U s e r s G u i d e ...
Page 120: ...112 L i f e B o o k N 6 4 0 0 S e r i e s U s e r s G u i d e ...


