background image

- 6 -

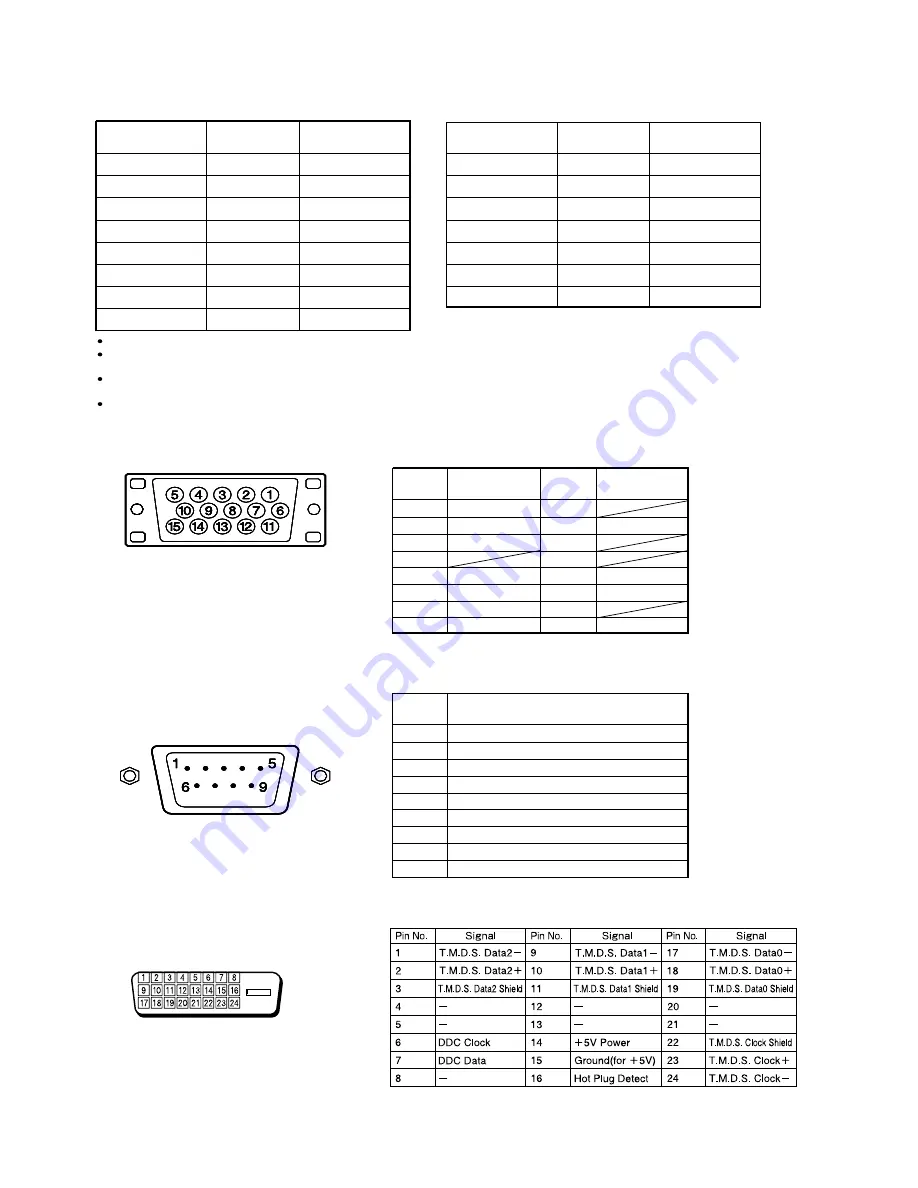
Horizontal

frequency (kHz)

Vertical

frequency (Hz)

Signal

15.73   

SDTV 

480i

15.63   

SDTV 

576i

31.47   

SDTV 

480p

31.25   

SDTV 

576p

45.00   

HDTV 

720p

37.50   

HDTV 

720p

33.75   

HDTV 

1,080i

28.13   

HDTV 

1,080i

FACTORY  SET  SIGNALS  (Component video mode)

Pin No.

Input signal

Pin No.

Input signal

1

Red

9

2

Green

10

Ground

3

Blue

11

12

4

5

Ground

13

Horiz. sync

6

Ground

14

Vert. sync

7

Ground

15

8

Ground

Outer side

Ground

Horizontal

frequency (kHz)

Vertical

frequency (Hz)

Signal

15.73   

NTSC

15.63   

PAL

15.63   

SECAM

15.63   

PAL 

60

15.63   

N-PAL

15.73   

M-PAL

15.73   

4.43 

NTSC

FACTORY  SET  SIGNALS  (Video, S-video mode)

The dedicated graphics card is optional.
In the 800 x 600 and 1,024 x 768 modes, images of reduced size are displayed on the screen, using size reduction and
interpolation.  Also note that on-screen information is also displayed in reduced size.
" Out of range" appears if the display receives a signal whose characteristic does not fall within the display's
permissible range.
You can check the input signals with "Information" on the OTHERS Menu screen.

The sync switch (TTL/ANALOG switch) is on
the rear of the 13-pin horizontal sync and
14-pin vertical sync terminals.

Pin No.

RGB INPUT TERMINAL

Pin No.

No. signal

1

DCD (Data Carrier Detect)

2

RD (Receive Data)

3

TD (Transmit Data)

4

DTR (Data Terminal Ready)

5

GND (Ground)

6

DSR (Data Set Ready)

7

RTS (Request To Send)

8

CTS (Clear To Send)

9

RI (Ring Indication)

RS-232C INPUT TERMINAL

DVI-D INPUT TERMINAL

50.00

59.52

59.95

59.94

50.00

50.00

59.94

50.00

60.00

50.00

60.00

50.00

59.94

50.00

59.94

Summary of Contents for PlasmaVision P42HHA30WS

Page 1: ...P42HHA30WS Co p y Pro h ib ite d FUJIT SU GEN ER AL Proprietary ...

Page 2: ... NAMES AND FUNCTIONS 12 VIDEO MODE ADJUSTMENT 16 RGB MODE ADJUSTMENT 17 TROUBLESHOOTING USING LED AND OSD 18 TROUBLESHOOTING FLOWCHART 19 26 VS AND VA ADJUSTMENT 27 GENERAL CONNECTION DIAGRAM 28 30 DISASSEMBLY PARTS LIST 39 TRANSPOR VOLTAGE OF EACH CONNECTOR TATION AND HANDLING RESTRICTIONS 40 ...

Page 3: ...sible injury to the operator When transporting by car place the unit as shown in the figure Slots and openings in the cabinet are provided for ventilation These ensure reliable operation and protect the unit from overheating These openings must not be blocked or covered The openings should never be blocked by placing the unit on a bed sofa rug or similar surface The unit should not be placed in a ...

Page 4: ... or parts with the same characteristics as the original parts Unauthorized substitutions may result in fire electric shock or other hazards Upon completion of any service of repairs ask the service technician to perform safety checks to determine that the unit is in proper operating condition Place the unit more than one foot away from heat sources such as radiators heat registers stoves and other...

Page 5: ... colors 1 07 billion 1 024 each for R G B Audio input 2 pin terminals three system 500mVrms 22kΩ Effective max Level terminal 10W 10W L R 6Ω output Dimensions Width 103 7cm 40 8 inch Height 64 2cm 25 2 inch Depth 8 5 cm 3 3 inch Net weight 30 0kg 66 0lbs Environment Operating Temperature 0 to 40 C 32 F to 104 F Relative humidity 20 to 80 Pressure 800 to 1 114 hPa Accessories 2 User s manual Remote...

Page 6: ... SVGA 75 Hz or less for XVGA SXGA 60 Hz or less for UXGA 640 x 480 31 47 59 94 VGA 640 x 480 640 x 480 37 50 75 00 VGA 75 Hz 43 27 85 01 VGA 85 Hz 720 x 400 31 47 70 09 400 lines 800 x 600 37 88 60 32 SVGA 60 Hz 800 x 600 800 x 600 46 88 75 00 SVGA 75 Hz 53 67 85 06 SVGA 85 Hz 1024 x 768 48 36 60 00 XGA 60 Hz 1024 x 768 1024 x 768 1024 x 768 60 02 68 68 75 03 84 99 XGA 75 Hz XGA 85 Hz 1280 x 1024 ...

Page 7: ... modes images of reduced size are displayed on the screen using size reduction and interpolation Also note that on screen information is also displayed in reduced size Out of range appears if the display receives a signal whose characteristic does not fall within the display s permissible range You can check the input signals with Information on the OTHERS Menu screen The sync switch TTL ANALOG sw...

Page 8: ...3 17 21 Pin No Input Signal 1 2 Right audio 3 4 Audio ground 5 Blue ground 6 Left audio 7 Blue Pin No Input Signal 8 9 Green ground 10 11 Green 12 13 Red ground 14 Pin No Input Signal 15 Red chrominance 16 17 18 Compositevideoground 19 20 Composite video Y 21 Ground ...

Page 9: ...CONNECTION 8 EXAMPLE OF CONNECTION TO EXTERNAL COMPONENTS Remote control Display Speaker optional Speaker VCR DVD player Satellite tuner PC ...

Page 10: ...video signal cable to either the S video input terminal or the video input terminal 9 Model P42HHA30W To video output To video input Bottom of Display To S video output To audio outputs To audio inputs To S video input ...

Page 11: ...nput terminal S video input terminal or the video input terminal If the component to be connected is equipped with component video output terminal it is recommended to connect to the component video terminal 10 To S video output To component video output To video output To audio outputs To audio inputs To video input To component video input To S video input To S video output To component video ou...

Page 12: ... dealer for information on the right cable to purchase The PC can be connected to either the front side or the rear side whichever is most convenient 11 To RGB output mD sub To audio output To RGB output DVI D To RGB1 input DVI D To audio input To RGB2 input mD sub Bottom of Display ...

Page 13: ...een over to a desired wide screen ON OFF button Turns the power ON and OFF standby state Right section Control Panel Right side of display DISPLAY SECTION FRONT This lamp shows the state of the power supply Lit red Stand by Lit green Power ON Lit orange Power saving DPMS Power saving Flashing red Malfunction Flashes differently depending function mode ON on the type of malfunction Receives signals...

Page 14: ...g a cable attach a ferrite core to the cable RGB1 input terminal RGB1 INPUT DVI D Connect this terminal to the PC s display digital RGB output terminal The connection cable No 88741 8000 made by molex Inc is recommanded RGB2 input terminal RGB2 INPUT mD sub Connect this terminal to the PC s display analog RGB output terminal or decoder digital broadcast tuner etc output terminal Component video in...

Page 15: ...erminal AUDIO1 INPUT Connect this terminal to the audio output terminal of your VCR etc External speaker output terminal EXT SP Connect this terminal to the optionally available speaker When connecting a cable attach a ferrite core to the cable Power input terminal Connect this terminal to the power cable supplied with the display When connecting a cable attach a ferrite core to the cable ...

Page 16: ... button ENTER Press this button to finalize the selection of a desired menu or option within a menu MUTE button Temporarily mutes the sound PICTURE MEMORY button Recalls the PICTURE MEMORY WIDE button Switches the screen over to a desired wide screen RGB3 VIDEO4 input mode selector button RGB3 VIDEO4 Selects RGB3 or VIDEO4 Volume adjustment buttons VOL Adjust the volume Press the button to increas...

Page 17: ...d as the Picture Mode Black Level Color Temp User Color Temp DVI Input Audio Input OSD Language Name Select 24 Frame Mode FACTORY DEFAULT Treble Bass Balance Loudness Load Save Execute Position Adjustment Clamp Position Only Comp Video 8 to 8 Size Width Height Yes No Default White Screen Yes No Yes No Default Red 0 to 255 0 to 255 0 to 255 Green Blue On Off DVI 1 DVI 2 On Off On Off Mode Freq Scan...

Page 18: ...n OSD dark Off Screen Orbiter Exhibition Mode Information Memory 1 Memory 2 Memory 3 Memory 4 Memory 5 Memory 6 Memory 7 Memory 8 English Deutsch Espanol Francais Italiano Portugues Video Input Yes No RGB PC Decoder Mode Time Moving Area Off Time Mode DPMS Off 1 min 15 min 45 min 60 min Black White Auto 1 Auto 2 NTSC PAL SECAM PAL60 N PAL M PAL 4 43NTSC VGA Auto WVGA 480P XGA WXGA SXGA SXGA Time O...

Page 19: ... every 5 sec No power Power supply protector operated Main Digital PCB 2 times Red 1 time Green Flashes twice Red LED and flashes once Green LED every 4 sec Temperature protector operated Ambient temperature of unit 2 times Red 2 times Green Flashes twice Red LED and flashes twice Green LED every 5 sec Temperature protector operated Main Digital PCB Temp sensor IC6950 3 times Red 2 times Green Fla...

Page 20: ...rocessing PCB faulty Replace Main Digital PCB Assy Check 5 Check 6 Check 7 Lights steadily for more than 10 sec GREEN NO YES All input image faulty Video input image faulty S video input image faulty Component video input image faulty RGB input image faulty Note 1 Since a voltage is applied to the Main Power PCB heat sinks while the set is operating do not touch the heat sinks 2 If the Main Power ...

Page 21: ...aulty PDP faulty Replace PDP Vs and Va must be adjusted Yes No Is green lamp lit continuously Main Digital circuit faulty Replace Main Digital PCB Assy No Video circuit faulty Replace Video PCB Assy Yes Yes CN502 shorted 1 Pull out Power Cord Plug and disconnect connectors CN351 and CN352 on Main Power PCB 2 Connect pin 1 and pin 13 of CN352 through a 1 4W 1KΩ resistor Connect pin 1 of CN352 and p...

Page 22: ...r Supply Unit circuit faulty Replace Main Power PCB Temperature protector operated Power lamp Flashes intermittently twice in red For 0 5 sec at an interval of 5 sec Check 3 Start Adjust PDP unit installation so that peripheral temperature is 40 0 or less No Yes Is ambient temperature of IC6950 on Sensor PCB less than 66 Microcomputer peripheral circuit faulty Yes Replace Main Digital PCB Assy Mic...

Page 23: ...n signal input PDP panel faulty No Signal processing circuit faulty Replace Main Digital PCB Assy Signal processing circuit faulty Replace Main Digital PCB Assy Is picture displayed normally when PDP changed No No Power Supply circuit faulty Yes Replace Main Power PCB Is voltage at each connector on Main Power PCB Normal ...

Page 24: ...reen 10 sec or more Can this unit select only RGB mode Is signal input level normal Microcomputer peripheral circuit faulty Yes No Is picture displayed on screen normal when new video PCB unit installed Video PCB Assy faulty Yes No Signal processing circuit faulty Replace Main Digital PCB Assy Yes No ...

Page 25: ...faulty Yes No Is picture displayed on screen normal when new Video PCB Unit installed Are brightness and color difference signals connected to input terminals correctly Video PCB Unit faulty Yes Check connection cable No No Is signal input level normal Signal processing circuit faulty Replace Main Digital PCB Assy Yes Yes No SYNC signals are added to the Y signal ...

Page 26: ...le Check input signal Connect RGB cable to terminal Check input signal No No Check input signal No Check input signal Is frequency of horizontal sync and vertical sync signals within specified range Is input level within specified range Yes Signal processing circuit faulty Replace Main Digital PCB Assy k le Is Sync signal i o signal input to pin 13 and vertical sync le i o TTL and polarity i o sig...

Page 27: ...1 Disconnect CN6 CN23 CN33 CN42 and CN52 2 Connect pin 1 and pin 13 of CN352 through a 1 4W 1k resistor Connect pin 1 of CN352 and pin 5 of CN509 through a 1 4W 1k resistor CN502 shorted 3 Press the power button 2 On the Main Power Supply PCB M03DJ CN33 Ground No NAME SPEC 1 Vcc 1 5 1V 0 25V 2 9 Vs 82 5V 1 5V 5 CN23 Ground No NAME SPEC 1 Va 60 0V 1 3V 4 CN6 Ground No NAME SPEC 1 Vpri2 3 3V 0 15V 3...

Page 28: ...n the no signal state Check points Refer to the drawing shown below Adjustment points Refer to the drawing shown below Adjustment value Within 0 2V of voltage indicated on the label of the PDP panel CN508 VS VA check point CN23 1 pin VA 4 pin GND 8 pin VS MAIN POWER SUPPLY PCB M03DJ PCB T4 T3 T2 CN1 CN2 CN352 CN507 CN351 CN502 CN509 CN7 CN901 CN6 CN23 CN3 ADJ VR582 VS ADJ VR581 VA 1 10 ...

Page 29: ...DIAGRAM P42HHA30WS 28 POWER SWITCH M03DZC M03DZB M03DZA M03DJ VIDEO AUDIO MAIN POWER M03CQ MAIN DIGITAL FPF42C128128UC 56 PLASMA DISPLAY UNIT OPTICAL FILTER M03DZD SENSOR 92 FUN 92 FUN INLET COMPONENT INPUT LED PHOTO KEY ...

Page 30: ...A30ES 29 M03DJ MAIN POWER FPF42C128128UC 56 PLASMA DISPLAY UNIT OPTICAL FILTER M03DYD SENSOR 92 FUN 92 FUN M03CQ MAIN DIGITAL M03DYA VIDEO AUDIO COMPONENT INPUT POWER SWITCH M03DYC M03DYB LED PHOTO KEY INLET ...

Page 31: ... 30 DISASSEMBLY 1 Removing the Rear Case and layout of Main PCB 1 Remove the 27 screws and Rear Case Layout of Main PCB A B C A Main Power PCB B Video Audio PCB C Main Digital PCB ...

Page 32: ...2 Removing the Main Power PCB 1 Remove the Rear Case 2 Take away the insulator 3 Disconnect the 8 circled connector 4 Remove the 4 screws and Main Power PCB View after Main Power PCB removed 31 ...

Page 33: ...io PCB 1 Remove the 5 circled screws 2 Slide the module in the direction of the arrow 3 Remove the 12 circled screws and shield option TOP 4 Remove the 4 circled screws and Video Audio PCB View after Video Audio PCB removed 32 ...

Page 34: ... PCB 1 Remove the Video Audio Unit Refer to Page 32 2 Remove the 15 sircled screws and shild main TOP 3 Disconnect the 9 circled connector 4 Remove the 4 circled screws and Main Digital PCB View after Main Digital PCB removed 33 ...

Page 35: ... of 2 1 Remove the Rear Case Video Audio Unit and 2 Disconnect the 1 circled connector Main Digital Unit 3 Remove the 6 circled screws and shield main bottom 5 Remove the 8 circled screws 4 Disconnect the 1 circled connector 34 ...

Page 36: ... PCB 9 Remove the 11 circled screws and Base Frame together with Fans 10 Remove the 6 circled screws and shield plate 11 Disconnect the 1 circled connector 6 Remove the Base Frame from the Front Case together with the panel and PCBs 35 View after only the PDP Unit was removed Replace the removed parts back in the correct places when the PDP Unit is replaced ...

Page 37: ...cled screws To remove the PDP Unit refer to Page 35 2 Pull the Bezel Front in the direction of arrow Repeat the same procedure on the other 3 locations 3 Pull toward the direction of arrow Remove the other side in a same manner View after the both top and bottom Bezel Front removed 36 ...

Page 38: ...6 Removing the Bezel Front and Optical Filter 2 of 2 View after Bezel Front was removed 37 ...

Page 39: ...7 Removing the Key Switch PCB 1 Remove the PDP Unit 2 Disconnect the 1 circled connector 3 Remove the 2 screws and Key Switch PCB Unit 4 Remove the 2 screws 5 Remove the Key Switch PCB 38 ...

Page 40: ...2 Power Switch PCB 8117320011 8117314010 PDP Unit S141014334 Button Key Switch 8114519005 Button Main Switch 8114518008 Power Cord UL CSA 8111725003 VDE 8111726000 Sensor PCB 8117354016 8117356010 Remoto Controller 8114649016 Badge 8112118002 Gasket Filter L R 8114537009 Gasket Filter T B 8114536002 Carton Top 8114549002 Carton Bottom 8114547008 Carton Bottom W 8116485001 Carton Sheet 8116404002 P...

Page 41: ...ON AND HANDLING RESTRICTIONS Transportation Don t load the plasmavision on a truck as shown in the drawing Don t hold the surface of the optical filter Over 30 cm Drop Floor Bad loading Handling Never drop Never topple ...

Page 42: ... 41 Don t stack the plasmavision over three units high Load the plasmavision as shown above Example of good transportation and handling Good loading 3 3 3 3 4 ...

Page 43: ...FUJITSU GENERAL CUSTOMER SERVICE LIMITED GLOBAL SUPPORT DIVISION OCTOBER 2003 ...

Reviews: