U41147-J-Z156-2-76
73
System components and expansions
chipDISK for RemoteView
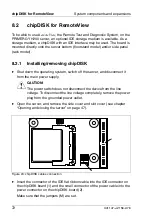
Figure 25: Installing chipDISK
Ê
Insert the chipDISK board at the intended location in the server (1), and
attach it using the three screws (2).
Figure 26: chipDISK connections on the system board
Ê
Connect the other end of the IDE cable to the primary IDE interface (1) of
the system board (see also the technical manual for the system board).
Ê
Connect the other end of the power cable to the power connector provided
on the system board (2) (see also the technical manual for the system
board).
1
2
1
2
Summary of Contents for PRIMERGY H200
Page 4: ......
Page 5: ...Related publications and index ...
Page 6: ......
Page 10: ......
Page 18: ...8 U41147 J Z156 2 76 Technical data Introduction ...
Page 19: ...U41147 J Z156 2 76 9 Introduction Technical data ...
Page 20: ......
Page 21: ...U41147 J Z156 2 76 11 Introduction Technical data ...
Page 22: ...12 U41147 J Z156 2 76 Technical data Introduction ...
Page 32: ......
Page 71: ...U41147 J Z156 2 76 61 Troubleshooting and tips Error messages on the control panel ...
Page 72: ......
Page 100: ......
Page 140: ......
Page 142: ......
Page 150: ......
Page 152: ......
Page 154: ......

