78
U41147-J-Z156-2-76
Accessible drives
System components and expansions
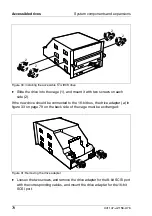
Figure 30: Installing the accessible
5¼-inch
drive
Ê
Slide the drive into the cage (1), and mount it with two screws on each
side (2).
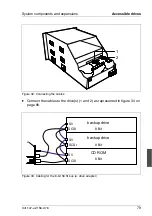
If the new drive should be connected to the 16-bit bus, the drive adapter (a) in
figure 33 on page 79 on the back side of the cage must be exchanged:
Figure 31: Removing the drive adapter
Ê
Loosen the two screws, and remove the drive adapter for the 8-bit SCSI port
with the corresponding cables, and mount the drive adapter for the 16-bit
SCSI port.
1
2
2
2
2
Summary of Contents for PRIMERGY H200
Page 4: ......
Page 5: ...Related publications and index ...
Page 6: ......
Page 10: ......
Page 18: ...8 U41147 J Z156 2 76 Technical data Introduction ...
Page 19: ...U41147 J Z156 2 76 9 Introduction Technical data ...
Page 20: ......
Page 21: ...U41147 J Z156 2 76 11 Introduction Technical data ...
Page 22: ...12 U41147 J Z156 2 76 Technical data Introduction ...
Page 32: ......
Page 71: ...U41147 J Z156 2 76 61 Troubleshooting and tips Error messages on the control panel ...
Page 72: ......
Page 100: ......
Page 140: ......
Page 142: ......
Page 150: ......
Page 152: ......
Page 154: ......

