7.4.2
Installing 3.5-inch HDD modules
Customer Replaceable
Unit (CRU)
Hardware: 5 minutes
Tools:
tool-less
Preliminary steps
▶
If applicable,
"Removing the front cover with lock" on page 48
▶
Locate the correct drive bay, see
"Overview of configurations" on page 127
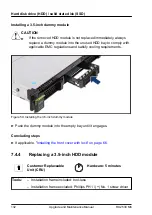
Removing a 3.5-inch HDD dummy module
Figure 47: Removing the 3.5-inch dummy module
▶
Press both tabs together (1) and pull the dummy module out of its bay (2).
CAUTION
▶
Keep the dummy module for future use.
▶
Always replace dummy modules into unused HDD/SSD bays to
comply with applicable EMC regulations and satisfy cooling
requirements.
Hard disk drive (HDD) / solid state disk (SSD)
128
Upgrade and Maintenance Manual
RX2530 M6
Summary of Contents for PRIMERGY RX2530 M5
Page 18: ...Content Upgrade and Maintenance Manual RX2530 M6 ...
Page 194: ...Fans 194 Upgrade and Maintenance Manual RX2530 M6 ...
Page 262: ...Expansion cards and backup units 262 Upgrade and Maintenance Manual RX2530 M6 ...
Page 278: ...Main memory 278 Upgrade and Maintenance Manual RX2530 M6 ...
Page 324: ...Accessible drives 324 Upgrade and Maintenance Manual RX2530 M6 ...
Page 336: ...Front panel 336 Upgrade and Maintenance Manual RX2530 M6 ...
Page 344: ...Serial interface 344 Upgrade and Maintenance Manual RX2530 M6 ...
Page 480: ...List of all used screws for PRIMERGY Servers Assembled in Germany and Japan February 2019 ...


