


TX100 S2
Service Supplement
103
Replacement routines
Ê
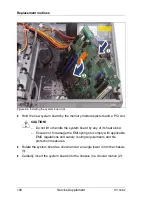
Reinstall all remaining system board components as shown in the related
sections:
–
Heat sinks: see
section "Installing the processor heat sink" on page 94
–
Memory modules: refer to the PRIMERGY TX100 S2 Options Guide
–
Expansion cards: refer to the PRIMERGY TX100 S2 Operating Manual
and Options Guide
I
Install all expansion cards into their original slots.
–
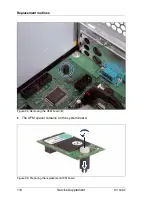
UFM: see
section "Replacing the USB Flash Module (UFM)" on
page 109
–
TPM: see
section "Replacing the Trusted Platform Module (TPM)" on
page 104
.
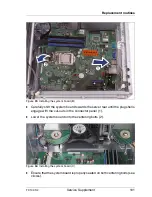
Ê
Reconnect all cables to the system board.
I
Ensure to connect SATA cables in the right order (see the cabling
plans in the appendix of the PRIMERGY TX100 S2 Options Guide).
The boot HDD should always be connected to SATA connector
HDD0.
Ê
Reinstall the air duct as described in section
4.1.4.2 on page 37
.
Ê
Close the HDD cage as described in section
4.1.2.2 on page 27
.
Ê
Close the side cover as described in section
4.1.1.2 on page 24
and
reconnect the AC power cord.
Ê
Reconnect all external cables.
Ê
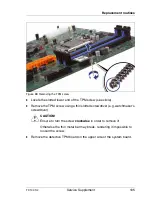
If applicable, activate TPM functionality in the system BIOS under
Security
>
TPM (Security Chip) Setting
>
Security Chip
. For more information, refer to the
"D2779 BIOS Setup Utility for PRIMERGY TX100 S2" manual.
V
CAUTION!
After installing the new system board, it is necessary to update system
specific data (e. g. BIOS) to ensure proper operation. Please refer to the
BIOS Manual for a detailed description.
Summary of Contents for PRIMERGY TX100 S2
Page 1: ...Service Supplement English PRIMERGY TX100 S2 Server Service Supplement Edition July 2010 ...
Page 6: ......
Page 14: ......
Page 22: ......


