214
Upgrade and Maintenance Manual
TX140
S2
Main memory
Ê
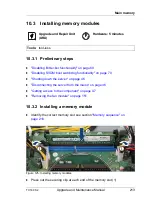
Align the notch on the bottom of the module with the crossbar in the slot (see
close-up).
Ê
Press down on the memory module until the securing clips snap into the
cutouts at each end of the module (2).
10.3.3 Concluding steps
Ê
"Installing the fan module" on page 152
Ê
"Reassembling" on page 58
Ê
"Connecting the server to the mains" on page 67
Ê
"Switching on the server" on page 68
Ê
If applicable,
"Updating or recovering the system board BIOS and iRMC" on
page 75
Ê
"Enabling SVOM boot watchdog functionality" on page 85
Ê
If applicable,
"Verifying the memory mode" on page 86
Ê
"Enabling BitLocker functionality" on page 90
10.4 Replacing memory modules
10.4.1 Preliminary steps
Ê
Identify the defective memory slot using the server management software.
Ê
"Disabling BitLocker functionality" on page 69
Ê
"Disabling SVOM boot watchdog functionality" on page 70
Ê
"Locating the defective server" on page 43
Ê
"Shutting down the server" on page 46
Upgrade and Repair Unit
(URU)
Hardware: 5 minutes
Software: 5 minutes
Tools:
tool-less
Summary of Contents for PRIMERGY TX140 S2
Page 30: ...30 Upgrade and Maintenance Manual TX140 S2 Before you start ...
Page 98: ...98 Upgrade and Maintenance Manual TX140 S2 Basic software procedures ...
Page 120: ...120 Upgrade and Maintenance Manual TX140 S2 Power supply ...
Page 148: ...148 Upgrade and Maintenance Manual TX140 S2 Hard disk drives solid state drives ...
Page 158: ...158 Upgrade and Maintenance Manual TX140 S2 System fan and air duct ...
Page 208: ...208 Upgrade and Maintenance Manual TX140 S2 Expansion cards and backup units ...
Page 216: ...216 Upgrade and Maintenance Manual TX140 S2 Main memory ...
Page 314: ...314 Upgrade and Maintenance Manual TX140 S2 Cabling ...
Page 332: ...332 Upgrade and Maintenance Manual TX140 S2 Appendix ...


