8
L i f e B o o k S 7 0 0 0 N o t e b o o k
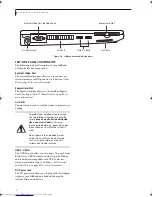
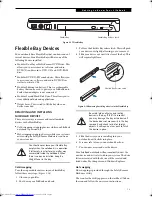
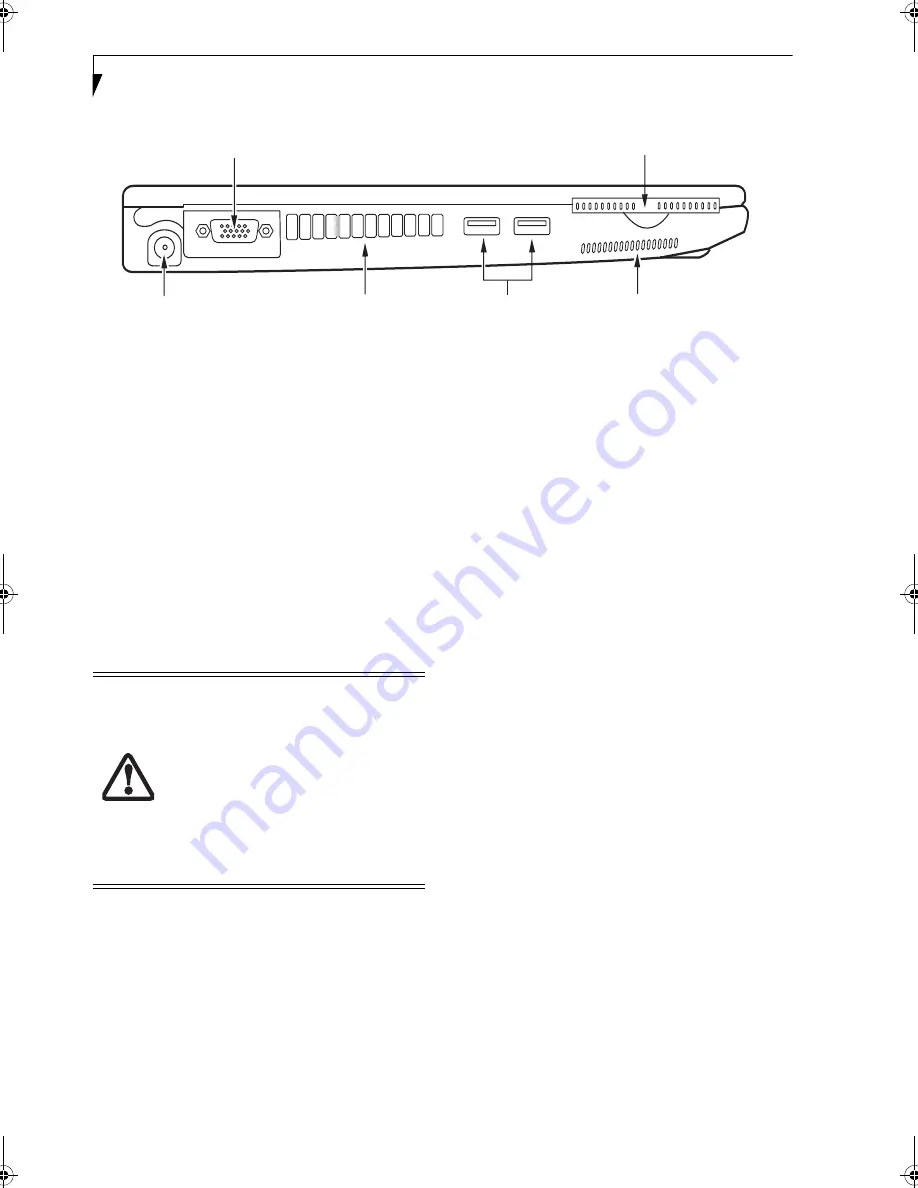
Figure 2-4. LifeBook notebook left-side panel
LEFT-SIDE PANEL COMPONENTS
The following is a brief description of your LifeBook
notebook’s left-side components.
External Video Port
The external monitor port allows you to connect an
external monitor or LCD projector.
(See External Video
Port on page 47 for more information)
ExpressCard Slot
The ExpressCard slot allows you to install an Express-
Card.
(See ExpressCards™/ Smart Cards on page 42 for
more information)
Air Vents
The air vents are used to cool the system to prevent over-
heating.
USB 2.0 Ports
The USB 2.0 ports allow you to connect Universal Serial
Bus devices. USB 2.0 transfers data at up to 480 Mbps
and is backward-compatible with USB 1.1 devices,
which transfer data at up to 12 Mbps.
(See Universal
Serial Bus Ports on page 47 for more information)
DC Power Jack
The DC power jack allows you to plug in the AC adapter
to power your LifeBook notebook and charge the
internal Lithium ion battery.
External Video Port (behind cover)
USB 2.0 Ports
ExpressCard Slot
DC Power Jack
Air Vents
Air Vents
To protect your notebook from damage
and to optimize system performance, be
sure to
keep all air all vents unobstructed
,
clean, and clear of debris
. This may
require periodic cleaning, depending upon
the environment in which the system is
used.
Do not operate the notebook in areas
where the air vents can be obstructed,
such as in tight enclosures or on soft
surfaces like a bed or cushion.
Elf S7210.book Page 8 Thursday, September 13, 2007 10:28 AM
Summary of Contents for S7210 - LifeBook - Core 2 Duo 2.2 GHz
Page 1: ...Fujitsu LifeBook S7210 Notebook User s Guide ...
Page 2: ......
Page 8: ...L i f e B o o k S 7 0 0 0 N o t e b o o k ...
Page 9: ...1 Preface ...
Page 10: ...L i f e B o o k S 7 0 0 0 N o t e b o o k ...
Page 12: ...2 L i f e B o o k S 7 0 0 0 N o t e b o o k ...
Page 13: ...3 2 Getting to Know Your LifeBook Notebook ...
Page 14: ...4 L i f e B o o k S 7 0 0 0 N o t e b o o k ...
Page 34: ...24 L i f e B o o k S 7 0 0 0 N o t e b o o k ...
Page 35: ...25 3 Getting Started ...
Page 36: ...26 L i f e B o o k S 7 0 0 0 N o t e b o o k ...
Page 44: ...34 L i f e B o o k S 7 0 0 0 N o t e b o o k ...
Page 45: ...35 4 User Installable Features ...
Page 46: ...36 L i f e B o o k S 7 0 0 0 N o t e b o o k ...
Page 58: ...48 L i f e B o o k S 7 0 0 0 N o t e b o o k ...
Page 59: ...49 5 Troubleshooting ...
Page 60: ...50 L i f e B o o k S 7 0 0 0 N o t e b o o k ...
Page 74: ...64 L i f e B o o k S 7 0 0 0 N o t e b o o k ...
Page 75: ...65 6 Care and Maintenance ...
Page 76: ...66 L i f e B o o k S 7 0 0 0 N o t e b o o k ...
Page 81: ...71 7 System Specifications ...
Page 82: ...72 L i f e B o o k S 7 0 0 0 N o t e b o o k ...
Page 87: ...77 8 Glossary ...
Page 88: ...78 L i f e B o o k S 7 0 0 0 N o t e b o o k ...
Page 97: ...87 Appendix A Integrated Wireless LAN User s Guide Optional device ...
Page 98: ...88 L i f e B o o k S 7 0 0 0 N o t e b o o k ...
Page 107: ...97 Appendix B Using the Fingerprint Sensor ...
Page 108: ...98 L i f e B o o k S 7 0 0 0 N o t e b o o k ...
Page 116: ...106 L i f e B o o k S 7 0 0 0 N o t e b o o k ...
Page 120: ...110 L i f e B o o k S 7 0 0 0 N o t e b o o k ...

