43
U s e r I n s t a l l a b l e F e a t u r e s
Memory Upgrade Module
Your Fujitsu LifeBook notebook comes with a minimum
of 512 MB of high speed Double Data Rate Synchronous
Dynamic RAM (DDR2-667 SDRAM) factory installed. To
increase your notebook’s memory capacity, you may
install an additional memory upgrade module. The
memory upgrade must be a dual-in-line (DIMM)
SDRAM module. To ensure 100% compatibility,
purchase the SDRAM module only from the Fujitsu web
store at www.shopfujitsu.com.
INSTALLING MEMORY UPGRADE MODULES
1. Turn off power to your notebook, remove any power
adapter (AC or auto/airline). Remove the battery.
2. Make sure that all the connector covers are closed.
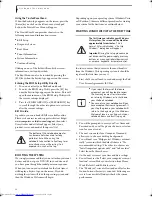
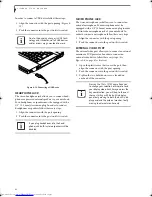
3. Turn the notebook bottom side up, and remove the
screw from the memory upgrade module compart-
ment.
(Figure 4-8)
4. Remove the cover.
5. Remove the memory upgrade module from the
static guarded sleeve.
6. Align the memory upgrade module with the part
side up. Align the connector edge of the memory
upgrade module with the connector slot in the
compartment.
Figure 4-8. Opening the Memory Upgrade Compartment
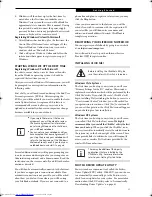
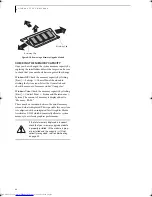
7. Insert the memory upgrade module at a 45° angle.
Press the connector edge of the module firmly down
and into the connector until it lodges under the
retaining clip. You’ll hear a click when it is properly
in place.
8. Replace the cover and reinstall the screws.
Figure 4-9. Installing a Second Memory Module
REMOVING A MEMORY UPGRADE MODULE
1. Perform steps 1 through 4 of Installing a Memory
Upgrade Module.
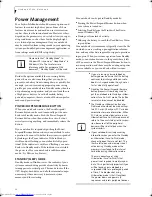
2. Pull the retaining clips sideways away from each side
of the memory upgrade module at the same time.
(Figure 4-10)
3. While holding the clips out, remove the module
from the slot by lifting it up and pulling it away from
your notebook.
4. Store the memory upgrade module in a static
guarded sleeve.
5. Replace the cover and reinstall the screws.
■
Do not remove any screws from the
memory upgrade module compartment
except the one specifically shown in the
directions for installing and removing the
memory upgrade module.
■
The memory upgrade module can be
severely damaged by electrostatic dis-
charge (ESD). To minimize risk to the
module, observe the following precau-
tions:
■
Before handling a memory module,
touch a grounded metal object to
discharge static electricity built up in
your body.
■
When installing or removing a
memory module, hold it by the edge
so as not to touch any contacts or
chips. Be careful not to touch any
internal computer terminals or
components; the oil from your
fingers could cause a short to the
components.
■
Be sure to power down your system
before adding or removing memory
modules. Even if the system is in
hibernate or standby states, data
could be lost or the memory could be
damaged if power is still available to
the system.
The memory upgrade module is not
something you routinely remove from
your notebook. Once it is installed, you
can leave it in place unless you want to
change system memory capacity.
2
Retaining clip
Alignment Key
2
1
Elf Lite S7211.book Page 43 Thursday, September 13, 2007 1:34 PM
Summary of Contents for S7211 - LifeBook - Core 2 Duo GHz
Page 1: ...Fujitsu LifeBook S7211 Notebook User s Guide ...
Page 2: ......
Page 8: ...L i f e B o o k S 7 0 0 0 N o t e b o o k ...
Page 9: ...1 Preface ...
Page 10: ...L i f e B o o k S 7 0 0 0 N o t e b o o k ...
Page 12: ...2 L i f e B o o k S 7 0 0 0 N o t e b o o k ...
Page 13: ...3 2 Getting to Know Your LifeBook Notebook ...
Page 14: ...4 L i f e B o o k S 7 0 0 0 N o t e b o o k ...
Page 34: ...24 L i f e B o o k S 7 0 0 0 N o t e b o o k ...
Page 35: ...25 3 Getting Started ...
Page 36: ...26 L i f e B o o k S 7 0 0 0 N o t e b o o k ...
Page 44: ...34 L i f e B o o k S 7 0 0 0 N o t e b o o k ...
Page 45: ...35 4 User Installable Features ...
Page 46: ...36 L i f e B o o k S 7 0 0 0 N o t e b o o k ...
Page 57: ...47 5 Troubleshooting ...
Page 58: ...48 L i f e B o o k S 7 0 0 0 N o t e b o o k ...
Page 72: ...62 L i f e B o o k S 7 0 0 0 N o t e b o o k ...
Page 73: ...63 6 Care and Maintenance ...
Page 74: ...64 L i f e B o o k S 7 0 0 0 N o t e b o o k ...
Page 79: ...69 7 System Specifications ...
Page 80: ...70 L i f e B o o k S 7 0 0 0 N o t e b o o k ...
Page 84: ...74 L i f e B o o k S 7 0 0 0 N o t e b o o k ...
Page 85: ...75 8 Glossary ...
Page 86: ...76 L i f e B o o k S 7 0 0 0 N o t e b o o k ...
Page 95: ...85 Appendix Integrated Wireless LAN User s Guide Optional device ...
Page 96: ...86 L i f e B o o k S 7 0 0 0 N o t e b o o k ...
Page 108: ...98 L i f e B o o k S 7 0 0 0 N o t e b o o k ...
Page 109: ......
Page 110: ......
Page 111: ......
Page 112: ......


