background image

88

7.2

Replacing the Pad ASSY

Replace the Pad ASSY following the procedure below.

1.

Remove the documents on the paper chute cover.

2.

Pull the cover open lever to open the ADF cover.

3.

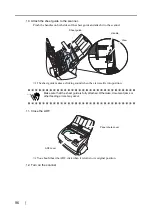
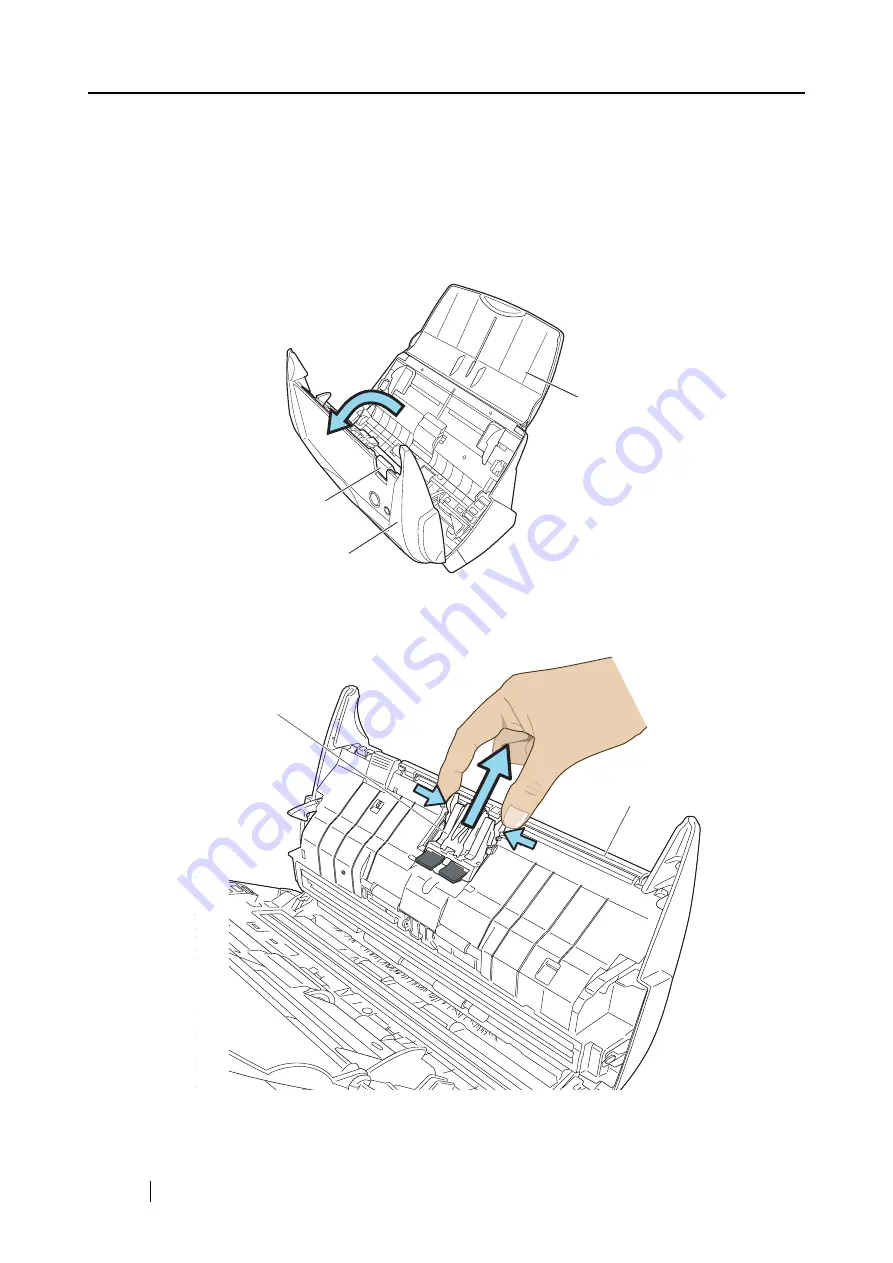
Remove the Pad ASSY.

Pinch both ends of the Pad ASSY and pull it out as shown below.

ADF cover

Cover open lever

Paper chute cover

ADF cover

Pad ASSY

Summary of Contents for ScanSnap fi-5110EOXM

Page 1: ...P3PC 1412 02ENZ0 Color Image Scanner fi 5110EOXM for Macintosh Operator s Guide TM ...

Page 2: ......

Page 3: ...Snap fi 5110EOXM can scan double sided color documents of A4 or Letter size at a speed of 15 sheets minute when Scanning quality is set to Normal Fastest Color mode is set to Auto Color Detection and Compression rate is set to 3 1 Small desktop footprint Having a footprint smaller than the size of A4 or Letter paper the ScanSnap scanner can be left on your desk all the time 1 Depending on the docu...

Page 4: ...2 Connecting ScanSnap 5 2 1 Installing ScanSnap 6 Before Installing ScanSnap 6 Installing Adobe Acrobat 7 Installing ScanSnap Manager 10 2 2 Connecting ScanSnap to your Computer 16 Connecting the AC Adapter 16 Connecting the USB Cable 17 Chapter 3 Basic Scanner Operations 19 3 1 Flow of Operations 20 Preparation 20 Scanning documents 22 Turning the Scanner ON OFF 25 End of Operation 26 3 2 Scannin...

Page 5: ...Saving scanned images in multiple files 60 Merging scanned images into one PDF file 62 Converting scanned images to searchable text with OCR 64 Chapter 4 Uninstalling ScanSnap 65 4 1 Uninstalling Supplied Programs 66 To uninstall ScanSnap Manager in Mac OS X v10 2 66 To uninstall ScanSnap Manager in Mac OS X v10 3 v10 4 67 Chapter 5 Troubleshooting 69 5 1 Clearing Document Jams 70 5 2 Troubleshoot...

Page 6: ...g Consumables 85 7 1 Replacing Consumables 86 Part Nos and Replacement Cycles of Consumables 86 7 2 Replacing the Pad ASSY 88 7 3 Replacing the Pick Roller 92 Appendix A Installation Specifications 99 Index 101 Repairs 103 ...

Page 7: ...ced radio TV technician FCC warning Changes or modifications not expressly approved by the party responsible for compliance could void the user s authority to operate the equipment Canadian DOC Regulations This digital apparatus does not exceed the Class B limit for radio noise emissions from digital apparatus set out in the Radio interference Regulations of the Canadian Department of Communicatio...

Page 8: ...factured for use in applications simply called high safety applications from here on that directly involve danger to life and health when a high degree of safety is required for example in the control of nuclear reactions at nuclear power facilities automatic flight control of aircraft air traffic control operation control in mass transport systems medical equipment for sustaining life and missile...

Page 9: ...ng system version 10 1 Mac OS X v10 2 Macintosh operating system version 10 2 Mac OS X v10 3 Macintosh operating system version 10 3 Mac OS X v10 4 Macintosh operating system version 10 4 Where there is no distinction between the different versions of the above operating system the general term Mac OS is used Adobe Acrobat 7 0 Adobe Acrobat 7 0 Standard Where there is no distinction between the di...

Page 10: ...ibes important details for ensuring the safe and correct use of this product Thoroughly read this manual before you start to use this product In particular be sure to read and fully understand the Safety Precautions described in this manual before you use this product Also store this manual in a safe place so that it can be easily referred to during use of this product Warning Indications Used In ...

Page 11: ...awing inside the triangle shows the specific caution A CIRCLE with a diagonal line inside shows action which users may not perform The drawing inside or under the circle shows the specific action that is not allowed R Outline characters on a colored background show instructions users should follow It may also include the drawing that shows the specific instruction The surrounding area where this w...

Page 12: ...this manual operate by following the actual displayed screen while referring to the User s Manual of the scanner application you are using Furthermore the screenshots in this manual are for ScanSnap Manager About Maintenance The user must not perform repairs on this scanner Contact the store where you purchased the scanner or an authorized FUJITSU Image Scanner service provider to make repairs to ...

Page 13: ...Do not place heavy objects on AC cables or pull bend twist heat damage or modify AC cables Also do not use damaged AC cables or power plugs and AC cables or power plugs when the wall socket is loose Use only specified AC cables and connector cables Failure to use the correct cables might cause electric shock and equipment failure Use this scanner only at the indicated power voltage and current Imp...

Page 14: ...scanner and unplug the power cable before contacting the store where you purchased the scanner Do not insert or drop metal objects in to the scanner Do not scan wet documents or documents with paper clips or staples Do not splash or allow the scanner to get wet If foreign objects water small metal objects liquids etc get inside the scanner immedi ately turn off the scanner and disconnect the power...

Page 15: ... free of vibration to prevent it from falling Install the scanner on a strong surface that will support the weight of the scsanner and other devices Firmly insert the power plug into the power outlet as far as it can go Do not block the ventilation ports Blocking the ventilation ports generates heat inside of scanner which may results in fire or scanner failure Do not place heavy objects on the sc...

Page 16: ...ol sprays to clean the scanner Aerosol sprays cause dirt and dust to enter the scanner which will result in scanner failure and malfunction Avoid touching any scanner mechanism when scanning as this may cause injuries When the scanner is not used for a long period of time be sure to disconnect the power plug from the power outlet for safety Do not install the scanner in the direct sunlight or near...

Page 17: ...1 ScanSnap fi 5110EOXM Operator s Guide 1 Chapter 1 Before You Start Using Your Scanner This chapter describes the necessary preparations before using ScanSnap 1 1 Names and Functions of Parts 2 ...

Page 18: ...ent Feeder Stacker Attach the scanner as shown Adjust the two front projection portions to the hollows on the bottom of the scanner Paper chute cover After opening it load the documents to be scanned on this unit Side guide Ajust the side guides to the width of documents so that the scanned images will not be skewed Cover open lever To open the ADF cover pull this lever towards you Operation butto...

Page 19: ...OLOR SCAN button Press this button to start scanning POWER button Turns on off the power supply Power lamp Indicates the scanner status Blue Lighted Ready Blue Blinking Scanning Yellow Lighted Error Light off Power off Seal informing you that the installation of the software has to be performed first After installing the software remove this seal USB connector AC adapter connector ...

Page 20: ...4 ...

Page 21: ...ect the ScanSnap scanner install ScanSnap Manager on your computer For details about the specifications such as space for installing the scanner refer to the Appendix under Installation Specifications page 99 2 1 Installing ScanSnap 6 2 2 Connecting ScanSnap to your Computer 16 ATTENTION You cannot connect more than 2 ScanSnap scanners to one computer ...

Page 22: ...AM 128MB or more recommended 512MB or more Free disk space ScanSnap Manager 10 Mbytes Adobe Acrobat 7 0 450 Mbytes Mac OS X v10 1 Mac OS X v10 2 Mac OS X v10 3 Mac OS X v10 4 ScanSnap Manager X 3 3 3 Adobe Acrobat 7 0 X 3 3 X ATTENTION v ScanSnap may not function if it is connected to the USB ports for the keyboard or monitor If you are using a commercially available USB hub use the type equipped ...

Page 23: ...7 0 CD ROM 1 Insert the Adobe Acrobat 7 0 CD ROM into the CD ROM drive The Adobe Acrobat 7 0 Standard window appears ATTENTION Adobe Acrobat 7 0 Standard system requirements OS Mac OS X v10 2 8 or v10 3 Screen Resolution 800 x 600 or higher For further details please visit Adobe Web Site http www adobe com HINT Adobe Acrobat is required for displaying the ScanSnap fi 5110EOXM Operator s Guide Adob...

Page 24: ...7 0 Standard folder to the Applications folder in which the software is installed HINT To open the CD tray or to eject a CD press the button on the key board If the keyboard does not have the button press instead F12 and hold it In case the Acrobat 7 0 Standard window is not displayed automatically copy the Adobe Acrobat 7 0 Standard folder in the Applications folder at Finder ...

Page 25: ... Adobe Acrobat 7 0 Standard folder in the Applications folder double click Acrobat Standard icon and follow the indicated instructions HINT Click the How to install button on the Adobe Acrobat 7 0 Standard window to learn more about the Adobe Acrobat 7 0 installation Refer to Adobe Acrobat Help about how to use Adobe Acrobat 7 0 ...

Page 26: ...ScanSnap icon 1 For Mac OS X v10 2 The Welcome to ScanSnap Manager Installer appears 2 For Mac OS X v10 3 or v10 4 The This Installer package needs to run a program to determine if it can be installed Do you want to continue dialog appears HINT To open the CD tray or to eject a CD press the button on the keyboard If the keyboard does not have the button press instead F12 and hold it Click Click ...

Page 27: ...erator s Guide 11 Connecting ScanSnap 2 Click the Continue button 3 At the Welcome to the ScanSnap Manager Installer screen click the Continue but ton The Important Information screen appears When you have finished reading click the Continue button ...

Page 28: ...en you have finished reading click the Continue button The confirmation of agreement screen appears If you accept the agreement click the Agree button If you click the Disagree button the installation would be aborted and the Software License Agreement screen returns If you click the Agree button the Select a Destination screen appears ...

Page 29: ...talled and click the Continue button to install in the displayed folder The Easy Install on selected destination name screen appears 6 On the Easy Install on selected destination name screen click the Install button The message Installing this software requires you to restart your computer when the installation is done Are you sure you want to install the software now appears Click the Continue In...

Page 30: ... completed the Startup item registration screen appears When you click the OK button on the Startup item registration screen the screen closes Even if you do nothing the screen closes automatically in 10 seconds HINT ScanSnap Manager and its manual will be installed ...

Page 31: ...TION For the user other than the one who is installed to use ScanSnap it is neces sary to register the ScanSnap Manager to the Startup Items manually 1 Log in as the user that you want to configure 2 On Mac OS X v10 2 from the System Preferences item you can register by choosing Login Items Add ScanSnap Manager On Mac OS X v10 3 or v10 4 from the System Preferences item you can register by choosin...

Page 32: ...wn below 1 Connect the AC cable to the AC adapter 2 Connect the AC adapter to the AC adapter connector on ScanSnap and to a power outlet ATTENTION Be sure to connect the AC cable first before connecting the USB cable Be sure to install ScanSnap Manager before connecting ScanSnap to your computer For details about the installation refer to Installing ScanSnap page 6 ATTENTION Do not use cables othe...

Page 33: ...connector ATTENTION Use only the USB cable supplied with the scanner Operation with a commercially available USB cable is not guaranteed When connecting to a USB hub be sure to connect the scanner to the hub nearest to your computer first stage If you connect to a USB hub from the second stage onwards ScanSnap may not function correctly If you connect the scanner using USB 2 0 please make a sure t...

Page 34: ...one second To prevent a mis operation the POWER button does not work unless it is pressed for longer than one second HINT The scanner can be turned on off by performing the following actions Opening closing the paper chute cover on the scanner Turning on off the computer Pressing the POWER button on the scanner when the paper chute cover is opened Opening closing the paper chute cover takes preced...

Page 35: ...3 Basic Scanner Operations This chapter describes the basic operations of ScanSnap 3 1 Flow of Operations 20 3 2 Scanning Different Document Types 27 3 3 Loading Documents 29 3 4 Changing Scan Settings 32 3 5 Various settings according to your needs 50 ...

Page 36: ... connected to the scanner 2 Make sure that the scanner is correctly connected to your computer 3 Turn on your computer The ScanSnap Manager icon appears in the Dock menu when Mac OS is started up 4 Open the paper chute cover HINT You can connect the scanner to your computer after it is turned on When the scanner is already connected to your computer you do not need to reconnect it Paper chute cove...

Page 37: ...e 21 Basic Scanner Operations 3 The scanner is turned on and the ScanSnap Manager icon will change from to HINT If the scanner is not automatically turned on Blue Power Light isON even when the paper chute cover is opened press the POWER button on the scan ner ...

Page 38: ...rs in the Dock menu when the Mac OS starts If ScanSnap Manager is not registered as a Startup Item in System Preferences follow the method below to configure it 1 On Mac OS X v10 2 from the System Preferences item you can register again by choosing Login Options Add ScanSnap Manager 2 On Mac OS X v10 3 or v10 4 from the System Preferences item you can register again by choosing Accounts My Account...

Page 39: ...dobe Acrobat Preview etc is started up and the scanned image is displayed For details about the settings for the scanning file names and the destination folder to save the data etc refer to 3 4 Changing Scan Settings page 32 ATTENTION v Do not connect to the computer or disconnect from it other USB devices dur ing the scanning operation Do not close the paper chute cover nor press the POWER button...

Page 40: ... of the Application tab in the Scan and Save Settings dialog For details refer to 3 4 Changing Scan Settings on page 32 Scanned documents can also be saved in an image format JPEG In this case change the document scan settings before scanning the document For details about changing the document scan settings refer to 3 4 Changing Scan Settings on page 32 The following settings can be changed Appli...

Page 41: ...r The lamp on the scanner lights up and the scanner is turned on To turn off the scanner when the paper chute cover is opened and while the computer is being started press the POWER button on the scanner HINT When you turn off on the scanner press the POWER button for longer than one second To prevent a mis operation the POWER button does not work unless it is pressed for longer than one second AT...

Page 42: ... from your computer 3 Disconnect the AC cable from the power outlet HINT ScanSnap Manager is necessary for operating ScanSnap To start ScanSnap Manager from the Finder select the installed destination of ScanSnap generally Applications ScanSnap ScanSnap Manager Generally there is no need to exit ScanSnap Manager HINT The power of the scanner is controlled by turning on off the computer or opening ...

Page 43: ...gth 50 8 to 360 mm 2 to 14 17 in HINT Do not scan the following documents Documents with paper clips or staples Documents on which the ink is still wet Documents larger than Legal width 8 5 in length 14 in Documents smaller than 2 width x 2 length in Materials other than paper such as fabric metal foil or transparencies Documents thinner than 52 g m2 14 lb and thicker than 127 g m2 28 lb Carbon pa...

Page 44: ...o 6 2 Cleaning the Scanner Exterior Stacker page 79 Carbonless paper contains chemical substances that may damage the Pad ASSY or rollers e g Pick roller When scanning pay attention to the following Clean the Pad ASSY and rollers as frequently as possible Compared with scanning common office documents the scanner s service life may be shorter When scanning photos the photo surfaces may become scra...

Page 45: ...ded on the scanner is as follows A4 size paper or smaller that makes a document stack of 0 2 5 mm or less 50 sheets at 64 g m2 or 17 lb Before loading a stack of document onto the scanner fan it as follows 1 Separate the documents into stacks of 5 mm thick or less 2 Hold both ends of the document stack and bend the document stack into an arch HINT Scanning accuracy increases when the document is l...

Page 46: ...per chute cover Load the document so that the top side of the two sided document in the case of two or more document sheets the first page faces the paper chute cover Reduce the quantity of the documents when the thickness of the document stack exceeds the reference marks on the side guides HINT Before loading long documents first pull out the paper chute cover extension ABCDEFG ABCDEFG 1234567890...

Page 47: ...es and the guides the scanned images may be skewed HINT If you use the stacker scanned document sheets will not be scattered when they have passed through the scanner For details on how to attach the stacker to the scanner refer to Names and Functions of Parts on page 2 Use the stacker as follows 1 Pull out the stacker towards you while holding it by its handle 2 Insert your finger into the indent...

Page 48: ...image Application Folder to save scanned images to Save Scan mode draft scan high quality scan scan in color mode scan in B W mode setting for text only document automatically remove blank pages deskew images Scanning File format for the scanned image File option Size of the document to be scanned Paper size Size of the file when saving scanned images Compression HINT Depending on your version of ...

Page 49: ...ange the settings Operation 1 Click and hold the ScanSnap icon on the Dock menu and select Setting from the menu The Scan and Save Settings dialog box appears HINT You can open the Scan and Save Settings dialog box by simultaneously pressing the Command S keys on the keyboard This can be used only when ScanSnap Manager is active ...

Page 50: ...34 2 Change the scan settings on the Scan and Save Settings window The following describes the setting items of each of the tabs ...

Page 51: ...y saved as files Adobe Acrobat Adobe Acrobat Reader or Adobe Reader Preview HINT The above applications will be added automatically into the selection list if installed Uninstalled application will be removed from the list automatically Adobe Acrobat Macintosh version is supplied with this product If you select Scan to File only saves image data as files the scanned image is saved to file after sc...

Page 52: ...Click the Browse button and select either the alias file of the application to register or select the execution file app The destination of the selected application is displayed at Application Path Enter the name to be displayed at Name of Application The name you entered is displayed at Application 3 When you have finished the above setting click the OK button 4 The following screen is displayed ...

Page 53: ...n Settings screen appears Change the desired items 3 When you have finished click the OK button 4 The Add or remove application screen appears and the settings are changed Click the Close button to close the screen HINT When you add an application please select an application that is able to process files in following formats JPEG jpg PDF pdf Scanned images cannot be displayed properly unless thes...

Page 54: ... path to save images Specify the folder to save the scanned images to When you click the Browse button the Browse for Folder screen is displayed Select the folder to save the scanned images to and click the Choose button ...

Page 55: ...e name is displayed at the bottom of the screen Clicking the OK button enables the settings An example of the file name that you set is displayed under the File name format button HINT About Counter When there is no other file with the same name as the one specified at File Name in the save destination folder specified on the Save tab the counter becomes 1 001 in the case of three digits From then...

Page 56: ...quality Excellent Slower Select this mode when you wish to scan documents at the highest quality HINT Normal is equivalent to 150 dpi for color and 300 dpi for B W Fine is equivalent to 200 dpi for color and 400 dpi for B W Best is equivalent to 300 dpi for color and 600 dpi for B W and Excellent is equivalent to 600 dpi for color and 1200 dpi for B W Generally the higher the required scanning qua...

Page 57: ...text File sizes can also be kept smaller than in the color mode SCAN button Specifies whether to in Duplex or Simplex mode when the SCAN button on the scanner is pressed Option button With this item you can configure other scan related settings Clicking the Option button displays the following screen HINT In normal circumstances please use Auto Color Detection If this setting is specified there is...

Page 58: ...e removes only the backsides i e blank pages of one sided documents from the output images No scanned images are generated if all the sheets in the document stack are recognized as blank pages Allow automatic image deskew This setting automatically detects skewed documents and corrects them for the output data Up to 5 degrees of skews can be corrected ATTENTION The following types of documents may...

Page 59: ...g detailed settings of PDF files This button is enabled when PDF pdf is specified at File format Click Option button to display the following dialog Generate one PDF file per scan Creates a merged PDF file of all the scanned images For example when 2 pages are set in this option scanning 6 pages of documents creates 3 files ATTENTION JPEG setting is not available when Auto Color Detection or B W i...

Page 60: ...44 Generate one PDF file per x Page Creates a new PDF file at each set page ATTENTION When two or more files are created by one scanning only the first file is displayed on the screen ...

Page 61: ... to select the size The following paper sizes Width x Length can be selected Automatic detection Letter 8 5 in x 11 in Legal 8 5 in x 14 in A4 210 mm x 297 mm A5 148 mm x 210 mm A6 105 mm x 148 mm B5 182 mm x 257 mm B6 128 mm x 182 mm Post card 100mm x 148mm Business card 90 mm x 55 mm 55 mm x 90 mm Custom size up to 5 sizes can be registered HINT We recommend using Automatic detection ...

Page 62: ...n Enter the name under Name The entered name is displayed in Paper size 3 To complete the setting click the OK button 4 The custom document size will be registered Click Close to exit from the Add or Remove Custom sizes window When deleting a custom document size 1 In the Add or Remove Custom sizes window select the document size to be deleted and click the Remove button 2 The confirmation messsag...

Page 63: ...m the standard sizes except for custom document sizes described in the previous page Thus there is no need to specify Paper size again to match the size of the loaded document which makes ScanSnap easier to use ATTENTION When you select Automatic detection and load an A6 size document onto the scanner the document is scanned as Post card size Do not load documents with different sizes simultaneous...

Page 64: ... for the scanned image The compression rate is controlled by moving the slider The larger the compression rate number is specified the higher the compression rate is set and the smaller the file size becomes ATTENTION v As the compression rate increases the quality of scanned images dete riorates ...

Page 65: ...en a one sided color document is scanned File type PDF Paper size A4 Brochure Color mode Color Color mode B W unit Kbytes Compression rate Scan mode 1 2 3 4 5 Normal quality 1240 521 431 332 233 Better quality 2079 818 684 528 367 Best quality 4030 1485 1245 922 632 Excellent quality 11207 3776 3155 2437 1648 Compression rate Scan mode Normal quality 200 Better quality 242 Best quality 422 Excelle...

Page 66: ... Scanning Duplex scan Application Preview Adobe Acrobat or Adobe Reader can be selected if they are installed Image saving folder Pictures folder of Home Filename format Use Operating System Setting Scanning quality Normal Fastest Color mode Auto Color Detection automatically judges whether the document is color or black and white Scanning Option Brightness Normal Setting for text only document in...

Page 67: ...tarts scanning documents in Duplex mode If most of your documents are single side you can change the default scan to Simplex by following the procedure below Operation 1 Click and hold the ScanSnap icon and select Setting from the menu 2 Click the Scanning tab and select Simplex scan at SCAN button 3 Click OK button to close the window 4 Load the document onto the scanner 5 Press the SCAN button S...

Page 68: ...52 The document is scanned in Simplex mode HINT To return the setting to the Duplex mode select Duplex scan in step 2 above The selected setting is applied to future scans until it is changed again ...

Page 69: ...e documents are scanned in monochrome If you want to scan color documents in black white change the settings following the procedure below Operation 1 Click and hold the ScanSnap icon and select Setting from the menu 2 Click the Scanning tab and select B W at Color mode On the other hand if you want to scan all documents in color select Color 3 Click the OK button to close the dialog 4 Load the do...

Page 70: ...rdless of whether or not their backsides are printed Though the backsides of one sided documents are scanned they are recognized as blank and automatically removed so they will not appear in the output data To change the setting follow the procedure below Operation 1 Click and hold the ScanSnap icon and select Setting from the menu 2 Select the Scanning tab and click the Option button ...

Page 71: ... 4 Click the OK button to close the window The setting is enabled from the next scanning ATTENTION The following types of documents may be accidentally recognized as blank pages Almost blank documents containing only a few characters Documents of only one color including black and without any patterns lines or characters When you scan such documents clear the checkbox ...

Page 72: ...ically correct document skew To change the setting follow the procedure below Operation 1 Click and hold the ScanSnap icon and select Setting from the menu 2 Select the Scanning tab and click the Option button 3 Click the Allow automatic image deskew checkbox ...

Page 73: ... not work properly for the following kinds of documents Documents on which the pitches of lines or characters are extremely narrow or characters are overlapped Documents which have many outline characters or fonts of similar styles Documents with only a few characters Documents with many photographs or figures Documents with a background pattern behind the characters Documents with characters prin...

Page 74: ...entation of this PDF file with Adobe Acrobat When you want change the orientation of any other page follow the procedure below Operation 1 With Adobe Acrobat open the PDF file targeted for this operation 2 From the menu bar select View and click Rotate View then specifies the direction of the rotation In this case select Clockwise ...

Page 75: ...Various settings according to your needs ScanSnap fi 5110EOXM Operator s Guide 59 Basic Scanner Operations 3 3 The rotated result is shown HINT For details of this function please refer to Adobe AcrobatHelp ...

Page 76: ...r of pages For example you can scan a batch of filled forms and create a separate file for each To change the setting follow the procedure below Operation 1 Click and hold the ScanSnap icon and select Setting from the menu 2 Select the File option tab and click the Option button ATTENTION Make sure that PDF pdf is specified at File format ...

Page 77: ...ed at each set page number 4 Click the OK button to close the window The setting is enabled from the next scanning on HINT In Duplex mode one sheet of a document comprises two pages front back It is recommended that you select the Scanning tab Option button to clear the Allow automatic blank page removal checkbox If this function is enabled there may be gaps between the page numbers when the docum...

Page 78: ...rocedure Operation To continue scanning 1 Check the last page scanned in the Message window 2 Load the unscanned pages back onto ADF 3 Click Continue scanning button to restart the scanning To quit scanning 1 Click the Quit button The following window appears 2 Click Yes to delete the data that were scanned up to the interruption Otherwise click No to save the data that were scanned up to the inte...

Page 79: ...ccording to your needs ScanSnap fi 5110EOXM Operator s Guide 63 Basic Scanner Operations 3 ATTENTION The Continue Scanning button may be grayed out as in the example below In this case it is not possible to continue scanning ...

Page 80: ...crobat open the PDF file you wish to convert 2 Select Document Recognize Text Using OCR Start from the menu bar 3 In the following window configure the necessary settings then click the OK button The text information is added to the image data by the Recognize Text function ATTENTION Error may occur when data scanned at 600dpi or over are converted using Adobe Acrobat 7 0 0 To avoid this plese do ...

Page 81: ...ng ScanSnap Uninstallation removes the ScanSnap program files that were copied during the installation from the hard disk to restore the system environment to its original state This chapter describes how to uninstall ScanSnap 4 1 Uninstalling Supplied Programs 66 ...

Page 82: ...eferences 5 Select Login Items from the System Preferences screen This displays the Login Items screen which lists all the applications automatically opened during login 6 Select the application to uninstall To uninstall ScanSnap Manager Select ScanSnap Manager 7 Click the Remove button ScanSnap Manager is uninstalled 8 Close the Login Items screen 9 Log in as the computer Administrator From the F...

Page 83: ...en select the corresponding user on My Account 7 On the Accounts screen click Login Items Mac OS X v10 4 Startup Item Mac OS X v10 3 This displays the Login Items Mac OS X v10 4 Startup Items Mac OS X v10 3 screen which lists all the application automatically opened during login 8 Select the application to be deleted To uninstall ScanSnap Manager Select ScanSnap Manager from the Startup Items list...

Page 84: ...68 ...

Page 85: ...ap fi 5110EOXM Operator s Guide 69 Chapter 5 Troubleshooting This chapter describes how to remove jammed documents and troubleshoot other problems 5 1 Clearing Document Jams 70 5 2 Troubleshooting Checklist 72 ...

Page 86: ...ight be injured When removing the jammed document be careful not to get your necktie or necklace entangled in the scanner The surface of the ADF glass can become very hot during operation Take care not to get burned Operation 1 Remove the document on the paper chute cover 2 Pull the cover open lever to open the ADF cover HINT When cleaning the inside ot the scanner please follow the guidelines in ...

Page 87: ...eshooting 5 3 Remove the jammed document 4 Close the ADF cover You should hear the ADF cover click when it returns to its original position ATTENTION Make sure that the ADF is completely closed Otherwise paper jams or other feeding errors may occur Paper chute cover ADF cover ...

Page 88: ... chute cover Open the paper chute cover Has the Mac OS fully loaded This scanner s power is controlled by turning on off the computer Please wait until Mac OS X has started up completely The LED might be off when Mac OS X is starting up or in the sleep mode Did you press the POWER button to turn off the scan ner The scanner can be turned off by pressing the POWER button when the paper chute cover ...

Page 89: ...e scanner may not be recognized shortly after the power is turned on back Perform the following 1 Disconnect and re connect the AC cable and AC adapter If this does not change the state perform step 2 2 If a USB hub is being used directly connect ScanSnap to your computer If this does not change the state perform step 3 3 Restart your computer If none of the above operations resolves the problem u...

Page 90: ...age 88 Is the document stack thicker than 0 2 5mm Reduce the number of sheets in the document stack to no more than 0 2 5mm thick Paper is not fed stops midway Is the Pick roller dirty Clean the Pick roller following the instructions in 6 3 Cleaning the Inside of the Scanner page 80 Is the Pick roller worn Replace the Pick roller following the instructions in 7 3 Replacing the Pick Roller page 92 ...

Page 91: ...rees The Allow automatic image deskew function can correct skewed images up to 5 degrees Load the document onto the scanner so that the document skew does not exceed this limit Depending on the contents of the document the automatic image deskew may not work properly Refer to Allow automatic image deskew page 42 1 To confirm whether the scanner is connected with USB1 1 or USB2 0 click and hold the...

Page 92: ...76 ...

Page 93: ...r describes how to clean ScanSnap WARNING Fire Electric Shock Before you clean the scanner turn off the scanner and disconnect the AC adapter from the power outlet 6 1 Cleaning Materials 78 6 2 Cleaning the Scanner Exterior Stacker 79 6 3 Cleaning the Inside of the Scanner 80 ...

Page 94: ...e FUJITSU scanner dealer where you purchased the scanner 2 Any lint free cloth can be used Cleaning Materials Parts No Remarks Cleaner F1 CA99501 0013 1 bottle 100ml Moisten a cloth with this fluid and wipe the scanner clean 1 Lint free dry cloth Commercially available 2 ...

Page 95: ...th moistened with a small amount of Cleaner F1 isopropyl alcohol or any neutral detergent ATTENTION Do not use paint thinner or other organic solvents When cleaning prevent water or moisture from getting inside the scanner Do not use compressed air cause dirt and dust to enter the scanner which may result in scanner failure and malfunction Cloth Cleaner F1 or neutral detergent Paint thinner ...

Page 96: ...canned when the ink has not been sufficiently fixed on the paper Clean the ADF according to the following procedure Refer to the illustrations on the following page CAUTION The glass surface inside the ADF becomes hot during the scanner operation Before you start cleaning disconnect the AC adapter from the outlet and wait at least 15 minutes for the scanner to cool down 1 Pull the cover open lever...

Page 97: ...the ADF cover and the opposite side Wipe off the dirt gently Pick roller x 1 Wipe clean the roller while turning it with your finger be careful not to scratch the surface Take particular care in cleaning the Pick roller since black debris on the roller adversely affect the pickup performance Plastic rollers x 4 Clean them lightly while rotating the rollers with your finger Take care not to scratch...

Page 98: ...rollers Take particular care in cleaning the eject rollers since black debris on the rollers adversely affect the feed performance When the ADF cover is open and the SCAN button is held down pressing the POWER button once will rotate the Feed and Eject rollers by a certain angle Generally speaking six presses of the POWER button make the rollers rotate one full turn ATTENTION Power the scanner onl...

Page 99: ...Guide 83 Daily Care 6 3 Close the ADF cover You should hear the ADF click when it returns to its original position ATTENTION When closing the ADF cover make sure that it is completely closed Otherwise paper jams or other feeding errors may occur Paper chute cover ADF cover ...

Page 100: ...84 ...

Page 101: ...This chapter describes how to replace consumables WARNING Fire Electric Shock Before you replace the consumables turn off the scanner and disconnect the AC adapter from the power outlet 7 1 Replacing Consumables 86 7 2 Replacing the Pad ASSY 88 7 3 Replacing the Pick Roller 92 ...

Page 102: ...replacement cycles are based on A4 Letter sized paper free of wood fibers 64 g m2 17 lb Depending on the actual paper used the replacement cycles may vary Use only the consumables specified by PFU LIMITED Do not use consumables and parts made by other manufacturers No Description P N Suggested Replacement Cycle 1 fi 5110EOX Pad ASSY PA03360 0002 50 000 sheets or one year 2 fi 5110EOX Pick roller P...

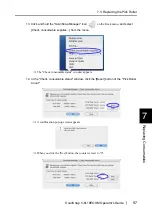
Page 103: ...nSnap Manager icon on the Dock menu 2 Click Check consumable supplies on the menu The Check consumable status screen appears This screen indicates how many times consumables have been used Replace consumables using Target value to change supplies as guidelines For details about purchasing consumables visit the website below or contact the Fujitsu scanner dealer where you purchased your scanner Web...

Page 104: ...e procedure below 1 Remove the documents on the paper chute cover 2 Pull the cover open lever to open the ADF cover 3 Remove the Pad ASSY Pinch both ends of the Pad ASSY and pull it out as shown below ADF cover Cover open lever Paper chute cover ADF cover Pad ASSY ...

Page 105: ...bles 7 4 Attach the new Pad ASSY 5 Close the ADF cover You should hear the ADF click when it returns to its original position ATTENTION Make sure that the Pad ASSY is firmly attached Otherwise document jams or other feeding errors may occur Pad ASSY ADF cover Paper chute cover ADF cover ...

Page 106: ...nap Manager icon on the Dock menu and select Check consumable supplies from the menu The Check consumable status window will appear 8 In the Check consumable status window click the Reset button of the Pad ASSY Count A confirmation pop up screen appears ...

Page 107: ...7 2 Replacing the Pad ASSY ScanSnap fi 5110EOXM Operator s Guide 91 Replacing Consumables 7 When you click the Yes button the counter is reset to 0 ...

Page 108: ... below 1 Remove the documents on the paper chute cover 2 Open the ADF while pulling the cover open lever 3 Remove the sheet guide Pinch the handle and claw together on both sides of the sheet guide and take it out ADF cover Cover open lever Paper chute cover Handle Sheet guide Claw ...

Page 109: ...part of the shaft and raise it to remove the shaft from the scanner while pulling the shaft to the left ATTENTION If the area around the Pick roller is contaminated by paper debris it may cause scanning errors Remove the dirt using a dry cloth moistened with Cleaner F1 Do not use water neutral detergent or aerosol spray Pick roller bushing Pick roller Pick roller shaft Pick roller shaft Pick rolle...

Page 110: ...e new Pick roller to the shaft Insert the new Pick roller aligning the protrusion with the slot on the Pick roller ATTENTION If you use your fingernail to pull up the picker roller tab your fingernail may get cracked or chipped Instead you can use a clip to do that Shaft Tab Pick roller 1 2 Shaft Protrusion Pick roller ...

Page 111: ...ight end of the shaft to the roller bushing right and set the shaft to the slot while lowering it 9 Rotate the roller bushing on the left by rotating it as shown below ATTENTION Make sure that the Pick roller is fully attached Otherwise document jams or other feeding errors may occur Pick roller Pick roller shaft Pick roller Pick roller shaft Pick roller bushing ...

Page 112: ...e makes a clicking sound when the claws settle into position 11 Close the ADF You should hear the ADF click when it returns to its original position 12 Turn on the scanner ATTENTION Make sure that the sheet guide is fully attached Otherwise document jams or other feeding errors may occur Handle Sheet guide Claw Paper chute cover ADF cover ...

Page 113: ...e ScanSnap Manager icon on the Dock menu and select Check consumable supplies from the menu The Check consumable status window appears 14 In the Check consumable status window click the Reset button of the Pick Roller Count A confirmation pop up screen appears When you click the Yes button the counter is reset to 0 ...

Page 114: ...98 ...

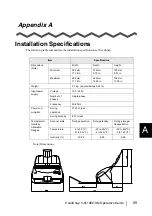
Page 115: ...5 91 in Maximum 284 mm 11 18 in 480 mm 18 90 in 302 mm 11 89 in Weight 2 7 kg approxiamtely 5 95 lb Input power supply Voltage 100 240 V Number of phases Single phase Frequency 50 60 Hz Power con sumption During operation 27 W or less During standby 8 W or less Temperature Humidity Allowable Ranges Scanner state During operation During standby During storage transportation Temperature 5 to 35 C 41...

Page 116: ...100 ...

Page 117: ...aning cycle 80 Cleaning Materials 78 Cleaning the ADF 80 Clearing Document Jams 70 Color scanning 41 Compression rate 48 Compression tab 48 Connecting ScanSnap 16 Connecting the AC adapter 16 Connecting the USB Cable 17 Consumables 86 Correcting skewed documents 56 Cover open lever 2 Custom size 46 D DAILY CARE 77 default settings 50 deskew 42 Document types 27 E Excellent quality 40 F File name s...

Page 118: ...a PDF file 58 S Safety Precautions xi Save tab 38 Saving scanned images as different files 60 Scan and Save Settings 33 SCAN button 3 Scanning color document in black and white 53 Scanning only one side of a document 51 Scanning tab 40 Select application 35 Select color mode 41 Select scanning mode 40 Selecting the file option 43 Setting for text only document 42 Side guide 2 31 Skipping blank pag...

Page 119: ...ct the store where you purchased your FUJITSU fi series image scanner or an authorized service provider The user must not perform any repairs on the scanner Repair parts for this scanner are retained for five years after discontinuation of this product Repairs ...

Page 120: ...104 ...

Page 121: ... this manual and any claims by a third party z Copying of the contents of this manual in whole or in part and copying of the scanner application is forbidden under the copyright law z Missing or wrongly collated pages will be supplied free of charge ScanSnap fi 5110EOXM Operator s Guide P3PC 1412 02ENZ0 Date of issuance Aug 2005 Issuance responsibility PFU LIMITED ...

Reviews: