4.2 Administrator Login
80
4.2.2 Setting up for Administrator Access via the Admin Tool
This section describes the required settings for logging in via the Admin Tool.
■
Checking the Internet Explorer Cache Settings
Check the Internet Explorer cache settings.
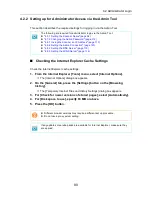
1. From the Internet Explorer [Tools] menu, select [Internet Options].
D
The [Internet Options] dialog box appears.
2. On the [General] tab, press the [Settings] button on the [Browsing
history].
D
The [Temporary Internet Files and History Settings] dialog box appears.
3. For [Check for newer versions of stored pages], select [Automatically].
4. For [Disk space to use], specify 63 MB or above.
5. Press the [OK] button.
The following are required for administrator login via the Admin Tool:
z
"4.5.1 Setting the Scanner Name" (page 94)
z
"4.7.3 Changing the Admin Password" (page 112)
z
"4.8.1 Giving the Scanner an IP Address" (page 113)
z
"4.8.8 Setting the Admin Connection" (page 123)
z
"4.8.2 Setting the DNS Server" (page 115)
z
"4.8.3 Setting the WINS Server" (page 116)
z
Different browser versions may require a different set up procedure.
z
Do not use a proxy server setting.
If any updates or service packs are available for Internet Explorer, make sure they
are applied.
Summary of Contents for ScanSnap N1800
Page 1: ...ScanSnap N1800 Network Scanner Operator s Guide P3PC 3182 01ENZ0 ...
Page 17: ...17 ...
Page 29: ...29 ...
Page 55: ...55 ...
Page 65: ...65 ...
Page 73: ...73 ...
Page 271: ...271 7 Press the Back button D The Central Admin Console main window appears again ...
Page 355: ...355 D The Main Menu window is shown again ...
Page 415: ...415 ...
Page 441: ...441 ...
Page 481: ...481 ...
Page 492: ...492 Appendix D Scanner Specifications This appendix gives specifications for the scanner ...
Page 527: ...527 ...
Page 528: ...528 Appendix G Glossary ...
Page 533: ...533 ...
Page 535: ...535 ...

