Button Settings (For USB Connection)
Specify an image scanning application to be launched when the scan/stop button is pressed.
The procedure when the scanner is connected via a USB cable is as follows.
1
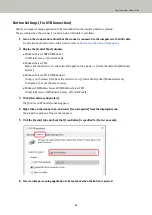
Turn on the scanner and confirm that the scanner is connected to the computer via the USB cable.
For details about how to turn on the scanner, refer to
How to Turn the Power ON (page 29)
.
2
Display the [Control Panel] window.
●
Windows Server 2008 R2/Windows 7
Click [Start] menu → [Control Panel].
●
Windows Server 2012
Right-click the Start screen, and select [All apps] on the app bar → [Control Panel] under [Windows
System].
●
Windows Server 2012 R2/Windows 8.1
Click [↓] on the lower left side of the Start screen → [Control Panel] under [Windows System].
To display [↓], move the mouse cursor.
●
Windows 10/Windows Server 2016/Windows Server 2019
Click [Start] menu → [Windows System] → [Control Panel].
3
Click [View devices and printers].
The [Devices and Printers] window appears.
4
Right-click on the scanner icon, and select [Scan properties] from the displayed menu.
The properties window of the scanner appears.
5
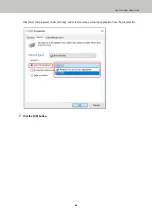
Click the [Events] tab and check that [Scan Button] is specified for [Select an event].
6
Select an image scanning application to be launched when the button is pressed.
How to Perform a Basic Scan
43
Summary of Contents for SP-1130Ne
Page 1: ...P3PC 7082 01ENZ2 FUJITSU Image Scanner SP 1130Ne Operator s Guide ...
Page 35: ...2 Lift up the stacker extension 1 towards you Basic Operations 35 ...
Page 36: ...3 Lift up the stacker extension 2 towards you Basic Operations 36 ...
Page 126: ...4 Click the OK button The password is set Scanner Settings Software Operation Panel 126 ...
Page 128: ...The password is cleared Scanner Settings Software Operation Panel 128 ...
Page 130: ...4 Click the OK button The password is set Scanner Settings Software Operation Panel 130 ...
Page 141: ...Outer Dimensions The outer dimensions are as follows Unit mm in Appendix 141 ...


