background image

Important notes

Protecting the display screen

Do not pour liquids on the device or wash it with a heavily soaked cloth. Do not
place items on the top of the screen, or damage may occur.

During normal use of the device, small particles from the environment
can become embedded in the pen tip and scratch the screen. The
warranty does not cover a scratched screen.

Energy saving

Notes

Energy

Energysaving

Switch off your Tablet PC if you do not need to use it. Switch off connected external devices
if you are not using them. If you use the energy saving functions, the Tablet PC uses less
power. You will then be able to work for longer before having to recharge the battery.

Power ef

fi

ciency is increased and environmental pollution reduced. You

save money and help protect the environment.

Energy saving under Windows

Make use of the power management features (see "

"Using the power-management features",

Page 32

").

Fujitsu

13

Summary of Contents for STYLISTIC Q5010

Page 1: ...System Operating manual FUJITSU Tablet STYLISTIC Q5010 ...

Page 2: ... found on the Internet at http www fujitsu com fts You can find driver updates at http support ts fujitsu com download Should you have any technical questions please contact our Hotline Service Desk http support ts fujitsu com contact servicedesk Your sales partner Your sales office We hope you enjoy working with your new Fujitsu system ...

Page 3: ......

Page 4: ...chnology Solutions GmbH Mies van der Rohe Straße 8 80807 Munich Germany http www fujitsu com fts Copyright Fujitsu Technology Solutions GmbH 2020 All rights reserved Publication Date 08 2020 Order No A26391 K498 Z320 1 7619 edition 1 ...

Page 5: ... Important notes 12 First time setup of your device 16 Working with the Tablet PC 19 Accessories for your Tablet PC optional 38 Security functions 53 Connecting external devices 60 Settings in BIOS Setup Utility 65 Troubleshooting and tips 67 Technical data 76 Manufacturer s notes 80 Index 81 ...

Page 6: ...ntries Microsoft and Windows are trademarks or registered trademarks of Microsoft Corporation in the USA and or other countries Bluetooth and the Bluetooth logo are registered trademarks of Bluetooth SIG Inc Adobe Reader is a trademark of Adobe Systems Incorporated USB Type C and USB C are trademarks of the USB Implementers Forum in the USA and other countries All other trademarks specified here a...

Page 7: ...Tablet PC 21 Programming the ON OFF button 21 Switching the Tablet PC off 22 Handwriting recognition 22 Touch screen 22 Select display orientation portrait or landscape orientation 24 Use the touch screen 24 Using fingers 24 Using the stylus pen 25 Tablet buttons 29 Camera 30 Rechargeable battery 31 Charging and maintaining the battery 31 Using the power management features 32 Memory cards 32 Supp...

Page 8: ...ecting external devices 60 Connecting an external monitor 60 Display port cradle only 60 VGA monitor port cradle only 61 Connecting USB devices 62 USB port with charging function USB Type C 63 How to remove USB devices correctly 63 Headphones microphone Line In Line Out headset combination port 64 Settings in BIOS Setup Utility 65 Starting the BIOS Setup Utility 65 Operating the BIOS Setup Utility...

Page 9: ...uickly 73 Acoustic warnings 73 Error messages on the screen 73 Restoring the system under Windows 10 75 Technical data 76 Tablet PC 76 Screen resolutions for integrated screen and external screens 77 Rechargeable battery 77 Mains adapter 36 W for the Tablet PC with without the keyboard docking 78 Mains adapter 90 W for the Tablet PC with cradle 78 Cradle optional 79 Keyboard dock optional 79 Manuf...

Page 10: ...Contents 6 Fujitsu ...

Page 11: ...authorised use Information on the connections and controls for your Tablet PC can be found in chapter Ports and controls Page 9 Further information The Windows drivers for your device can be found on our Internet site The factory installation of your device does not support any other operating system Fujitsu Technology Solutions accepts no liability whatsoever if any other operating system is used...

Page 12: ...e123 or a command used to start a program start exe This font indicates information that is displayed on the screen by a program e g Installation is complete This font indicates terms and texts used in a software interface e g Click on Save names of programs or files e g Windows or setup exe This font indicates cross references to another section e g Safety information cross references to an exter...

Page 13: ...u an overview of the device s indicators and connections Please familiarise yourself with these components before you start to work with the device Front 4 5 1 1 3 2 7 6 6 1 Loudspeaker 2 Ambient light sensor 3 Camera 4 Camera LED 5 Power on indicator 6 Mechanical fixture for keyboard dock cradle 7 Docking port Fujitsu 9 ...

Page 14: ...slot configuration dependent protected by cover 4 Memory card slot protected by cover 5 USB port 3 2 Gen1 USB Type A protected by cover 6 Rechargeable battery reset button protected by cover 7 USB port 3 2 Gen1 USB Type C with charging function and Display port Protected by cover 8 Combined headphone and microphone port 9 Pen slot 10 Eyelet for the optional pen cord 10 Fujitsu ...
Page 15: ... controls Top side view 1 2 3 4 5 1 ON OFF button 2 Volume up button 3 Volume down button 4 Shortcut button 5 Microphone Rear 1 2 3 1 Camera light 2 Camera 3 Fingerprint sensor configuration dependent Fujitsu 11 ...

Page 16: ...ed in the Safety Regulations manual This Tablet PC complies with the relevant safety regulations for data processing equipment If you have questions as to whether you can set up the Tablet PC in the intended environment please contact your sales point or our hotline help desk Additional safety notes for devices with wireless components Wirelesscomponent WirelessLAN Bluetooth safetynotes If a wirel...

Page 17: ...reen Energy saving Notes Energy Energysaving Switch off your Tablet PC if you do not need to use it Switch off connected external devices if you are not using them If you use the energy saving functions the Tablet PC uses less power You will then be able to work for longer before having to recharge the battery Power efficiency is increased and environmental pollution reduced You save money and hel...

Page 18: ...mains voltage If this is not the case obtain the appropriate mains adapter for your Tablet PC Do not use any other voltage converter Check whether the local mains voltage and the power cable are compatible If this is not the case buy a power cable that matches the local conditions Ask the appropriate government office for your travel destination whether you may use your Tablet PC with its installe...

Page 19: ...intwork or the Tablet PC itself Please ensure that no liquid enters the Tablet PC The touchscreen is very sensitive to scratches Only clean the display surface with a very soft slightly damp cloth Switch the Tablet PC off Cleaning Notes TabletPC Keyboard Touchpad Touchscreen The casing surfaces may be cleaned with a dry cloth If particularly dirty use a damp cloth that has been dipped in water mix...

Page 20: ...ovides the device with the necessary power You can increase the operating time by using the available energy saving functions For instructions on how to connect external devices e g mouse printer to your Tablet PC please refer to the operating manual for your device The first time the device is switched on a system message may appear Battery is low Please charge the battery System shutdown in 30s ...

Page 21: ...ubber feet of the device may mark certain types of delicate surfaces Keep other objects at least 100 mm 4 inches away from the device and its mains adapter to ensure adequate ventilation Do not expose the device to extreme environmental conditions Protect the device against dust moisture and heat Mains adapter connecting Preparingforoperation Mainsadapter Observe the safety notes in the enclosed S...

Page 22: ...r to use your device for the first time the operating system is pre installed on the hard disk 2 1 Press the ON OFF button 1 for about one second to switch the device on The power on indicator 2 lights up as long as the system is switched on During installation follow the instructions on screen If a Windows operating system is installed on your device you will find more information on the system a...

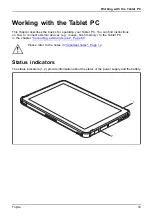
Page 23: ... find instructions on how to connect external devices e g mouse flash memory to the Tablet PC in the chapter Connecting external devices Page 60 Please refer to the notes in Important notes Page 12 Status indicators Statusindicators Symbols The status indicators 1 2 provide information about the status of the power supply and the battery 2 1 Fujitsu 19 ...

Page 24: ...ll not be started When the state of charge of the battery is less than 90 the battery will be charged to 100 as soon as the mains adapter is connected The indicator light is orange The battery is being charged The indicator is not lit The battery is not being charged the battery is already more than 90 charged or the mains adapter is not connected The indicator flashes orange Rechargeable battery ...

Page 25: ... lights up as long as the system is switched on Programming the ON OFF button You can program the ON OFF button Operating system Menu Windows 10 Control Panel Hardware and Sound Power Options If you have assigned a password you must enter this when requested to do so in order to start the operating system Detailed information can be found in the chapter Security functions Page 53 Fujitsu 21 ...

Page 26: ...ns for integrated screen and external screens Page 77 High quality LCD screens TFT are installed in Fujitsu Tablet PCs For technical reasons these screens are manufactured for a certain resolution An optimum and sharp image can only be ensured with the resolution intended for the particular screen A screen resolution which differs from the specification can result in an unclear image The screen re...

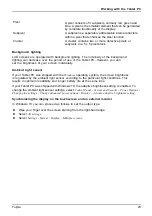
Page 27: ...ent light sensor If your Tablet PC was shipped with the Windows operating system the screen brightness is regulated by the ambient light sensor according to the particular light conditions This results in optimum readability and longer battery life at the same time If your Tablet PC was shipped with Windows 10 the adaptive brightness setting is enabled To change the ambient light sensor settings s...

Page 28: ...ot just affect the screen settings on the Tablet PC but also those on externally connected monitors Use the touch screen You can execute commands as follows using the stylus pen supplied with your device using your fingers Using fingers You can execute certain commands by using your finger tip on the touchscreen of your device Everything which you can select or activate using your finger tip can a...

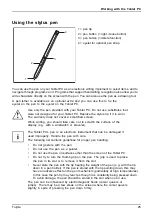
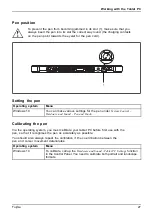
Page 29: ...ay e g with a wristwatch or bracelet The Tablet PC s pen is an electronic instrument that can be damaged if used improperly Handle the pen with care The following list contains guidelines for proper pen handling Do not gesture with the pen Do not use the pen as a pointer Do not use the pen on surfaces other than the screen of the Tablet PC Do not try to turn the thumb grip on the pen The grip is u...

Page 30: ...ry with the pen tip Starting programs Double click with the left hand mouse button Briefly touch the program icon twice with the pen tip Moving an object window Drag with the left hand mouse button held pressed Place the pen tip directly on the object window Hold the pen tip pressed against the screen Move the desired object window Opening a context menu Click with the right hand mouse button Plac...

Page 31: ...e pen under System Control Hardware and Sound Pen and Touch Calibrating the pen Via the operating system you must calibrate your tablet PC before first use with the pen so that it recognises the pen as accurately as possible You should also always repeat the calibration if the co ordination between the pen and cursor movement deteriorates Operating system Menu Windows 10 To calibrate call up the H...

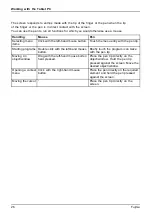
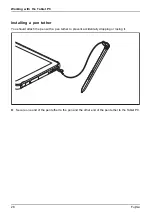
Page 32: ... PC Installing a pen tether You should attach the pen with a pen tether to prevent accidentally dropping or losing it Secure one end of the pen tether to the pen and the other end of the pen tether to the Tablet PC 28 Fujitsu ...
Page 33: ...scription Functions 2 Volume up button Increase the volume 3 Volume down button Decrease the volume 4 Shortcut button Start function manager or screen shot function If the ON OFF switch of the Tablet PC is pressed in combination with the volume down button this corresponds to the function of the key combination Ctrl Alt Del on a keyboard Fujitsu 29 ...

Page 34: ... being used You can only use the camera with a particular application e g an Internet telephony program or a video conferencing program which supports a camera When using the camera the Tablet PC support must not shake The camera automatically adjusts itself to the current light level For this reason the touchscreen may flicker while the light level is adjusted Further information on use of the ca...

Page 35: ...mum temperature of 35 C 95 F You can charge the battery by connecting the Tablet PC to the mains adapter see Mains adapter connecting Page 17 If the mains adapter is connected when the state of charge of the battery is more than 90 charging will not be started When the state of charge of the battery is less than 90 the battery will be charged to 100 as soon as the mains adapter is connected If the...

Page 36: ...re held in the main memory or in a swap file on the hard disk Never switch off the Tablet PC while it is in a power saving mode If the built in battery is nearly flat close the open files and do not go into power saving mode If you do not intend to use your Tablet PC for a long period of time Exit the power saving mode if necessary via touching the screen or by switching on the Tablet PC Close all...

Page 37: ... Memorycard Close the slot cover 3 Removing the memory card Memorycard To avoid any loss of data always follow the correct procedure for removing the card see the documentation for your operating system 2 1 3 Open the slot cover 1 Press the edge of the memory card so that the memory card will jump part of the way out of its slot Pull the memory card out of the slot in the direction of the arrow 2 ...

Page 38: ...ur network provider Please note that the SIM card format must be micro SIM 3FF Other SIM card formats such as full size 1FF mini SIM 2FF or nano SIM 4FF do not fit in the SIM card slot of your tablet PC Please do not insert any other format of SIM card as they could twist or even damage the system Inserting the SIM card 3 4 2 1 Open the slot cover 1 Pull the SIM card holder out of the slot 2 Inser...

Page 39: ...t PC Removing the SIM card 3 4 2 1 Open the slot cover 1 Pull the SIM card holder out of the slot 2 Remove the SIM card from the SIM card holder 3 Push the SIM card holder back into the slot 4 Close the slot cover Fujitsu 35 ...

Page 40: ...on for your operating system Access via LTE configuration dependent If you ordered an integrated LTE module with your system you can enjoy optimum reception and maximum energy efficiency without awkward cables or antennas An installed LTE module is ready for immediate use If you did not order an LTE module you can purchase the accessories for LTE reception from your retailer or your Fujitsu Techno...

Page 41: ...etwork cable to the LAN port of the accessory 1 Connect the network cable to your network connection 2 Your network administrator can help you to configure and use the LAN connections The network cable is not included in the delivery scope This type of cable can be obtained from a specialist dealer Use a shielded network cable CAT 5e GPS GPS Whether your device has this function or not depends on ...

Page 42: ... Tablet PC Cradle for charging the Tablet PC and with additional ports Keyboard dock with LAN port and keyboard Protective TPU folio case with shoulder and hand straps Folio protective cover Adapter cable USB Type C HDMI USB LAN adapter cable The following sections provide more information on handling the accessories 38 Fujitsu ...
Page 43: ... Tablet PC is mounted on the cradle only USB cables with a length of up to 3 m are supported at all the USB ports Cradle components Ports Ports Cradle 1 3 2 4 9 5 6 7 8 1 Release button 2 Status LED 3 Connector on the cradle for the docking port of the Tablet PC 4 USB 3 2 Gen1 port Type A 5 VGA monitor port 6 Display port 7 LAN port 8 Security Lock device 9 DC input connector DC IN The status LED ...

Page 44: ...fore setting it up Follow the instructions below when doing so Place the cradle on a flat stable nonslippery surface Never place the cradle and the mains adapter on a heat sensitive surface Do not expose the cradle to extreme environmental conditions Protect the cradle from dust humidity and heat 40 Fujitsu ...
Page 45: ... mains adapter from the mains socket Pull the mains adapter cable out of the DC jack DC IN of the Tablet PC 1 2 3 4 Position the Tablet PC so that it lies on the surface of the tray on the cradle Push the tablet PC onto the cradle in the direction of the arrow 1 until you feel it engage in the connector and until the release button has returned to its original position Plug the DC output connector...

Page 46: ...rate the Tablet PC from the cradle during operation 2 1 Push the release button in the direction of the arrow 1 until it remains in the pressed position red marking becomes visible While holding the bottom part of the cradle lift the Tablet PC away from the cradle in the direction of the arrow 2 42 Fujitsu ...

Page 47: ...s a device which has been optimised for convenient input of texts and allows connection to an Ethernet LAN You only need to dock the Tablet PC Components of the keyboard dock Keyboarddock Ports 1 3 2 1 Release button 2 LAN port on the rear 3 Docking port for the Tablet PC Fujitsu 43 ...

Page 48: ...board dock as shown 2 a 4 3 1 Open the cover of the DC jack socket a Press the tablet PC onto the keyboard dock in the direction of the arrow 1 until you feel it engage on the connector Connect the mains adapter cable to the DC input connector DC IN on the Tablet PC 2 Connect the power cable to the power adapter provided for the tablet PC 3 see chapter Technical data Page 76 Plug the power cable i...

Page 49: ...eyboard dock during operation To prevent problems we recommend that you undock the Tablet PC using the appropriate function in the operating system 1 2 Press and hold the release button 1 until it remains in the pressed position red marking becomes visible Lift the Tablet PC away from the keyboard dock in the direction of the arrow 2 Fujitsu 45 ...

Page 50: ...te commands They correspond to the buttons on a conventional mouse You can also deactivate the touchpad via the keyboard so that you cannot move the cursor unintentionally see chapter Key combinations Page 51 Moving the pointer Move your finger on the touchpad Touchpad The pointer will move Selecting an item Move the pointer to the item you wish to select Touchpad Tap the touchpad once or press th...

Page 51: ... item Touchpad Press and hold the left button and with your finger on the touchpad drag the item to the desired position The item will be moved Switching the Touchpad on and off You can switch the touchpad on and off using the keyboard see Key combinations Page 51 Fujitsu 47 ...

Page 52: ...th key combinations The following description of keys refers to Windows Additional functions supported by the keys are described in the relevant manuals supplied with your application programs The figure below shows how to access the different characters on keys with overlaid functions The example applies when the Caps Lock key has not been activated The illustrations shown below may differ from y...

Page 53: ...s Lock function simply press the Caps Lock key again Shiftkey CapsLock Shift key The Shift key causes uppercase characters to appear In the case of overlay keys the character printed on the upper left of the key appears when that key is pressed Shiftkey Shift Fn key The Fn key enables the special functions indicated on overlay keys see Key combinations Page 51 Fnkey Cursor keys The cursor keys mov...

Page 54: ...f each key If you have switched on the virtual numeric keypad you can output the characters shown on the upper right of the keys The keyboard layout shown below may differ from your actual device 1 Valid characters when the Num key is not activated 2 Valid characters when the Num key is activated Further information about the status indicators can be found in chapter Status indicators Page 19 Coun...

Page 55: ...f This key combination switches the touchpad and the touchpad buttons on or off Fn F4 Touchpad Touchpadbuttons Touchpad Decrease screen brightness This key combination decreases the brightness of the screen Fn F67 LCDscreen Screenbrightness Increase screen brightness This key combination increases the brightness of the screen Fn F7 Screenbrightness Decrease volume This key combination reduces the ...

Page 56: ...rity Task Manager This key combination opens the Windows security Task Manager window Ctrl Alt Del Back tab This key combination moves the cursor back to the previous tab stop Shift Tab Backtab Key combinations using the Windows keys are detailed in the manual for your operating system In addition the following non labelled key combinations are supported Fn S Pause Fn B Break Fn R SysRq 52 Fujitsu...

Page 57: ...tting your password you may be locked out and unable to access your data Therefore please note the following information Back up your data on external data carriers at regular intervals Some security functions need you to choose passwords Make a note of the passwords and keep them in a safe place If you forget your passwords you will need to contact the our Service Desk Deletion or resetting of pa...

Page 58: ...int sensor can record an image of a fingerprint With additional fingerprint software this image can be processed and used instead of a password 1 You must install the fingerprint software in order to be able to use the fingerprint sensor 1 The current AuthConductor Basic software for the fingerprint sensor is available on the Internet at https www fujitsu com emeia solutions business technology se...

Page 59: ...Setup Utility Before using the various options for password protection in the BIOS Setup utility to increase data security please observe the following Make a note of the passwords and keep them in a safe place If you forget your supervisor password you will not be able to access your Tablet PC Deletion of the password is not covered by your warranty and a charge will be made for assistance Passwo...

Page 60: ...ked to enter a password Enter the password and press the Enter key Confirm new Password requires you to confirm the password Enter the password again and press the Enter key Changes have been saved is a confirmation that the new password has been saved To set the user password select Set User Password and proceed exactly as when configuring the supervisor password If you do not want to change any ...

Page 61: ... With the supervisor password you have set in the BIOS Setup Utility see section Setting supervisor and user password Page 56 you can also prevent starting of the operating system Operatingsystem Activating system protection Start the BIOS Setup Utility and go to the Security menu Operatingsystem Select the Password on Boot option and press the Enter key Select the desired option First Boot or Eve...

Page 62: ...to delete the holder in the TPM By clicking on Enabled all secret keys e g SRK Storage Root Keys AIK Attestation Identity Keys etc generated by applications are deleted Please note that you will then no longer be able to access the data you have encrypted with the keys based on that holder In the Exit menu choose the option Exit Saving Changes Press the enter key and select Yes The tablet PC resta...

Page 63: ...BIOS Setup Call BIOS Setup and select the Advanced menu Mark Boot Configurations and press the enter key From the UEFI Boot On Screen Keyboard selection choose the option Enabled In the Exit menu choose the option Exit Saving Changes Press the enter key and select Yes The tablet PC is rebooted and the password dialogue is displayed Tap on the password field to enable the on screen keyboard Fujitsu...

Page 64: ...to the documentation supplied with the external device Some of the external devices require special drivers see the operating system and external device documentation Connecting an external monitor Display port cradle only Displayport The display port of the cradle can be used to connect a display LCD TV or a plasma TV with an appropriate port The screen output is limited to a maximum of two exter...

Page 65: ...creenport Monitorport Switch off the Tablet PC and the external monitor Plug the data cable of the external monitor into the monitor port First switch on external monitor and then the Tablet PC You can also switch back and forth between the external monitor and the LCD screen of the Tablet PC see Touch screen Page 22 You can display the same picture on the external monitor and the LCD screen of th...

Page 66: ...0 has a data transfer rate of up to 480 Mbit s USB 3 0 has a data transfer rate of up to 5 Gbit s USB 3 2 Gen1 has a data transfer rate of up to 5 Gbit s With USB 3 2 generation 2 the data transfer rate is up to 10 Gbit s Additional information can be found in the documentation for the USB devices Connect the data cable to the external device Connect the data cable to the USB port on the Tablet PC...

Page 67: ... in BIOS Setup Utility Page 65 section USB devices are hot pluggable This means you can connect and disconnect the cables of USB devices while the system is running Additional information can be found in the documentation for the USB devices Connect the data cable to the external device Connect the data cable to a USB port USB Type C of the Tablet PC How to remove USB devices correctly Always corr...

Page 68: ...one or external loudspeakers to your Tablet PC Connect the audio cable to the external device Connect the audio cable to the headphone port of the Tablet PC The internal loudspeakers are disabled If you buy a cable from a retailer please note the following information The headphones microphone Line In Line Out headset combi port on your Tablet PC is a 3 5 mm jack socket If you want to connect head...

Page 69: ...he start up sequence Exit Exits the BIOS Setup Utility Starting the BIOS Setup Utility Press and hold the volume down button and switch the tablet PC on BIOSSetupUtility If a password has been assigned enter the password and press the Enter key If you have forgotten the password contact your system administrator or contact our customer service centre The BIOS Setup Utility starts Operating the BIO...

Page 70: ...standard entries for all menus of the BIOS Setup Utility choose Load Setup Defaults and Yes Discard Changes Discard changes without exiting the BIOS Setup Utility To discard the changes you have made select Discard Changes and Yes The settings in place when BIOS Setup Utility was called remain effective You can now make additional settings in the BIOS Setup Utility If you want to exitBIOS Setup Ut...

Page 71: ...s Any changes you have made to the hardware or software after receiving the Tablet PC Any changes you have made to the BIOS Setup settings after receiving the Tablet PC Your system configuration and all peripheral devices connected to your system Your sales contract Our Tablet PCs have been designed primarily with mobile applications in mind This means that considerable effort has been made to opt...

Page 72: ...e previous section Disconnect the mains adapter from the device Use a small pointed tool with caution to press the battery reset button The device performs a reset comparable to removing the battery You can then restart it Help if problems occur Should you encounter a problem with your computer that you cannot resolve yourself Note the ID number of your device The ID number is found on the type ra...

Page 73: ... PC to a mains outlet using the mains adapter Note The battery will only be charged again when the battery capacity is less than 90 The Tablet PC s touchscreen remains dark Touchscreen touchscreenistoodark Cause Troubleshooting Touchscreen is switched off Press a key external keyboard or tap on the touchscreen External monitor or television set connected Check whether the graphics driver settings ...

Page 74: ...y into the external monitor and into the power socket Check whether the data cable is properly connected to the Tablet PC and the external monitor if it is plugged in with a connector Switch on the Tablet PC and the external monitor The external monitor is blank or the image is unstable Screen Monitor Cause Troubleshooting The wrong external monitor has been selected or the wrong screen resolution...

Page 75: ...the Tablet PC The power adapter is not connected correctly Check whether the mains adapter is connected correctly to the Tablet PC Switch on the Tablet PC The Tablet PC stops working TheTabletPC Energysavingmode Cause Troubleshooting The Tablet PC is in energy saving mode Leave energy saving mode An application programme has caused the malfunction Close the application program or restart the Table...

Page 76: ...hat the data cable connecting the Tablet PC to the printer is properly connected Check whether the correct printer driver is loaded refer to the printer documentation The wireless connection to a network does not work Thewirelessconnectiontoanetworkdoesnotwork Cause Troubleshooting The wireless component is disabled Switch the wireless component on see Switching the wireless components on and off ...

Page 77: ...mum brightness may have been set for the screen Reduce the brightness of the screen to lower energy consumption You will find the setting under Control Panel Hardware and Sounds Windows Mobility Center Acoustic warnings Acousticerrormessages Errors Cause Troubleshooting A beep sounds every few seconds The battery is almost flat Charge the battery Error messages on the screen Errormessagesonthescre...

Page 78: ...external keyboard Check the connection and reboot the Tablet PC nn Stuck key Make sure that no key is pressed Operating system not found Check in the Boot menu in BIOS Setup to ensure that the correct boot sequence is set Make sure that the operating system is installed on the corresponding drive Press F1 to resume F2 to SETUP This error message appears if an error occurs during the self test befo...

Page 79: ...em under Windows 10 If necessary you can reset your system to the original state of the hard disk Select Settings from the Start menu Select Update security Select Recovery Select according to your requirements from the options given Fujitsu 75 ...

Page 80: ...ndicator Back 8 megapixels mobile light Graphics card Chip Intel UHD Graphics Maximum resolution on external display USB Type C 3840 x 2160 Dimensions Width x depth x height 262 8 x 168 7 x 12 3 mm 10 35 x 6 64 x 0 48 inch Weight depending on configuration from 600 g 1 33 lbs Input devices Tablet buttons 4 keys Pen Pen with 2 pen buttons Slots Memory card slot 1 x microSD SIM card slot configurati...

Page 81: ... Integrated monitor WUXGA 1920x1200 Monitors System interface USB Type C 3840x2160 60 Hz VGA 1920x1200 60Hz DP 1920x1200 60Hz ON ON ON 2 1 ON ON ON 2 1 ON ON with Reduced Blanking Rechargeable battery You can find information on the batteries used in your device on the Internet at http www fujitsu com fts support 2 cell lithium ion rechargeable battery 4250 mAh Nominal voltage 7 2 V Rated capacity...

Page 82: ...al voltage 12 V Maximum rated current 3 A An additional mains adapter or power cable can be ordered at any time Mains adapter 90 W for the Tablet PC with cradle Technicalspecifications Primary Nominal voltage 100 V to 240 V automatic Nominal frequency 50 Hz to 60 Hz automatic Maximum rated current 1 5 A Secondary Nominal power 90 W Nominal voltage 19 V Maximum rated current 4 74 A An additional ma...

Page 83: ...1 7K1 Mechanism class DIN IEC 721 7M2 Operating temperature 5 C 35 C 41 F 95 F Transport temperature 10 C 60 C 5 F 140 F Relative humidity 20 80 no condensation Operating height up to 3048 m Keyboard dock optional Electrical data Protection class II Anschlüsse Docking port 7 pin LAN port 1 x Ambient conditions Environment class DIN IEC 721 7K1 Mechanism class DIN IEC 721 7M2 Operating temperature ...

Page 84: ...ote that TCO certified systems bear the TCO certified logo Further information is given in the TCO certified manual appendix at http support ts fujitsu com Manuals SAR limit value Specific Absorption Rate SAR Body SAR value 2W kg Other certification markings Certificationmarkings Any other certification markings are listed in the Manual Appendix Additional Certifications supplement If such marking...

Page 85: ...dphones 64 cradle Connecting a Tablet PC 41 Cradle 39 Ctrl Alt Del 52 Cursor control 49 Cursor keys 49 D Date is incorrect 69 Device setting up 17 Display orientation selecting 24 Display port 60 E Energy energy saving 13 Energy saving 13 Energy saving mode leaving 71 Enter 49 Enter key 49 Error message on the screen 73 Error messages on the screen 73 Errors Acoustic warnings 73 Ethernet LAN 37 F ...

Page 86: ... P Packaging 16 Password changing 56 entering 56 removing 57 Password protection 55 Pen 25 Portrait orientation screen 24 Ports 39 Keyboard dock 43 Power power consumption 32 power management features 32 Power on indicator 21 Preparing for operation 17 Printer does not print 72 R Rechargeable battery 31 see Battery 31 Return 49 S Safety notes 12 SAR 80 Screen no screen display 70 Screen brightness...

Page 87: ...eaning 15 dragging items 47 executing commands 46 moving the pointer 46 selecting an item 46 switch off 51 Touchpad buttons 51 Touchscreen cleaning 15 difficult to read 69 notes 22 reflected glare 69 remains blank 69 touchscreen is too dark 69 TPM 58 Transport Transport damage 16 Transportation 14 Travel 14 Troubleshooting 67 Trusted Platform Module 58 U USB connection with charging function USB T...

Reviews: